Upper thread keeps breaking: needle, tension and path to check
Your sewing machine upper thread breaks when it catches, frays, or snaps along its path due to needle issues, tension imbalance, incorrect threading, or bobbin problems. Check the thread path in sequence: needle, tension discs, take-up lever, and bobbin case to find and fix the break point.
On this page (8 sections)
- The short version
- How to tell upper-thread breaks from bobbin-thread breaks
- Rethreading in the right order with presser foot up and thread seated in take-up and tension discs
- Needle size, type, burrs and installation direction for the fabric and thread
- How to reset and test upper tension and check for lint or nicks in the path
- Bobbin winding, insertion direction and bobbin-case lint that mimics top-thread breaks
- Thread quality, spool direction, and when to change thread before changing settings
- Still wondering?
Part of our guide on sewing machine skipping stitches
Key figures
- Needle size
- 80/12 EU/US
- Thread weight
- 50 wt
- Tension test
- 1-4 numeric range
- Bobbin fill
- 3/4 full
- Presser foot
- Up for rethread
The short version
- Breaks usually happen at the sharpest point on the thread path or where tension is tightest.
- Rethread fully with presser foot raised to seat thread properly in tension discs.
- Replace dull or bent needles matching needle size and fabric type.
- Check bobbin winding and lint buildup; these can mimic upper thread breaks.
- Use good quality thread and unwind the spool in the right direction.
How to tell upper-thread breaks from bobbin-thread breaks
Upper thread breaks happen when the thread snapping occurs above the needle plate, often visible on the spool or needle side. Bobbin thread breaks come from below the fabric and usually cause looping or skipped stitches.
If the top thread snaps immediately after you start sewing, it’s likely an upper-thread issue. Conversely, if stitches nest under the fabric, the bobbin thread or bobbin case is suspect.
Check your stitch formation. Uneven stitches or loops at the bottom are signs of bobbin thread trouble, not upper thread breaks. Knowing this distinction helps you avoid wasting time fixing the wrong part.
Rethreading in the right order with presser foot up and thread seated in take-up and tension discs
Always raise the presser foot when threading to open the tension discs. This seating lets the thread pass freely and evenly, preventing unwanted friction. There is more on sewing machine needle keeps breaking in a separate guide.
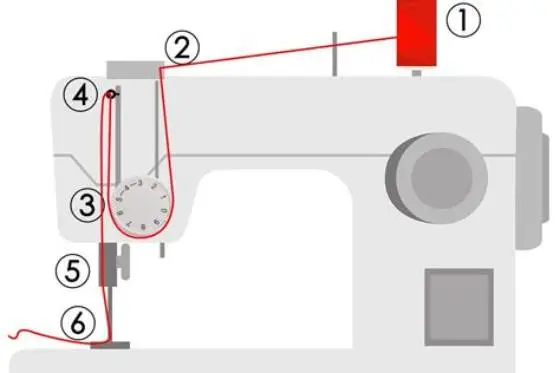
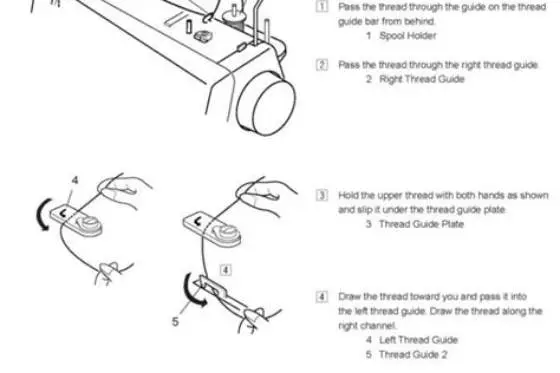
Follow the exact threading path your manual shows: spool, thread guide, tension discs, take-up lever, needle bar guides, then needle eye. Missing one step or threading out of order causes catches or frays.
Pull the thread gently along each point to check it sits snugly without resistance or slack. This confirms proper seating and eliminates many break causes.
You’ll know the take-up lever is missed when the thread snaps within 2 to 3 stitches and forms a small bird’s nest under the fabric. The lever lifts and drops about 1 inch each stitch, so thread not seated there whips loose and catches. Leave a 4 to 6 inch tail behind the needle and hold it for the first 3 stitches. Tug the tail after those stitches and it should slide smooth, not jerk. That quick check takes 10 seconds and saves a full rethread. It helps to understand sewing machine threading guide before going further.
- Raise presser foot to open tension discs.
- Guide thread from spool through any thread guides.
- Pass thread between tension discs fully.
- Thread take-up lever ensuring thread loops properly.
- Guide thread through needle bar thread guides.
- Thread needle front to back with correct needle size.

SCHMETZ Microtex Sharp Sewing Machine Needles
Stops your thread snapping with a fresh sharp 80/12 Microtex point that pierces cleanly without fraying the thread.
Needle size, type, burrs and installation direction for the fabric and thread
A needle dull or bent even microscopically can snag and break thread. Use a fresh needle sized for your fabric: usually 80/12 for medium-weight fabrics and 70/10 for light fabrics.
Match needle type to fabric: universal needles work broadly, ballpoint is best for knit/stretch, and sharp for woven fabrics.
Check needle installation direction; needles have a flat back that must face the correct way as per your manual. Wrong installation bends the needle and frays thread. There is more on fixing thread loops in a separate guide.
Inspect the needle eye for burrs or roughness by running your fingernail gently over it. Burrs catch thread fibers and cause breaks.
- Needle size: use 80/12 for average cotton, heavier fabric needs 90/14 or higher.
- Needle type: universal for woven, ballpoint for knit.
- Installation: flat side of needle faces back.
- Burr check: smooth eye prevents thread frays.
Find exactly where your sewing machine thread breaks along the path, fixing needle, tension, or bobbin issues in sequence.
How to reset and test upper tension and check for lint or nicks in the path
Upper thread tension controls thread tightness and affects breakage. Reset tension to the middle setting (usually 3 or 4 on a 1-9 scale) before testing.
Run the thread through the tension discs with the presser foot up, checking for debris or lint buildup. Lint can wedge in discs and alter tension unevenly, snapping thread. If that sounds like your situation, read up on verifying bobbin seating and timing next.
Use a magnifying glass to inspect the thread path from spool to needle for any sharp edges or nicks that catch thread fibers.
Test tension by pulling a length of thread through the machine by hand; it should feel firm but smooth. If it snags, clean or gently sand the offending part.
Set your tension dial to 4 for medium cotton with 50 wt thread and test on a folded scrap. Sew a 6 inch seam at 2.5 mm stitch length and check the middle 4 inches. You want the top and bobbin threads to meet in the center of the fabric, not pull to either side. If the top thread breaks when you raise tension to 6 or 7, you’ve gone too tight and the thread frays before it breaks. Lower it back to 4 and retest. Write down the setting that holds so you can return to it.
- Raise presser foot to open tension discs.
- Set tension dial to mid-range (3-4).
- Clean tension discs with a soft brush or cloth.
- Inspect thread path for nicks or burrs with magnifier.
- Pull thread by hand to feel smooth tension.
Bobbin winding, insertion direction and bobbin-case lint that mimics top-thread breaks
Bobbin thread issues can look like upper thread breaks. Make sure the bobbin winds evenly, about three-quarters full, without loose loops.
Insert the bobbin into its case with thread flowing in the right direction, usually clockwise, so it feeds evenly.
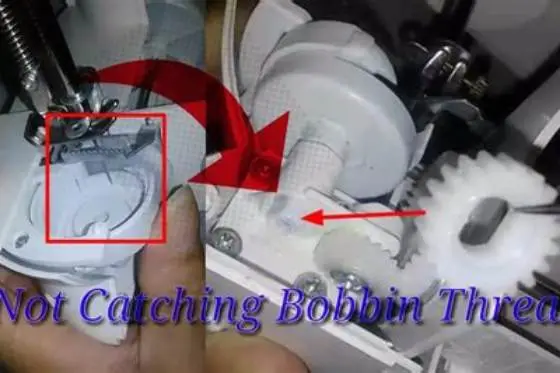
Lint collects inside the bobbin case and shuttle hook area. Clean it out regularly with a small brush or vacuum attachment. Lint buildup raises tension on the bobbin thread and causes snapping above or below fabric.
Check the bobbin case for rough edges or damage. Smooth parts prevent thread catching.
Wind at medium speed until the bobbin looks flat across the top, about 75% full, and stop if you see a ridge on one side. A ridge means the thread stacked unevenly and it will jerk free in short pulls, which snaps the top thread on the next stitch. Drop the bobbin in so the thread pulls counter-clockwise on most drop-in machines. Most front-load cases pull clockwise instead, so pull 4 inches through the tension slot and test the drag. The thread should unwind smooth with light drag, not spin free. Clean the case each time you change the bobbin.
- Wind bobbin evenly to 3/4 full to avoid loose thread pulls.
- Insert bobbin clockwise unless manual states otherwise.
- Clean bobbin case monthly for lint and dust.
- Inspect bobbin case edges for smoothness.
Thread quality, spool direction, and when to change thread before changing settings
Poor quality thread or thread that’s old, brittle, or tangled often snaps regardless of machine settings.
Always pull thread from the spool in the recommended direction to prevent twisting and knots. Many machines feed spool thread from the top or side; check your manual.
Replace thread before adjusting tension or needle if it looks dull, fuzzy, or inconsistent thickness. Good thread should be smooth and even in 50 wt weight for most home sewing.
Thread stored in humid or dusty conditions can deteriorate, so keep your thread in sealed containers.
Swap thread before you touch tension if the spool is older than 2 to 3 years or has sat in sun. Old cotton snaps with a clean pop after 8 to 10 inches of sewing, while good 50 wt polyester stretches a little first. Test a 12 inch length by hand and give it a sharp tug, then pull slow near a light. You’ll see thin spots or fuzz on weak thread, and you’ll feel it catch between your fingers. That’s your sign to change the spool, not the dial. Keep new spools in a closed box away from light.
- Use smooth, consistent 50 wt thread for general sewing.
- Pull thread from spool in correct direction per machine manual.
- Replace thread showing fuzz, knots or weak spots.
- Store thread in dry, clean spaces to prolong life.
Still wondering?
Why does my upper thread keep breaking only on some fabrics?
Different fabrics need different needle sizes and thread types. A 80/12 needle with 50 wt thread suits cotton but heavier or slippery fabrics may need stronger needles or special threads to avoid breaks.
Can incorrect bobbin insertion cause upper thread breaking?
Yes. If the bobbin is inserted backward or unevenly wound, it causes tension imbalance that can snap the upper thread unexpectedly.
How often should I replace my sewing machine needle?
Every 8 to 10 hours of sewing or with each new fabric type. Needles dull or bend quickly, causing thread breaks and skipped stitches.
Is it okay to use any thread brand with my machine?
Thread quality varies widely. Use a smooth, consistent thread like 50 wt polyester or cotton for your projects. Cheap or old thread often snaps and clogs machines.
What does it mean when adjusting tension does not fix thread breaking?
If rethreading properly, needle and bobbin are good, lint cleaned, and thread quality confirmed, persistent breaks suggest damaged thread path parts or need for professional servicing.