How to thread a sewing machine: top thread and bobbin without jams
Lift the presser foot, follow the numbered guides from spool pin through tension discs and take-up lever to the needle, then drop in the bobbin so it turns against the pull. Leave 4-6 inch tails under the foot and test on scrap. That seating stops most nests.
On this page (8 sections)
- The short version
- How to thread a sewing machine: the full path at a glance
- Upper thread path: spool pin through tension discs and take-up lever to needle
- Bobbin: how to wind and insert it and which way it should turn
- Needle: how to thread it easily and which way the eye faces
- Brand quirks: what changes on Singer, Brother, Janome, Kenmore, Viking and vintage Singer
- Thread and trouble: cotton vs polyester and fixes for nests, skips and breaks
- Still wondering?
Part of our guide on beginner sewing courses
Key figures
- Tail length
- 4-6 inches each
- Presser foot
- Up to thread
- Needle size start
- 80/12 universal
- Thread weight
- 40-50 wt polyester
- Test after threading
- Sew 3 inches on scrap
- Bobbin check
- Turns against pull
The short version
- Thread with the presser foot up so the tension discs open and the thread can seat.
- Seat, tug, and ping each guide before you sew: you should feel a light snap at the discs.
- Bobbin must turn against its pull and click into tension; clockwise or counter depends on the case.
- If stitches nest or skip, re-thread top and bobbin and fit a new 80/12 needle before touching tension.
How to thread a sewing machine: the full path at a glance
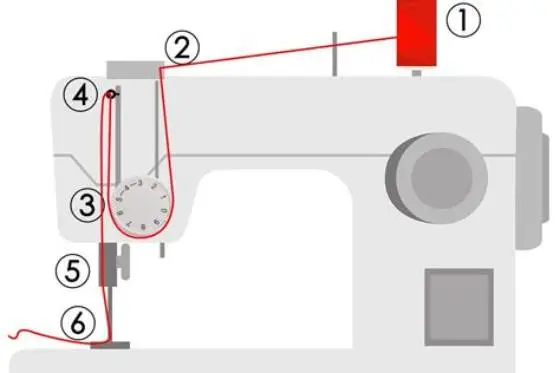
You need about 4-6 inches of tail on top and bobbin, with both tails tucked under the presser foot to the back, before the needle moves. That length keeps the tails from being sucked down and jamming. Picture the path as a single U shape. Top thread runs down from the spool, around the tension, up through the take-up lever, then down to the needle. Bobbin thread comes up to meet it.
A correct seating looks and feels light, not tight. At the tension discs the thread sits deep between two metal plates, you feel a soft click as it drops in. At the take-up lever the thread slides into the slot or hole and moves freely when you tug. At the needle the thread passes front to back on most home machines, and the last 3-4 inches hang straight without curling around the needle.
Use this check before you sew. With the presser foot up, pull the top thread near the needle. It should slide with almost no drag. Lower the foot and pull again. You should feel clear, even resistance. If drag does not change, the thread missed the discs. Re-thread with the foot up. That one test prevents the classic bird's nest under the fabric.
Upper thread path: spool pin through tension discs and take-up lever to needle
Start with the needle at its highest point and the presser foot up, spool on the spool pin with a cap that just covers the end. Foot up opens the tension discs so thread can seat. Needle up brings the take-up lever to the top where you can see it. Those two positions make threading easier and prevent skipped stitches. If that sounds like your situation, read up on maintaining your sewing machine next.
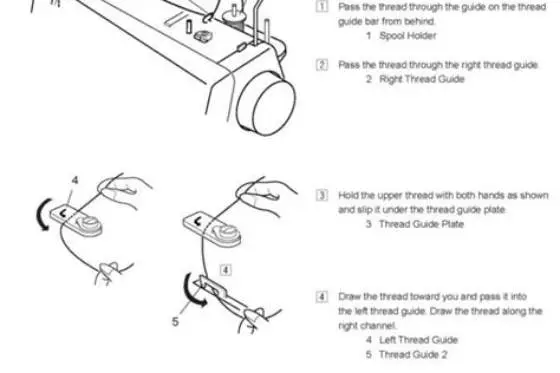
Follow the numbered guides on the machine, and tug at each one. You want the thread to make a firm seat, not just rest on top. Most machines go spool to thread guide, down around tension, up through take-up lever, down through guides, then through the needle front to back. If your machine has a pretension guide or check spring near the tension, make sure the thread snaps under it. You will feel it.
Finish with 4-6 inches through the needle eye and under the foot to the back. Turn the handwheel toward you for one full stitch. The take-up lever should rise and fall without catching. If it snags, the thread missed the lever. Pull it out and reseat it. A smooth lift means the path is right, and you can move to the bobbin.
- Raise needle to top with handwheel and lift presser foot.
- Place spool on pin, add cap, pull thread through first guide.
- Bring thread down around tension discs and snap under check spring.
- Go up and seat thread fully in take-up lever slot or hole.
- Guide thread down through remaining guides and thread needle front to back.
- Pull 4-6 inch tail under presser foot to the back and do foot-up, foot-down pull test.

50 Pcs bobbins for Sewing Machine- Eoehro
Fits Class 15 bobbin requirement with height 0.45 inches matching the manual's specification.
Bobbin: how to wind and insert it and which way it should turn
A well-wound bobbin feels firm and even, with about 80-90% full and no soft dips, wound at a medium speed of roughly 50-60% on the foot pedal. Fast winding stretches thread and makes uneven layers. The thread should leave the spool smoothly and pass through the bobbin winder tension disc. If the bobbin wobbles or the thread piles at one end, stop and reseat the bobbin on the winder spindle. We go through sewing machine thread keeps breaking step by step elsewhere on the site.
Drop-in bobbins sit in a case under the needle plate, while front-load bobbins sit in a removable bobbin case you pull out. Both need the thread to turn against the pull. Hold the bobbin so the thread tail falls, then pull. The bobbin should spin the opposite way. On many drop-ins that is counter-clockwise, on many front-load cases it is clockwise. Your manual shows the direction with a small arrow. Trust the arrow over memory.
Seat the bobbin until you hear a light click and the thread slides into the tension slot. Leave a 4-6 inch tail. For a drop-in, guide the tail through the slot and under the finger. For a front-load case, slide the thread under the tension spring until it exits the delivery eye. Tug gently. You should feel steady, light drag, not free spooling and not locked. That drag is bobbin tension doing its job.
- Wind bobbin evenly to 80-90% full, then cut thread at the notch.
- Remove needle plate or open bobbin door and lift out case if front-load.
- Drop bobbin in so thread pulls against the turn shown by the arrow.
- Pull tail into tension slot until you feel light, even drag.
- Leave 4-6 inch tail, replace plate or case, and bring bobbin thread up.
Nine out of ten thread nests happen because the top thread was not seated between the tension discs.
Needle: how to thread it easily and which way the eye faces
Most home needles thread front to back, with the flat side of the shank facing the back on vertical-needle machines. The needle eye faces front, so the groove runs front to back. That groove shields the thread as the needle pierces fabric. If you thread back to front, the thread shreds and breaks. Check the flat, push the needle up until it stops, then tighten the screw firmly. There is more on sewing tips for beginners in a separate guide.
To thread easily, cut the thread at a sharp angle and hold it 1/2 inch from the end between finger and thumb. Bring the needle to you, not your head to the needle. A white card behind the needle makes the eye pop. Use the built-in needle threader if you have one: hook down, thread across, release. Or use a fine wire threader. Tweezers help pull the tail through without bending the needle.
Leave 4-6 inches through the eye and under the foot. The thread should hang straight, not loop around the needle. Turn the handwheel toward you to pull the bobbin thread up. Hold the top tail lightly while you turn. Both tails should now lie under the foot to the back, top tail on top of bobbin tail. If the top tail keeps slipping out, you left it too short. Add an inch.
- Needle direction: flat to back, groove to front, thread front to back on most home machines.
- Threader use: lower hook fully, lay thread in guide, release slowly and pull loop.
- Tail fix: if thread frays at the eye, cut fresh and try again with a new 80/12 needle.
Brand quirks: what changes on Singer, Brother, Janome, Kenmore, Viking and vintage Singer
All modern home machines follow the same U path, but the guides move. Brother and Janome often mark the path with numbered arrows on the top cover and a clear take-up lever window. Singer home models usually have a similar top layout with a wire check spring you must snap under. Viking machines often add an extra pretension guide before the main discs. The principle stays identical, the plastic shapes shift. If that sounds like your situation, read up on common sewing mistakes and how to avoid them next.
Kenmore models vary because several makers built them, so follow the numbers on your machine rather than memory from another brand. Vintage Singer machines, like the 15, 66 and 99 class, often have a face-plate tension on the front and a front-load bobbin case with a latch. You thread down, around the tension dial, up through the lever on the face, then down to the needle, which may thread left to right on some vintage heads. Check the manual diagram.
Bobbin class still trips people. Many Brother and Singer drop-ins use Class 15 clear plastic bobbins, while some Janome and Viking use Class 15 or proprietary clear bobbins of the same height. Vintage front-load Singers often take metal Class 66 or 15J. Height matters within 0.5 mm. A tall bobbin rubs and nests, a short one loses tension. Use the class your manual states, and keep bobbins of one system separate.
| Brand family | Top path notes | Bobbin system | Needle direction |
|---|---|---|---|
| Singer modern | Numbered top guides, wire check spring | Often Class 15 drop-in | Front to back |
| Brother | Numbered cover, window for lever | Often Class 15 drop-in | Front to back |
| Janome | Numbered cover, extra guide | Class 15 or maker spec | Front to back |
| Kenmore | Varies by maker, follow numbers | Check manual (15 or 66) | Usually front to back |
| Viking | Pretension guide before discs | Maker spec, often drop-in | Front to back |
| Vintage Singer | Face-plate tension dial | Front-load metal case | Left to right on some heads |
Thread and trouble: cotton vs polyester and fixes for nests, skips and breaks
For most home sewing, 40-50 wt polyester all-purpose thread handles the widest range of fabrics, with a smooth finish and a little give. Cotton 40-50 wt works well for quilting cotton and natural fabrics but can be lintier and a touch weaker on stretch seams. Use 50 wt for piecing and general seams, 40 wt when you want the stitch to show, like topstitching. Match needle size to thread: 80/12 for 50 wt, 90/14 for 40 wt or denim.
Nests under the fabric mean the top thread was not seated. Skipped stitches often mean a bent needle, wrong needle system, or the thread missed the take-up lever. Breaking thread points to burrs, a too-small needle eye, or thread catching on the spool notch. Fix in this order and test 3 inches on scrap after each step. Cheap fixes first save a service trip. If the Sewing Machine Doctor tool is available on this site, turn the model to the trouble spot and it walks you through the same checks.
Re-thread with the presser foot up, fit a new needle of the right system, check the bobbin direction and tension slot, clean lint from under the needle plate, and make sure the spool cap fits. Pull both tails to the back and hold them for the first two stitches. If nests persist after a clean re-thread and fresh needle, the timing or tension assembly needs a shop. Do not force the tension dial past its normal 3-5 range to chase a threading error.
- Nest on bottom: re-thread top with foot up and reseat in take-up lever, then test.
- Skipped stitches: fit new 80/12 needle, flat to back, re-thread, check lever seating.
- Thread breaks: check for burr on needle plate, use 40-50 wt polyester, add spool cap.
- Noisy or looping bobbin: wrong bobbin class or tail not in tension slot - refit bobbin.
- Lint buildup: brush out bobbin area, no canned air, oil only if manual says so.
| Thread fibre | Best for | Lint and stretch | Needle to use |
|---|---|---|---|
| Polyester 40-50 wt | Most garments, stretch, general sewing | Low lint, some give | 80/12 universal, 90/14 for heavy |
| Cotton 40-50 wt | Quilting cotton, natural fibres | More lint, less give | 80/12 or 90/14 quilting |
| Heavy 30 wt | Topstitching, denim | Needs larger eye | 90/14 to 100/16 |
- polyester stretches a little and resists breaking on seams that move
- lower lint keeps bobbin area cleaner between cleans
- cotton can look more matte on quilts but sheds more lint
- heavy 30 wt needs larger needle and wider stitch
Still wondering?
Why does my thread keep nesting under the fabric?
The top thread missed the tension discs or take-up lever. Lift the presser foot, re-thread from the spool through each guide, and do the foot-up, foot-down pull test. Hold both 4-6 inch tails to the back for the first stitches and test on scrap.
Which way should the bobbin turn when I pull the thread?
It should turn against the pull, so tension can work. Many drop-ins turn counter-clockwise and many front-load cases turn clockwise, but your manual arrow is the rule. Reseat until you feel light, even drag in the tension slot.
Which way do I thread the needle?
On most modern home machines, front to back, with the flat of the needle to the back. Some vintage Singer heads thread left to right. If the thread shreds, you likely threaded the wrong way or need a fresh 80/12 needle.
Can I use cotton thread in any sewing machine?
Yes, but 40-50 wt polyester suits more fabrics and makes less lint. Use cotton for quilting cotton when you want a matte look, and pair 50 wt with an 80/12 needle, 40 wt with 90/14. Avoid heavy 30 wt unless the needle eye is large enough.
Do I need a special bobbin for my brand?
You need the class your manual states, often Class 15 for many Brother and Singer drop-ins. Height differences of 0.5 mm cause nests or loose stitches. Keep bobbins sorted and use only the correct height and material.