How to wind a bobbin on a sewing machine or by hand without tangles
To wind a bobbin, place the correct bobbin on the winder spindle, run thread through the bobbin tension disc, start with a few wraps clockwise, and wind at medium speed until the bobbin is 80-90% full and feels firm and even, not spongy or lopsided.
On this page (8 sections)
- The short version
- How to wind a bobbin on a sewing machine: the standard sequence
- How to wind a bobbin by hand: a usable backup when the winder fails
- Thread handling: how to use thread properly when winding
- Common mistakes when winding a bobbin: what tangles actually mean
- How to unwind or fix a bobbin if wound incorrectly
- Test and store: when to keep the wind and when to start over
- Still wondering?
Part of our guide on beginner sewing courses
Key figures
- Full bobbin
- 80-90% full, firm to touch
- Wind speed
- Medium, not full pedal
- Start wraps
- 3-4 wraps by hand
- Thread weight
- 40-50 wt for most cottons
- Tension check
- Tail pulls with light drag
- Fix bad wind
- Unwind fully, rewind fresh
The short version
- Wind with the presser foot up and the needle disengaged so the thread path stays light and smooth.
- Stop at 80-90% full; an overfilled bobbin rubs the case and causes jams.
- Use the exact bobbin your manual lists; a near fit wobbles and winds unevenly.
- Test the tail pull; it should unwind smooth with light drag, not race or snag.
How to wind a bobbin on a sewing machine: the standard sequence
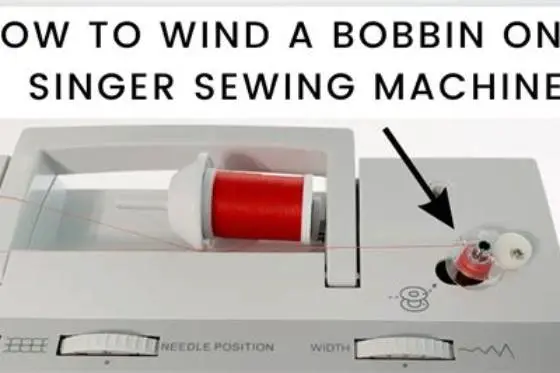
A standard Class 15 bobbin usually takes 30 to 45 yards of 50 wt thread when it looks 80-90% full, and the exact amount depends on thread thickness and how tightly your winder packs it. You will know the wind is right when the sides feel firm and flat, not puffy in the middle. That firm, even cylinder is what feeds without tangles. The query how to wind a bobbin on a sewing machine comes up because the steps are small but order matters.
Set up the thread path before you touch the winder. Put your spool on the spool pin with its cap or felt in place, pull thread through the first thread guide, then around the small bobbin tension disc on top of the machine. That little disc is the brake that keeps the wind snug. Keep the presser foot up so the top tension discs stay open and the thread runs free. If your machine has a needle disengage or handwheel clutch, use it so the needle does not jab while you wind.
Seat the empty bobbin on the bobbin winder spindle and push it right or click it over to engage winding mode. Hold the thread tail and wrap it 3-4 turns clockwise around the bobbin by hand, then trim the tail to about 1/4 inch (0.6 cm) or hold it upright. Press gently on the pedal to start at medium speed. Let the guide fill the bobbin layer by layer. Stop when the sides are just shy of the rim, cut the thread at the cutter, and disengage the winder before you sew.
You will see machines differ in one detail. Some use a fill stop that clicks, others expect you to judge by eye. Trust the 80-90% rule either way. An overfilled bobbin swells past the rim and drags inside the bobbin case. That drag is why the next section matters when your winder will not cooperate. It helps to understand checking tire wear before going further.
- Turn handwheel to raise needle, then lift presser foot and disengage needle if your machine allows.
- Place spool, thread through guide and around bobbin tension disc exactly as manual shows.
- Push bobbin onto winder spindle and lock winder into winding position.
- Wrap tail 3-4 times clockwise, hold tail up, and start at medium speed.
- Guide tail for first seconds, snip close, wind to 80-90% full, then cut and disengage.

LOKUNN 25 Pcs Bobbins for Sewing Machine Plastic Bobbins for Sewing
Provides 25 plastic bobbins of diameter 0.8 inch and height 0.45 inch, suitable for most sewing machines needing standard size bobbins.
How to wind a bobbin by hand: a usable backup when the winder fails
A hand-wound bobbin usually holds 15 to 25 yards of 50 wt thread before your fingers lose even tension, and the usable amount depends on how steady your wraps stay. It will not be as tight as a machine wind, but it will sew a short seam, test a colour, or finish a quilt label without a trip to the shop. You want a smooth, level roll with no ridges or dips. That shape tells you the thread will leave the bobbin without snagging.
Anchor the thread so it cannot slip. Poke the tail through the small hole in the bobbin side and hold it with your thumb, or tape it for the first few turns. Wrap clockwise if your machine feeds that way, keeping light, even pull with your other hand as if you were winding yarn. Turn the bobbin, not the thread. Overlap the first layer to lock the tail, then build side to side in slow, flat layers. Keep the sides parallel and do not let the middle dome up.
Check firmness often. A good hand wind feels firm but springy when you press the side with a fingertip, not hard like plastic and not soft like a pillow. Stop at about 75-80% full, a touch lower than a machine wind, because hand tension varies more. Trim the tail and tuck it through the bobbin slit so it does not unwind in the case. Drop it in and pull the tail. It should unroll smooth with a little drag. We go through no-serger seam finishes step by step elsewhere on the site.
Hand winding proves how much tension matters. Too loose and loops lift and tangle under the fabric. Too tight and the bobbin warps or the thread stretches and then puckers. That balance is exactly what the next section controls on the machine.
- Thread tail through bobbin hole, hold tight against the core, and make 5-6 anchoring wraps.
- Wind slowly side to side, keeping light pull and flat, even layers.
- Pause to press and sight the sides; fill to 75-80% and keep the edge just below the rim.
- Trim, secure tail in slit, and test pull before you place it in the case.
- Gets you sewing without a working winder
- Good for testing colour or short seams
- Less even than machine wind
- Holds less thread, needs rewinding sooner
Thread handling: how to use thread properly when winding
Correct thread handling gives you a bobbin that unwinds with about 1 to 2 ounces of pull when you tug the tail, and the exact drag depends on thread finish and bobbin case spring tension. You feel it as light, steady resistance, not a free spin and not a yank. That drag is set by the path and the bobbin tension disc, not by yanking the spool. Keep the spool free to turn and let the disc do the braking.
Use the thread your project needs, but wind with care. A 50 wt cotton or 40 wt polyester are the everyday pair for piecing and garment seams, and they wind the most evenly because they are smooth and consistent. Specialty threads change the feel. Metallics and heavy 30 wt quilting threads need slower speed and lighter foot pressure on the pedal because they kink and stretch. Woolly nylon and elastic threads should be wound at low speed with almost no extra pull, or they will stretch on the bobbin and shrink back in the seam. We go through straight line sewing tips step by step elsewhere on the site.
Mind the spool itself. A cross-wound spool sits horizontally on its cap and feeds off the top, while a stacked spool stands vertical and feeds off the side. Place it as your manual shows so the thread leaves without twisting or catching. Keep the thread in the thread guide and around the tension disc the whole time. If it pops out mid-wind, stop, rethread that short path, and start again. A bobbin wound half with and half without that disc will have a soft spot that nests later.
Thread choice and path set the wind, but your hands set the mistakes. A wobble, a snag, or a rush shows up later as loops on the underside. The next section names those tells before they cost you a seam.
- Spool placement: match cap and orientation so thread feeds without hopping or twisting.
- Tension disc: keep thread seated the whole wind; reseat if it jumps out.
- Speed: medium for cotton/poly, slow for metallic or stretch threads.
- Tail control: trim to
1/4 inch(0.6 cm) after the first layers lock, do not bury a long tail inside.
A bobbin that looks full past the rim is already too full to sew clean.
Common mistakes when winding a bobbin: what tangles actually mean
A tangled bobbin often shows loops or nesting under the fabric within the first 2 to 3 inches (5 to 7.5 cm) of stitching, and the pattern depends on whether the bobbin was loose, uneven, or overfilled. You can read the bobbin before you sew. Sight it at eye level. The thread should lie flat from rim to rim with no valleys, no hill in the middle, and no thread poking past the edge. Any of those shapes predicts a snag. For the detail, see our notes on creating a sturdy thread shank.
The most common error is winding too fast with the presser foot down. The top tension discs then pinch the thread, the winder starves, and the bobbin winds soft and spongy. Another frequent one is using the wrong bobbin style. A Class 15 bobbin in a Class 66 machine, or a plastic bobbin where metal is specified, wobbles on the spindle and lays thread in ridges. A third is starting without anchoring wraps, so the core slips and later loops lift. Each has a clear symptom you can spot without sewing a stitch.
Overfilling is the quiet culprit. Past 90% full the thread rubs the bobbin case walls and cannot unwind evenly. Underfilling is not a fault, but it leaves you short mid-seam. Thread that jumps out of the thread guide mid-wind creates a two-texture bobbin, half tight and half loose, which flips between tension and no tension as it feeds. Fix these at the winder and you avoid picking out a nest later.
Seeing the mistake is half the fix. Knowing how to clear it without making a bird's nest of thread on the table is the other half, which is where a careful unwind helps.
| What you see | Likely cause | Fix now |
|---|---|---|
| Soft, spongy sides that dent when pressed | Wound with presser foot down or thread off disc | Rewind with foot up and thread seated in disc |
| High middle, low edges (dome) | Winder guide off centre or hand wind not level | Rewind slower, guide thread side to side evenly |
| Thread past the rim | Overfilled past 90% | Unwind to 80-90% or rewind fresh |
| Ridges or wobble | Wrong bobbin size or cracked bobbin | Swap to manual-specified bobbin |
| Loops under fabric in first inches | Loose wind or tail buried inside | Rewind with 3-4 anchoring wraps, trim tail short |
How to unwind or fix a bobbin if wound incorrectly
A bad wind usually needs a full unwind and rewind to sew right, and you can tell because the thread feels uneven when you roll the bobbin between thumb and finger. If you feel bumps, soft spots, or a loose outer layer that slides, do not try to save it by sewing through it. That loose layer will dump and jam under the needle plate. Cutting losses early saves fabric and time, and thread is cheap compared to picking out seams.
Unwind cleanly so you do not add twists. Keep the bobbin on a pencil or chopstick through its centre, hold light tension with a soft cloth, and pull steadily at low speed by hand. Do not yank. If the thread is specialty or you want to reuse it, wind it back onto an empty spool or around a piece of card to keep it kink-free. Snip any kinked or fuzzy section where the thread kinked over the rim. If the bobbin is cracked, warped, or the sides are chewed, toss that bobbin. A damaged bobbin never winds true again.
Rewind with the fixes that prevent the same fault. Reseat thread in the bobbin tension disc, lift the presser foot, use the correct bobbin, and keep medium speed with light pedal pressure. Anchor with those 3-4 wraps and trim the tail to 1/4 inch (0.6 cm). Fill to 80-90% and stop. If you are fixing a hand wind, switch to the machine winder now if you can. Even a short machine wind over a hand-wound core is steadier than a full hand wind.
A fresh wind still needs a quick test before it goes into a project. One pull tells you more than a whole seam, and the next section shows that check in seconds. For persistent tension puzzles, the site's Sewing Machine Doctor lets you turn the machine in 3D, click the bobbin area, and follow the fix it suggests.
- Put bobbin on a pencil, hold thread with light drag through a cloth, and unwind steadily.
- Inspect thread and bobbin; discard kinked thread and any cracked or warped bobbin.
- Rethread winder path correctly, lift presser foot, and rewind at medium speed to 80-90% full.
- Trim, seat bobbin in case with correct thread direction, and pull tail to test drag.
Test and store: when to keep the wind and when to start over
A quick pull test tells you in 2 to 3 seconds whether to keep the wind, and the result depends on bobbin case spring tension and thread weight. Hold the bobbin in the case or in your palm and pull the tail about 6 inches (15 cm). It should leave smooth with light, even drag. If it races with no drag, the wind is too loose. If it jerks or stalls, the bobbin is overfilled or the thread is pinched past the rim. Either fail means rewind now, not after you have sewn into good fabric.
Sew a short trial on scraps before the project. Use two layers of your actual fabric and the same needle size, like 80/12 for quilting cotton, and stitch 4 to 5 inches (10 to 12 cm) at normal length. Look underneath. Even, flat stitches mean the bobbin and top thread are balanced. Loops, eyelashes, or a nest point to the bobbin wind or a missed thread guide, not to the top tension dial. Cheapest fixes first. Rethread with the presser foot up, try a new needle, clean lint from under the needle plate, and confirm the right bobbin.
Store bobbins so a good wind stays good. Keep them at 80-90% full and do not stack heavy spools on top where they can dent the sides. Use a bobbin ring or box that holds each bobbin upright, and tuck the tail into the slit or add a small clip so it cannot loop around the core. Label specialty threads with weight, like 40 wt or 60 wt, so you do not grab a metallic bobbin for piecing. A tidy box saves you rewinding a perfect bobbin you just made.
You now have a repeatable routine: correct bobbin, correct path, medium speed, firm 80-90% fill, and a two-second pull test. Keep that rhythm and winding stops being guesswork. Your seams will start clean, stay even, and you will reach for the winder without a second thought.
- Keep test: smooth pull with light drag and flat stitches on scrap.
- Rewind now: racing pull, jerky pull, thread past rim, or spongy sides.
- Storage: upright, tail secured, no weight on top, label specialty threads.
Still wondering?
Why does my bobbin thread tangle or nest under the fabric right after I start?
A soft, uneven, or overfilled wind feeds in jerks and the top thread loops underneath. Rewind to 80-90% full with the presser foot up, thread seated in the bobbin tension disc, and 3-4 anchoring wraps trimmed short, then test the tail pull for light, even drag.
Can I use any bobbin that fits on the winder?
No. Use the exact bobbin your manual lists, like Class 15 or 66, in the material it specifies. A close fit wobbles on the spindle, winds in ridges, and can jam the hook. When in doubt, match the number stamped on the original bobbin.
Do I need to hold the thread tail while winding?
Hold it for the first few seconds until the wraps lock, then let go and trim to about 1/4 inch (0.6 cm). A long tail buried inside the wind later works loose and snags as the bobbin unwinds.
My machine has no bobbin winder. Can I still sew?
Yes. Wind by hand to 75-80% full with light, even pull and flat layers, or use a standalone bobbin winder that matches your bobbin size. Hand winds are fine for short seams; rewind by machine when you can for longer runs.
How do I know which way the bobbin should unwind in the case?
Follow your manual diagram. Many drop-in cases want the thread to pull off counter-clockwise with a light click as the thread seats in the tension spring. If stitches loop underneath, flip the bobbin and retest on scrap.