How to sew a button by hand so it stays through washing
Sew a button by hand using 6-8 passes of thread, matching the thread shank height to fabric thickness, and anchor the knot under the button so it holds through washing without pulling out.
On this page (8 sections)
- The short version
- Thread choice, length, and needle for hand sewing a button
- How to anchor the first stitch so the knot does not pull through
- 2-hole vs 4-hole stitch pattern and how many passes to make
- How to form and wrap a thread shank for shirts vs pants/coats
- How to tie off, bury, and trim the thread so it holds through washing
- How to sew a button by hand so it stays through washing
- Still wondering?
Part of our guide on wind a bobbin evenly
Key figures
- Thread length
- 18-24 inches
- Pass count
- 6-8 passes
- Needle size
- 80/12 sharp
- Shank height
- Matches fabric thickness
- Thread type
- Polyester 50 wt
- Button holes
- 2-hole or 4-hole
- Knot location
- Under button
The short version
- Use polyester thread in 18-24 inch lengths for strength and control.
- Anchor your first stitch with a secure knot or backstitch to stop pulling through.
- Make 6-8 passes through the button holes for a tight, stable hold.
- Wrap thread tightly around the shank to match fabric thickness and prevent pulling.
- Tie off by burying the knot under the button to avoid loosening during washing.
Thread choice, length, and needle for hand sewing a button
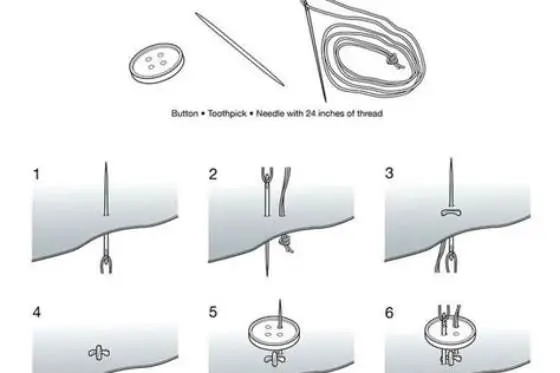
Choose polyester thread with weight 50 wt for durability through many wash cycles. Cotton thread tends to break or weaken faster under friction and moisture. Use a new, sharp needle size 80/12 for most buttons to pierce fabric cleanly without distorting holes.
Cut thread lengths between 18 and 24 inches (45-60 cm). Shorter than 18 inches means frequent re-threading and wasted knots; longer than 24 inches risks tangles and knots that weaken the thread. Thread length depends on button size and your hand size.
Thread the needle evenly and pull it to leave a tail of about 3 inches (7.5 cm) before knotting the end. This tail helps anchor the thread in the first stitch.
Use a needle with a sharp point, not a ballpoint needle, to avoid damaging the fabric fibers. A dull or bent needle can create oversized holes that weaken the fabric around the button. The other half of this decision is how to sew a straight line.
If the button is large or heavy, consider doubling the thread for extra strength. Cut two equal lengths of thread, knot them together, and thread the needle. This doubles the thread’s durability, especially on coats or heavy pants.

Singer 67110 Button & Carpet Sewing Thread
Lets you sew buttons by hand with a strong 70% polyester button thread on a 50-yard spool made for buttons.
How to anchor the first stitch so the knot does not pull through
Start by threading the needle and making a small knot at the end or by creating a backstitch loop on the underside of the fabric. The knot must be large enough to avoid pulling through the fabric but small enough to sit flat.
Push the needle up through the fabric just beside the button’s hole, then through the hole itself. Pull the thread tight so the knot catches on the back fabric surface, not the button.
Alternatively, create a double backstitch by sewing a tiny stitch, then passing the needle through the thread loop before tightening. This secures the thread without a bulky knot.
Test the knot’s hold by gently tugging the thread after the first stitch. If it slips, re-tie the knot or use a double backstitch method to secure it better.
For delicate fabrics, avoid making the knot too bulky. Instead, use a small backstitch loop that spreads the tension over a wider area, preventing fabric damage.
2-hole vs 4-hole stitch pattern and how many passes to make
Buttons come with either 2 or 4 holes. For 2-hole buttons, sew in a simple straight stitch pattern up and down through both holes. For 4-hole buttons, choose parallel (two pairs sewn) or crisscross stitch style depending on button design and garment stress points.
Make 6 to 8 passes of thread through each hole pair to build a stable hold. Fewer stitches risk loosening quickly, while many more add unnecessary bulk and thread waste. Count each needle pass carefully to ensure even tension.
Pull the thread taut but not so tight it puckers the fabric or button. The goal is a firm hold that allows slight movement for stress absorption.
When sewing 4-hole buttons, the crisscross pattern distributes stress more evenly, making it ideal for heavy-use garments like jackets or work shirts.
For light fabrics or decorative buttons, parallel stitching is faster and less bulky but still strong enough for most everyday wear.
Count passes carefully: for example, 7 passes through each hole pair means 14 total passes on a 4-hole button, providing maximum strength without excess thread.
| Aspect | 2-hole button | 4-hole button |
|---|---|---|
| Stitch pattern | Straight up and down | Parallel or crisscross |
| Pass count | 6-8 passes | 6-8 passes per hole pair |
| Strength | Good for light use | Better for heavy use |
| Thread bulk | Less bulky | More thread used |
Counted passes and a thread shank matched to fabric thickness keep hand-sewn buttons secure through washing.
How to form and wrap a thread shank for shirts vs pants/coats
A thread shank is a small spool of thread between the button and fabric that gives space for fabric thickness. Shirts with thinner fabric need a shorter shank, about 1/8 inch (3 mm). Pants and coats with thicker fabric require a taller shank, about 1/4 inch (6 mm).
After stitching through the button holes multiple times, pass the needle under the button (between button and fabric). Wrap the thread tightly around the bundle of stitches to form the shank equal to the fabric thickness.
This wrapping provides flexibility for buttoning without stressing the thread or fabric. Finish wrapping about 6-8 times, then pull tight to secure the shank before tying off.
To check correct shank height, place the button on the fabric and hold a matchstick or toothpick between them while sewing. The thread wraps around this spacer, ensuring consistent shank thickness.
For stretch fabrics, allow a slightly taller shank (up to 3/16 inch or 4.5 mm) to accommodate fabric movement without pulling the button off.
If the shank is too tight, the button sits flush and restricts fabric movement, causing stitches to snap. Too loose, and the button wobbles or snags.
How to tie off, bury, and trim the thread so it holds through washing
To tie off, pass the needle through the shank wrapping but not through fabric or button holes. Make a small knot by looping thread and pulling tight. Repeat for double security.
Bury the needle under the button on the underside fabric by sewing a few tight stitches through the fabric only, pulling the thread taut before trimming close to the fabric.
This method hides the knot and prevents it from catching or loosening in washing. Trim thread to about 1/8 inch (3 mm) to avoid fraying but leave enough to keep the knot stable.
- Pass needle through thread shank wrapping.
- Make one or two tight knots.
- Sew needle through fabric underside several times to bury thread.
- Trim thread close to fabric.
How to sew a button by hand so it stays through washing
Start with polyester thread 18-24 inches long and a sharp 80/12 needle. Anchor the thread knot on the fabric side beside the button hole using a backstitch or a knot.
For 2-hole buttons, pass the needle 6-8 times up and down through both holes. For 4-hole buttons, sew either parallel or crisscross stitches, passing the thread 6-8 times through each hole pair.
After stitching, wrap the thread 6-8 times under the button to form a shank matching the fabric thickness (about 1/8 inch for shirts, 1/4 inch for coats). Tie off with a secure knot hidden under the button and bury the thread by stitching into the fabric underside.
Check your work by gently pulling the button. It should hold firmly with slight movement allowed by the shank. This method prevents pulling through or button loss during washing.
Still wondering?
Can I use cotton thread instead of polyester for sewing buttons?
Cotton thread works but breaks down faster in washing. Polyester thread at 50 wt offers better strength and stretch, lasting longer through washes.
What if I don’t wrap a thread shank under the button?
Skipping the shank can cause the button to pull tightly against fabric, risking thread breakage and fabric puckering, especially on thicker fabrics.
How do I know when to stop sewing passes through the button holes?
Aim for 6 to 8 passes through each hole or hole pair. This range balances hold strength with manageable thread bulk.
Is it better to tie a knot or backstitch to anchor thread?
Both methods work if done firmly. A backstitch can provide a flatter finish, while a knot is simpler for beginners to secure.
How long should the thread tail be before knotting?
Leave about 3 inches (7.5 cm) of thread tail after threading the needle to make a secure knot or backstitch without slipping.