Foot pedal does nothing when pressed: what to check first
If your sewing machine foot pedal doesn’t respond when pressed, first check the power outlet, pedal connection, and cord for damage. Testing pedal continuity and machine response will tell if you need a replacement or repair.
On this page (8 sections)
- The short version
- Safe power-off checks before testing
- How to tell if it's the pedal, cord, or machine
- Power-on clues: hum, light, and intermittent response
- No-tools tests vs multimeter continuity test and what it means
- When to replace the foot control vs when to get service
- Sewing machine foot pedal not working: step-by-step check
- Still wondering?
Part of our guide on adjusting feed pressure
Key figures
- Typical pedal voltage
- 110-120V AC US
- Common pedal resistance
- 5-15 ohms
- Test pedal continuity
- Multimeter needed
- Common pedal cord length
- 4-6 feet
- Pedal replacement cost
- Varies, +
The short version
- Check if the pedal or cord is faulty by swapping or testing continuity.
- Inspect power outlet and plug seating before opening your machine.
- Listen for motor hum or watch machine lights for power clues.
- No pedal response with good power means pedal replacement or service.
- Multimeter testing confirms pedal and cord status beyond visual checks.
Safe power-off checks before testing
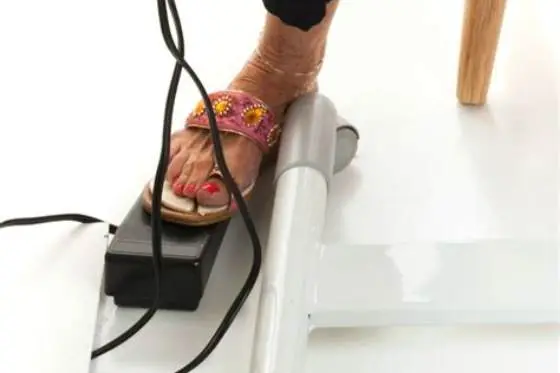
Start by unplugging your machine to avoid electric shock. Check the power outlet by plugging in a lamp or phone charger. If the outlet powers those devices, it’s likely fine.
Make sure the sewing machine plug is firmly seated in the outlet. Loose or corroded plugs cause no power to the pedal and machine.
Inspect the foot pedal cord for visible damage like frayed wires or cracks, especially near connectors. A damaged cord often causes no response.
Look at the connector pins on both ends of the pedal cord. Bent or corroded pins disrupt electrical flow and stop the pedal from working. We cover fixing wiring issues in its own article.
Check if your machine has a reset button and press it. Sometimes electronics shut down for safety and need a reset before the pedal works again. This can happen after a power surge or short circuit.
Confirm the pedal socket is free of lint or debris. Dust buildup inside the socket can block the electrical connection and stop the pedal signal from reaching the machine. Use a flashlight and gently blow or vacuum out the socket to clear it.
How to tell if it's the pedal, cord, or machine
Press the pedal and watch or listen closely for any motor hum or machine light. No sound or light usually means no power is reaching the machine. We cover bobbin winder won't spin in its own article.
Swap the pedal with a known working one if you have access. If the machine responds, your pedal is faulty. If not, suspect the cord or machine wiring.
Test continuity of the pedal and cord using a multimeter set to resistance (ohms). A working pedal usually shows low resistance around 5-15 ohms.
If continuity tests pass but the pedal still doesn’t work, the machine's internal wiring or motor control might need service. If that sounds like your situation, read up on machines that stay dry next.
If you have no spare pedal, test the pedal and cord together by measuring resistance while pressing the pedal. Resistance should start high and smoothly drop as you press. A flat reading means the pedal is stuck or damaged.
Try to identify if the pedal cord is detachable from the pedal itself. If yes, test each part separately. Sometimes the cord fails internally near the plug and swapping just the cord can restore function.
| Test | Pedal Fault | Cord Fault | Machine Fault |
|---|---|---|---|
| Multimeter continuity | No or high resistance | No continuity | Continuity OK |
| Swap pedal | Machine works with new pedal | Machine doesn't work | Machine doesn’t respond at all |
| Power on hum/light | No sound or light | No sound or light | Power on but no motor response |

Klein Tools MM325 Digital Manual-Ranging Multimeter
Lets you pinpoint why your pedal is dead by checking cord and pedal continuity with its 2MΩ resistance and continuity test.
Power-on clues: hum, light, and intermittent response
If the machine hums or the power light comes on when you press the pedal, power is reaching the motor. The problem may be mechanical inside the machine or the pedal’s variable control.
Intermittent pedal response usually means a loose wire inside the pedal or cord, or worn pedal contacts.
No hum, no light, and no response almost always point to power not reaching the motor. This could be a broken cord, bad pedal, or internal wiring fault.
A buzzing or clicking noise without motor movement could mean the motor is jammed or the pedal variable resistor is failing.
If the pedal causes a dim light or a faint hum but no motor movement, the motor brushes might be worn out. This causes low current flow and weak motor response. Check your machine's manual for motor brush replacement intervals.
A pedal that occasionally works then stops could be overheating internally. Touch the pedal after use; if it feels hot, internal contacts are failing and causing intermittent power delivery.
Look for signs of arcing or burning smells near the pedal or cord. This indicates electrical faults that need immediate attention to avoid damage or fire risk.
This guide helps you pinpoint why your sewing machine foot pedal does nothing when pressed, with clear steps to isolate the problem.
No-tools tests vs multimeter continuity test and what it means
You can do simple no-tools tests: plug and unplug the pedal, wiggle the cord gently while pressing, and try another outlet. These can spot obvious faults fast.
The pedal should smoothly vary motor speed as you press it. No response or jerky changes suggest pedal wear or wiring issues.
A multimeter set to resistance mode can check if the pedal’s variable resistor and cord wires are intact. A reading outside about 5 to 15 ohms usually means a fault.
Zero or infinite resistance readings on pedal pins mean open or short circuits. Replace the pedal if readings are faulty.
Use the multimeter to check resistance at multiple pedal press levels. Resistance should change gradually from maximum (open pedal) to minimum (fully pressed). Sudden jumps or no change means faulty variable resistor.
Test each wire in the pedal cord individually for breaks by gently bending it while measuring resistance. Resistance spikes or drops to zero when bending indicate internal wire breaks.
If your multimeter has a diode test, check the pedal for any built-in diodes or components that might fail and cause no pedal response. Refer to your pedal’s schematic if available.
- Unplug power to the machine.
- Disconnect the foot pedal from the machine.
- Set a multimeter to measure resistance between pedal plug pins.
- Press and release the pedal while watching for resistance changes.
- If resistance stays infinite or zero, pedal or cord is faulty.
When to replace the foot control vs when to get service
Replace the foot pedal if it fails continuity or shows no variable resistance when pressed. Replacement pedals usually plug in directly and meet your machine’s voltage rating (typically 110-120V AC).
If the pedal and cord test fine but the machine still doesn’t run, the problem is internal wiring or motor-related. This is a job for a service technician.
Avoid trying to repair internal machine electronics yourself unless you have experience. Incorrect repairs can damage your machine or cause injury.
Keep your original pedal’s specifications handy when shopping for a replacement, including plug type, voltage, and cord length.
Sewing machine foot pedal not working: step-by-step check
Follow these steps to isolate the problem with your unresponsive foot pedal.
Step 1: Check the outlet with another device to confirm it works and plug the machine in firmly.
Step 2: Inspect the pedal cord and connectors for visible damage or bent pins.
Step 3: Swap the pedal with a known good one if available to see if the machine runs.
Step 4: Use a multimeter to test pedal and cord continuity and variable resistance.
Step 5: If pedal and cord test good, suspect machine wiring or motor and seek service.
Step 6: Replace the foot pedal if continuity or resistance tests fail.
- Unplug power before starting checks.
- Confirm outlet powers other devices.
- Inspect pedal cord and plug pins.
- Try a different pedal if you have one.
- Test pedal and cord with a multimeter.
- Replace pedal or call service as needed.
Still wondering?
Can a dirty foot pedal cause it to stop working?
Yes, dust or lint inside the pedal can block the electrical contacts. Cleaning may restore function if the pedal has a removable cover. Otherwise, internal wear might require replacement.
How does the foot pedal control sewing speed?
The pedal has a variable resistor that changes electrical current to the motor. Pressing harder reduces resistance, increasing speed. Faulty resistors or wiring break this control.
Is it safe to use a universal foot pedal as a replacement?
Universal pedals may work if voltage and plug type match your machine. However, compatibility varies, so check your machine’s manual or manufacturer’s recommendations first.
What if the sewing machine runs without the foot pedal?
Some machines start with a separate start/stop button. If yours runs only with the button, your foot pedal or its cord likely has a fault needing replacement or repair.
Can I repair a broken foot pedal myself?
Minor fixes like cleaning or resoldering loose wires may be possible if you have basic skills. Complex internal repairs are better left to professionals to avoid damage and injury.