Seam allowance: what it means and how wide to sew it
Seam allowance is the measured space, typically 5/8 inch (1.5 cm) for garments, between the fabric edge and the sewn line. You measure it from the fabric edge inward; this spacing controls fit and joining accuracy.
On this page (8 sections)
- The short version
- What seam allowance means and where it is measured from
- Standard widths: 5/8 inch garments, 1/2 inch and 1/4 inch quilting, and when they change
- Why a consistent allowance matters for fit, size and piecing
- How to mark and sew seam allowance accurately with a seam guide, foot and tape
- How much to add if a pattern does not state it and how to press and finish the allowance
- Seam allowance explained: how to set, check and keep the width
- Still wondering?
Part of our guide on beginner sewing courses
Key figures
- Garment seam allowance
- 5/8 inch (1.5 cm)
- Quilting seam allowance
- 1/4 inch (0.6 cm)
- Alternate quilting allowance
- 1/2 inch (1.3 cm)
- Common measurement point
- From fabric edge
- Seam allowance importance
- For fit and piecing
The short version
- Seam allowance is the distance from fabric edge to stitching line.
- Common widths: 5/8 inch for garments, 1/4 inch for quilting.
- Consistent seam allowance ensures correct fit and good joins.
- Use guides and marking tools to sew seam allowances accurately.
- If pattern lacks allowance, add standard widths before cutting.
What seam allowance means and where it is measured from
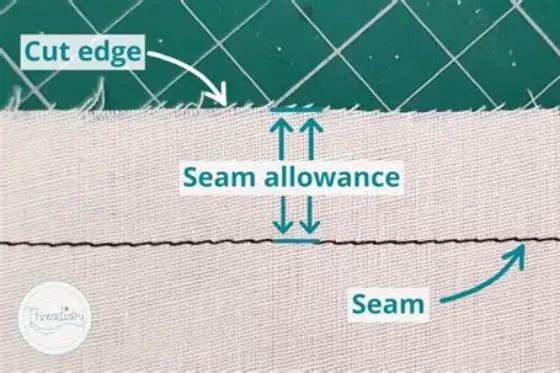
Seam allowance is the measured space between the edge of your fabric and the stitch line you sew. This space is a buffer that lets you join fabric pieces without cutting into the stitched sections.
The key measure is the width from the raw edge inward toward the seam line. For example, a 5/8 inch seam allowance means your stitching sits 5/8 inch away from the fabric edge. This ensures enough fabric remains for a strong seam and allows adjustments if needed.
Measuring seam allowance consistently from the edge prevents fit problems later. If you sew too close or too far from the edge, garment size and shape change, or quilting pieces won’t align correctly.
Think of seam allowance as a safety zone. It protects your seam from fraying and leaves you fabric to reshape or repair. Always check your pattern or instructions for the exact width given. People in this spot often ask about hiding raw edges without bulk as well.
Standard widths: 5/8 inch garments, 1/2 inch and 1/4 inch quilting, and when they change
The most common seam allowance for garment sewing is 5/8 inch (1.5 cm). This size balances durability and flexibility, allowing alterations without bulk. It is standard for most commercial patterns in the US, UK, Canada, and Australia.
In quilting, a smaller seam of 1/4 inch (0.6 cm) is popular. This narrow allowance reduces bulk at points where multiple seams cross, keeping quilt blocks flat. Some quilters use 1/2 inch (1.3 cm) for beginner ease or heavy fabrics.
Certain projects require adjusting seam allowance. Heavy fabrics like denim or upholstery sometimes use wider allowances to prevent seam ravel or to accommodate topstitching. Children’s or very fitted garments may need narrower allowances for precise shaping. If that sounds like your situation, read up on hiding zipper teeth smoothly next.
Always check your pattern for the seam allowance specified. If none is given, assume 5/8 inch for garments and 1/4 inch for quilting unless fabric or design suggests otherwise.
| Project Type | Typical Seam Allowance | Reason |
|---|---|---|
| Garments | 5/8 inch (1.5 cm) | Standard for fit and alteration space |
| Quilting (traditional) | 1/4 inch (0.6 cm) | Minimizes bulk at seam intersections |
| Quilting (heavy fabric) | 1/2 inch (1.3 cm) | Easier sewing and fabric thickness |
| Heavy-duty sewing | 3/4 inch or more | Prevents seam failure and allows topstitching |
Why a consistent allowance matters for fit, size and piecing
Consistency in seam allowance keeps your project’s size and shape true to pattern or design. If you vary the allowance from seam to seam, parts won’t match when joined. This leads to misaligned edges and puckered seams.
For garments, even a difference of 1/8 inch (0.3 cm) in seam allowance can alter the final circumference of a waist or sleeve. This affects how the garment fits the wearer. For the detail, see our notes on needle sizes explained.
In quilting, seam allowance inconsistencies can throw off block sizes. A block sewn with uneven allowances will not line up with others, creating gaps or uneven borders in your quilt top.
Once the fabric is cut, your allowance width fixes the finished size. Sewing with a consistent allowance also makes pressing and finishing easier, as seams nest or open predictably.
That’s why using a guide or marking ahead to keep seam allowance steady is worth the extra effort. It’s a skill that pays off in every project.
Seam allowance is the crucial measured space from fabric edge to stitching that controls fit and seam strength.
How to mark and sew seam allowance accurately with a seam guide, foot and tape
Marking and sewing seam allowance accurately starts with tools. A seam guide attaches to your sewing machine foot or throat plate to help keep fabric edge aligned with a fixed distance to the needle.
You can also use adhesive seam allowance tape stuck to the machine bed at the desired distance from the needle. This acts as a visual and physical stop, guiding the fabric edge.
Marking fabric edges with washable pencils or tailor’s chalk lines the seam allowance before sewing, especially on tricky curves or bulky fabrics. Pins placed just outside the allowance help keep edges aligned.
Sew slowly and keep the fabric flush against your guide or tape. Check your machine’s manual for feet designed for standard 5/8 inch quilting or garment seam allowances. Pressing the allowance open or to one side also locks in accuracy for the next step.
- Seam guide: fixes fabric edge distance from needle
- Seam allowance tape: visual and tactile guide
- Marking tools: chalk or pencil for pre-sewing lines
- Pins: keep fabric edges aligned during sewing
How much to add if a pattern does not state it and how to press and finish the allowance
When your pattern omits seam allowance, add 5/8 inch (1.5 cm) for garments or 1/4 inch (0.6 cm) for quilting before cutting. This standard ensures enough fabric to sew and adjust.
Measure precisely with a ruler or tape to draw the cutting line away from the pattern edge. Cutting on this line gives you fabric with built-in allowance.
Press the seam allowance after sewing: for garments, press open to reduce bulk; for quilting, press allowances to one side so blocks nest neatly.
Finish raw edges with pinking shears, zigzag stitch, or serger to prevent fraying. This preserves the seam integrity, especially on woven fabrics prone to unraveling.
Keeping seam allowances tidy and consistent here makes your project last longer and fit better.
- Measure and mark standard seam allowance on fabric if not given.
- Cut fabric on the marked outer line.
- Sew seam line inside the marked allowance.
- Press seam allowances opened or to one side, as fabric and pattern direct.
- Finish raw edges to prevent fraying.
Seam allowance explained: how to set, check and keep the width
Setting seam allowance width comes down to choosing the right measurement and tools. Use a seam gauge or a ruler to mark allowances before cutting and sewing.
To check seam allowance, measure from the edge of fabric to the row of stitches after sewing. This confirms you maintained the correct width throughout.
Keeping seam allowance consistent takes practice and aids like seam guides or tape on your machine bed. Adjust machine feet or settings for your preferred allowance size.
The width you use depends on fabric type, project needs, and pattern instructions. Whenever uncertain, follow the standard widths: 5/8 inch for garments and 1/4 inch for quilting, adjusting by bulk or fit.
Keeping this habit ensures professional results that fit and assemble well.
- Choose the appropriate seam allowance width for your project.
- Mark the allowance line on fabric edges before cutting.
- Use a seam guide or tape while sewing to maintain width.
- Measure sewn seams to confirm allowance is consistent.
- Press and finish allowances according to fabric and project.
Still wondering?
What happens if seam allowance is too narrow or too wide?
Too narrow an allowance risks seams pulling apart or fabric fraying. Too wide adds bulk, causing uneven seams or fit issues. Keeping the allowance consistent ensures durable, well-fitting garments or quilts.
Can I change seam allowance to alter garment size?
Yes. Narrowing the allowance slightly reduces size; widening it adds ease. But change evenly on all seams to keep the garment balanced.
How do I measure seam allowance on an existing garment?
Look inside the seam and measure from the fabric edge to the stitching line. This gives the allowance used when it was made.
Is seam allowance different for stretch fabrics?
Often a smaller allowance is used to minimize bulk and allow stretch. Check your pattern or test with fabric scraps before cutting.
Why do quilting patterns usually use 1/4 inch allowance?
A 1/4 inch allowance minimizes bulk where multiple seams cross, helping blocks lie flat and seams match precisely.