French seam in two passes: how wide to sew each fold
Sew your French seam in two passes: first, sew a 3/8-inch (1 cm) seam wrong sides together, trim to 1/8 inch (0.3 cm), then press. Second, sew a 5/8-inch (1.5 cm) seam right sides together enclosing edges flat to hide raw fabric fully. This method avoids bulk and poking edges.
On this page (8 sections)
- The short version
- How to sew a French seam with two passes
- First pass width: wrong sides together seam allowance
- Trimming and pressing after first pass
- Second pass: enclosing raw edges and keeping the seam flat
- Common failures and how to fix them
- Adapting French seams for pillowcases, straight seams, and hand sewing
- Still wondering?
Part of our guide on threading and winding for beginners
Key figures
- First pass width
- 3/8 inch (1 cm)
- Trim allowance to
- 1/8 inch (0.3 cm)
- Second pass width
- 5/8 inch (1.5 cm)
- Seam type
- French seam
- Best fabric weight
- Light to medium
- Pressing needed
- Each pass
The short version
- First pass at 3/8 inch wrong sides together seals initial seam.
- Trim seam allowance to 1/8 inch before pressing to prevent edge poking.
- Second pass at 5/8 inch right sides together fully encloses raw edges.
- Press seams sharply after each step to keep fabric flat and smooth.
- Avoid bulk by trimming allowance and keeping stitch widths correct.
How to sew a French seam with two passes

Start by sewing the fabric wrong sides together at a 3/8-inch (1 cm) seam allowance. This first pass holds the seam and leaves room for trimming. After sewing, trim the seam allowance down to 1/8 inch (0.3 cm) to remove excess fabric that would add bulk or poke through later.
Press the trimmed seam open or flat with a hot iron set for your fabric fibre. This pressing encourages the seam to lay flat and reduces fabric distortion.
Next, fold the fabric so the right sides face each other, enclosing the raw edges inside. Sew the second pass at a wider 5/8-inch (1.5 cm) seam allowance. This pass fully encloses the raw edges, creating a clean, finished seam.
Finish by pressing the seam flat or slightly to one side. If pressed carefully, the seam looks neat from both sides, with no raw edges visible. We go through zipper insertion guide step by step elsewhere on the site.
First pass width: wrong sides together seam allowance
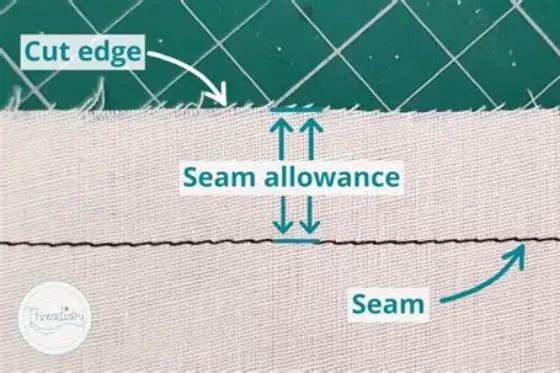
The first pass always uses a narrower seam allowance, typically 3/8 inch (1 cm). This thinner line allows you to trim without cutting into the final seam allowance needed for the second pass. Sew with the fabric's wrong sides facing, so the raw edges remain exposed for trimming and folding.
A wider first seam risks encroaching on the final seam allowance. Too narrow makes the seam weak or difficult to trim accurately. Using a consistent 3/8 inch balances these needs.
Once sewn, carefully trim the seam allowance down to 1/8 inch (0.3 cm). This tiny allowance prevents the raw fabric edge from poking out of the folded French seam or causing lumps. Before you commit to anything, it is worth looking at seam allowance explained.
The exact measurement of the first seam allowance can vary slightly depending on fabric type. For very fine or slippery fabrics like silk, reducing the first seam to 5/16 inch (0.8 cm) may help prevent shifting while sewing. This narrower allowance still allows enough fabric for trimming but reduces bulk in delicate materials.
Conversely, for fabrics that fray heavily, such as loosely woven linens, you might start with a slightly wider first seam of 7/16 inch (1.2 cm). This extra fabric lets you trim thoroughly while ensuring the seam stays intact during handling. Always test on a fabric scrap to find the best balance.

Sewing Gauge Sewing Measuring Tool
Holds your French seam first pass at exactly 1/8 inch so the raw edge stays fully enclosed without bulk or poke-through.
Trimming and pressing after first pass
Trimming to 1/8 inch (0.3 cm) after the first pass is crucial. If you leave more fabric, it will poke out after folding and sewing the second pass. Less than 1/8 inch risks cutting too close and weakening the seam. For the detail, see our notes on how to start a sewing business.
Use a sharp pair of scissors or a rotary cutter to achieve a clean edge. Uneven trimming increases bulk and can cause visible bumps along the final seam.
Press the seam allowance flat or open using an iron set to the fabric type. Cotton and linen take a hot iron, synthetics need a medium setting. Pressing sets the seam and helps the fabric fold sharply with minimal thickness.
Exact seam widths and trimming steps make French seams invisible and flat without adding bulk or showing raw edges.
Second pass: enclosing raw edges and keeping the seam flat
The second pass uses a 5/8-inch (1.5 cm) seam allowance, sewn with right sides of fabric together. This wider allowance fully encloses the trimmed raw edges from the first pass inside the seam.
Keep the fabric layers aligned and flat while feeding through the machine. A slower sewing speed and steady feed prevent puckers or bubbles.
After sewing, press the seam flat to one side or open. The pressing sets the seam allowance and ensures the seam lays smooth, without bulk. Avoid pressing directly on the seam stitches to keep them tight.
When sewing the second pass, keep the needle centered between the fold and the raw edge inside. This positioning keeps the seam balanced and prevents the seam allowance from twisting or rolling out, which would expose raw edges.
If you notice puckering after sewing the second pass, check your presser foot pressure. Excessive pressure can stretch the fabric, causing bubbles. Reducing the pressure or using a walking foot can help keep layers feeding evenly.
For very lightweight fabrics, use a shorter stitch length, around 2.0 mm, on the second pass to stabilize the seam without adding bulk. Longer stitches risk pulling the fabric and causing uneven folding.
Common failures and how to fix them
If raw edges show through, check if you trimmed enough after the first pass. Trim more fabric if edges poke out.
Bubbling occurs when fabric layers shift or are sewn at uneven tension. Slow down and realign fabric before stitching the second pass to fix this.
Bulk at seam ends often results from folding or overlapping fabric. Trim seam allowances evenly and avoid catching extra fabric when sewing ends.
If issues persist, check your machine tension and needle size. Using a needle too large for the fabric or wrong tension creates uneven stitching.
| Problem | Cause | Fix |
|---|---|---|
| Raw edges showing | Not trimmed enough | Trim seam allowance to 1/8 inch |
| Bubbling or puckers | Fabric shifted during sewing | Sew slowly and realign layers |
| Bulk at ends | Uneven trimming or overlap | Trim evenly, avoid folding fabric |
| Uneven stitches | Wrong needle or tension | Use appropriate needle and adjust tension |
Adapting French seams for pillowcases, straight seams, and hand sewing
For pillowcases and straight seams, sew the first pass at 3/8 inch and trim to 1/8 inch exactly as usual. Straight seams are easier to manage and help keep the seam flat.
When sewing curved seams, work carefully to avoid stretching the fabric. Use shorter stitch length and press well.
Hand sewing a French seam needs the same two passes: a narrow stitch on wrong sides first, trimming, then sewing right sides together. Use a backstitch for strength and press with a damp cloth.
Hand sewing takes longer but works well for delicate fabrics where a machine might damage the fibres or for inaccessible areas.
For pillowcases, the French seam adds a professional finish that stands up to repeated washing. Sew the first pass at 3/8 inch (1 cm), trim neatly, then sew the second pass at 5/8 inch (1.5 cm). The wider second seam gives room to insert piping or decorative trim if desired.
Straight seams on woven cotton are the easiest to handle with French seams since the fabric doesn’t stretch. Keep the fabric aligned carefully during sewing to avoid edge misalignment. Pinning or clipping the seam allowance every few inches helps maintain control.
Hand sewing the first pass uses tiny running stitches to hold the seam securely, about 10 stitches per inch (2.5 cm). After trimming and pressing, the second pass uses a backstitch spaced evenly about 3 mm apart to enclose the edges firmly. Pressing with a warm iron on a pressing cloth prevents scorching delicate fabrics.
- Sew first pass wrong sides together at 3/8 inch.
- Trim seam allowance to 1/8 inch and press.
- Fold right sides together, enclosing raw edges.
- Hand sew second pass with backstitch at 5/8 inch.
- Press seam flat or to one side.
Still wondering?
Why is the first pass seam allowance narrower than the second?
The first pass uses a 3/8-inch seam allowance to leave enough fabric to trim down without weakening the final seam. The second pass is wider to fully enclose the trimmed edges.
What happens if I don’t trim the seam allowance after the first pass?
Untrimmed edges can poke through the final seam or create lumps, ruining the neat finish French seams offer.
Can I sew a French seam without pressing between passes?
Pressing sets the seam and reduces bulk. Skipping it often results in seams that bubble or don’t lie flat.
Is a French seam suitable for all fabrics?
French seams work best on light to medium-weight fabrics where bulk is a concern. Avoid very thick or bulky fabrics unless modified.
How tight should the tension be when sewing a French seam?
Use normal tension for your fabric. Too tight causes puckers; too loose creates loops. Test on scrap fabric to dial in the right tension.