Piping foot vs zip foot: which presser foot for piping
Which presser foot for piping depends on cord thickness. A zipper foot handles thin-to-medium cord. For anything thicker, a piping or welting foot is better, since it holds the cord still while you stitch.
On this page (10 sections)
- The short version
- What a piping or welting foot actually is
- When a standard zipper foot works instead
- Single vs double piping feet and the cord size they take
- Shank type: what fits your machine and what won't
- Industrial machines take their own piping feet
- Cutting bias strips: why the 45° angle matters
- Sewing piping cord step by step with the foot
- Getting close to the cord without clipping it
- Still wondering?
Part of our guide on sewing machine skipping stitches
Key figures
- Cord a zip foot handles
- thin-to-medium cord
- Shank check
- snap-on or screw-on
- Strip width
- cord + 2 x allowance
- Seam allowance for piping
- 3/8 in (1 cm)
- Stitch for piping
- 2.5-3 mm straight stitch
- Clip the cord here
- at the seam line, inside the allowance
The short version
- Zip foot: free arm, no groove, works for thin-to-medium cord and any curve
- Piping foot: the right tool when the cord is thick or the seam is long and straight
- Measure cord diameter plus two seam allowances before you buy a foot
- Check your machine manual to confirm shank type before ordering
- Industrial piping feet are specific to the machine class and rarely fit a domestic machine
What a piping or welting foot actually is
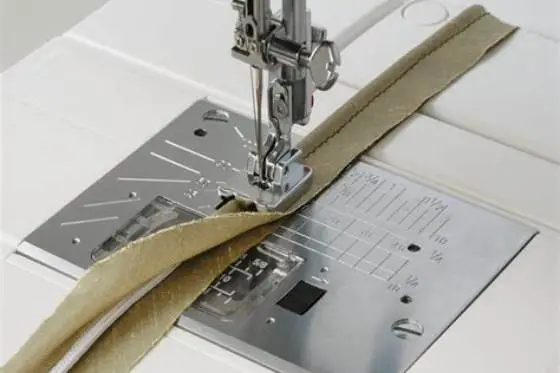
A piping foot is a presser foot with a groove or tunnel running along its underside, left to right. You feed the corded bias strip into that groove and the tunnel holds the cord in line while you stitch. The needle runs down just to one side of the tunnel, so the seam lands a hair from the cord. That is the whole trick.
The groove depth matters more than the brand. Cord sits in the tunnel and pushes the fabric out around it. Too shallow a groove and the needle nicks the cord. Too deep and the stitching wanders away from it, so your piping looks loose when the cord pulls straight.
You'll see these sold as piping feet, welting feet or cording feet. They are the same tool. Some are single, some are double, and the double ones are the reason people buy a set instead of one.
You buy a piping foot on its own, while a zip foot is usually in the accessory box already, so it costs nothing. For the detail, see our notes on presser foot kit for sewing machines.
- holds cord straight
- edge stitching stays tight
- works on thick cord
- awkward on tight curves
- needs matching shank
- costs more than a zip foot
When a standard zipper foot works instead
A zipper foot is the honest answer for most home piping jobs. It has no groove, just a narrow sole you can adjust to either side of the needle. You feel the cord with your fingertip and steer the strip so the needle falls beside it. Thin-to-medium cord sews cleanly this way, and curves behave better than they do in a groove.
The catch is control. Nothing holds the cord, so a thick cord shifts as the strip bends. Your stitch line drifts, the cord kinks, and the piping goes wavy along a straight seam. For cushions and bag edges this rarely shows. For upholstery or a long straight bolster it does.
Use the zip foot when your cord is thin, your seams curve, and you already own the foot. Buy the piping foot when the cord is fat, the seam is long and straight, or you'll be doing this often enough that the wobble costs you more than the foot. We cover loose needle bar sewing machine in its own article.
One more reason to start with the zip foot: it costs nothing if it's already in the accessory box, and you learn how the cord feels under the needle before you commit to a groove.
For heavy upholstery or thick canvas, a walking foot or an adjustable binder with grooves handles the bulk better than a standard piping foot. Metal feet outlast plastic ones on upholstery-weight work and resist flex under thick cord.
| Job | Zip foot | Piping foot |
|---|---|---|
| Thin-to-medium cord | Works well | Works well |
| Thick cord | Cord shifts | Holds cord in the tunnel |
| Tight curves | Steers easily | Can fight you at small radius |
| Long straight seam | Stitch line can drift | Stays parallel to the cord |
| Cost | Often included with the machine | Bought separately |
Single vs double piping feet and the cord size they take
A single piping foot has one tunnel on one side. You stitch one edge of the strip, then flip and stitch the other. It's slower and it suits one row of piping on a seam. There is more on adjust sewing machine tension in a separate guide.
A double piping foot has a tunnel on both sides of the needle, so you can stitch both edges of the strip without turning the work. That makes it the pick for bags, cushions, upholstery and any job with a lot of piping. The trade-off is a wider foot that crowds narrow curves.
Cord sizes follow the finished look. As an example, with a 3/8 in (1 cm) seam allowance per side, a 1/2 in (1.3 cm) finish comes from a cord around 3-4 mm. Add your seam allowance twice to the cord diameter and you have the strip width. Measure the cord with calipers or a ruler, and check the cord and strip together before you cut the full length.
Double feet are sized for cord ranges, not one diameter. Read the listed size range, in millimetres, before you buy. If the listing doesn't state it, treat that as a risk and look at another one. If that sounds like your situation, read up on bobbin case loose in singer machine next.
Shank type: what fits your machine and what won't
Look at the bottom of your presser foot lever. A flat bar with a screw means a screw-on foot. A small moulded block that a foot clips into means a snap-on foot. That single detail rules most feet in and out, and no groove size can fix a wrong shank.
Low shank, high shank and slant shank are the three common domestic types. Low shank is the most common on home machines sold in the US, UK, Canada and Australia. High shank sits on a taller bar. Slant shank is a specific vintage Singer arrangement and needs slant-specific feet.
Shank heights vary by maker and model, so check your manual or the manufacturer's accessory list rather than treating any measurement as definitive. Measure your own machine if the manual does not name the shank type.
If your machine is snap-on, a screw-on foot will not clip on. If it's screw-on and you want a snap-on foot, adapters exist for some low-shank machines. Confirm your shank type before you shop.
Industrial machines take their own piping feet
Industrial piping feet are not interchangeable with domestic ones. They mount on a specific industrial foot bar or a walking-foot mechanism and they're sized to the machine class, not to a snap-on block. A home sewer can't clip one onto a domestic machine.
That is usually not a problem. The cords a home sewer works with sit in the same 3-10 mm range the domestic feet are built for. A domestic piping foot handles cushions, bags and garments perfectly well. Industrial kit comes into play for high-volume production and heavy upholstery weights.
If you do own an industrial machine, buy the foot listed for your machine's foot-bar type and stitch class. Neither figure is guessable, so get it from your machine's manual or the accessory spec sheet, not from a photo online.
For anyone running a home machine, the domestic foot is the honest answer. It's cheaper and the groove sizing is aimed at your materials.
Cutting bias strips: why the 45° angle matters
Piping needs bias-cut strips, not straight-grain ones. A bias strip is cut at a 45° angle to the fabric's lengthwise grain, so the weave sits diagonally. That diagonal stretch lets the strip bend around curves without puckering or tearing.
Cut straight-grain and the strip fights every curve. The fabric has no give, so you get tucks at tight corners and the piping buckles. Bias strips flex, wrap smoothly and take the shape you sew.
Mark a 45° line from one corner of your fabric and cut strips parallel to that line. Join strips on the straight grain, not the bias, for clean flat seams.
Sewing piping cord step by step with the foot
Cut your bias strip wide enough. Roll the cord in the strip, wrong side out, and you're ready to attach the foot.
Before you start, set a straight stitch around 2.5-3 mm as a starting point, with an 80/12 needle for mid-weight fabric, moving up to a 90/14 for heavier upholstery. Check the setting with the test strip before you start the real seam. A 50 wt cotton or polyester thread suits most fabric piping. Clip the cord so it sits about 1 cm from the strip end to reduce bulk at the join.
- Fit the piping foot to the correct shank and lower the lever.
- Set stitch length around 2.5-3 mm and a straight stitch.
- Place the corded strip on the fabric, raw edges together, cord toward the foot groove.
- Raise the needle, slide the strip into the groove so the cord sits inside the tunnel.
- Lower the foot and turn the handwheel toward you one full stitch, checking the needle clears the cord.
- Sew slowly past the cord, guiding the strip so the cord stays in the groove.
- Use a narrow basting stitch at the strip ends to stop the cord pulling out.
- Clip the cord at the seam line, about 1 cm in from the raw edge, to join two lengths.
- tight stitch line beside the cord
- cord stays straight on long runs
- repeatable joins
- slower on tight curves
- needs shank matching
- groove size must suit the cord
Getting close to the cord without clipping it
The whole skill is stopping about 1 mm short of the cord. The needle should brush the cord's edge, not cut it. If your stitch sits 2-3 mm away, the finished piping will look loose, especially after the cord pulls in.
Watch the needle as you sew, not the strip behind it. Guide with both hands close to the foot and keep the cord pressed into the groove. Slowing the machine down to a near-stop is normal for piping. It's the fastest way to a clean line.
If you can't get close enough, the needle position is the fix. Many machines let you move the needle left or right by a few millimetres. Nudge it toward the cord and run the test strip again rather than adjusting your hands.
When the seam is sewn, the cord should sit tight against the stitch line with no gap and no cut. If you can see a visible strip of fabric between the stitch and the cord, take it out and move the needle one step closer.
Buy a piping foot when the cord is thick or the seam is long and straight. Otherwise a zipper foot is enough.
Still wondering?
Can I sew piping with a regular presser foot?
Only if you can keep the stitching close to the cord, which a standard foot struggles to do. The foot covers the cord and the needle position sits too far away. Use a zipper foot or a piping foot instead.
What size cord fits a piping foot?
It depends on the model, so check the listed range in millimetres. As an example, with a 3/8 in (1 cm) seam allowance per side, expect a finished 1/2 in piping from a cord around 3-4 mm; test your cord and strip to confirm.
Will a snap-on piping foot fit my screw-on machine?
No, it won't clip on. Look for a screw-on piping foot in the right shank, or check whether an adapter is listed for your machine. Measure your shank height before you order.
Do I need to baste the cord into the strip first?
Piping feet are designed to feed the cord as you sew, so basting is optional. Basting helps on slippery fabric and very stiff cord, and it reduces the cord pulling free at the ends.
What needle and thread should I use for piping?
Use an 80/12 needle for mid-weight fabric and a 90/14 for upholstery. Match a 50 wt cotton or polyester thread to the fabric rather than the cord.
How close should the stitching sit to the cord?
About 1 mm from the cord edge, close enough to look tight, clear enough not to cut it. If you see a gap of fabric between the stitch and cord, move the needle closer.