Loose Needle Bar on a Sewing Machine? Fix It Step by Step
Your needle bar loose sewing machine usually has a loose needle clamp screw, a worn needle, or a worn bushing. Switch the power off, fit a new 80/12 needle, tighten the clamp screw with a screwdriver, and test the bar for side play.
On this page (8 sections)
Part of our guide on sewing machine skipping stitches
Key figures
- First fix
- New 80/12 needle
- Power state
- Off and unplugged
- Clamp tool
- Screwdriver, not fingers
- Test fabric
- Folded cotton scrap
- Workshop sign
- Bar wobbles side to side
- Skip this
- Forcing a jammed machine
The short version
- Switch the power off before you touch the needle area.
- Fit a new 80/12 needle before you blame the bar.
- Tighten the needle clamp screw with a screwdriver, not by hand.
- Side play in the bar itself means a workshop job.
- Test on a folded scrap and check the stitches before real fabric.
Needle bar loose sewing machine: what it means
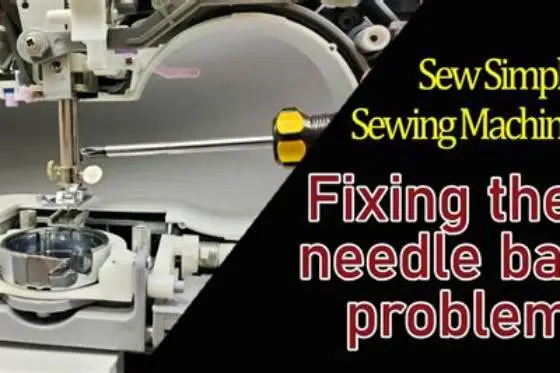
With a needle bar loose sewing machine, a metal rod moves more than it should. That is too much movement. The needle bar is the upright rod that holds the needle and drives it up and down. It should slide straight, with no side wobble and no twist. When it loosens, the needle drifts off line and the stitches suffer.
Your machine shows the fault in small ways at first. Stitches skip on plain cotton, seams wander off the marked line, and the needle may click against the needle plate. Check the bar before you change settings. Small signs matter.
Heavy seams and hard jams often start the trouble. Sewing over thick seams can push the needle sideways and strain the clamp. Force used to clear a jam can shift the bar in its guide. Age adds wear to the bushing, which is the sleeve that keeps the bar straight. Wear builds slowly.
Stop sewing when the needle hits metal or the bar twists by hand. One that strikes the plate can snap and throw a sharp piece. Do not force it. Switch the power off, lift the presser foot, and take the fabric out gently. Safe checks come next, and they cost nothing. For the detail, see our notes on uneven stitches sewing.
- Needle bar: the upright rod that holds the needle and moves it up and down.
- Needle clamp: the small holder at the bottom of the bar that grips the needle shank.
- Bushing: the sleeve inside the machine that guides the bar in a straight line.
Signs: tell a loose bar from a loose needle
Most loose bars turn out to be loose needles, so sort the two apart first and save yourself a needless repair bill. The loose needle twists or slides in the clamp when you touch it. The loose bar moves as a whole rod, and the needle stays firm in its clamp. That test tells you plenty.
Watch how the needle sits in the plate hole as you turn the handwheel by hand. The good needle drops through the centre of the hole each time. The bent needle rubs one side of the hole and then the other. The loose bar lets the whole needle drift, even with a straight new needle fitted. Watch it fall.
Look at the presser foot too, since a loose foot can look like a bar fault. The foot should sit flat on the plate with no rock. Tighten the foot screw before you judge the bar. Flat means sound.
Listen to the machine as it runs slowly on a scrap. The loose needle gives a light tick as it shifts in the clamp. The worn bushing gives a dull rattle from inside the head. Skipped stitches with no rattle point to a slipped bar. Listen hard.
| What you see | Likely cause | Next step |
|---|---|---|
| Needle twists in the clamp | Loose needle clamp screw | Refit the needle and tighten the screw |
| Whole bar moves side to side | Worn bushing or loose bar guide | Book a technician |
| Needle rubs one side of the plate hole | Bent needle | Fit a new 80/12 needle |
| Presser foot rocks on the plate | Loose presser foot screw | Tighten the foot screw |
| Stitches skip with no rattle | Bar height has slipped | Book a technician |

SCHMETZ Universal (130/705 H) Household Sewing Machine Needles
Gives you a fresh 80/12 universal needle for medium cotton so you can rule out the cheapest cause of a loose needle bar before touching any screw, with 10 needles in the card.
Checks: safe tests before you touch a screw
Safe checks start with the power off and the plug out. Machine manuals tell you to switch the machine off before any work in the needle area, since a live machine can start without warning. Fingers stay clear of moving parts, and the handwheel is the only part you turn. Work in good light so you can see the clamp and the plate hole clearly. Light helps.
Grip the needle gently and try to twist it in the clamp. The firm needle stays put, and a loose one turns with light pressure. Next, hold the bar just above the clamp and push it left, then right. The sound bar feels solid, with no click and no side play. No click is good.
Roll the old needle on a flat table to check for a bend. The straight needle rolls in a smooth line, while a bent one wobbles and lifts at one end. Fit a new needle even when the old one looks straight, because a blunt tip hides damage. Change it anyway.
Turn the handwheel toward you and watch the needle at its lowest point. The needle should drop cleanly through the plate hole without touching the sides. If the eye sits far above or below its normal place, the bar has slipped. Leave height and timing work to a technician.
- Switch the machine off, unplug it, and raise the presser foot.
- Try to twist the needle in the clamp with light finger pressure.
- Push the bar gently left and right just above the clamp.
- Roll the needle on a flat table and look for a wobble.
- Turn the handwheel toward you and watch the needle pass through the plate hole.
A wobbling needle bar rarely means a dead machine, and the cheapest fix often takes five minutes.
Fixes: cheapest first, in the right order
Start with a new needle, since it costs the least and fixes the most faults. Fit a fresh 80/12 universal needle for medium cotton, flat side of the shank to the back. Push the shank up until it touches the stop inside the clamp. Tighten the needle clamp screw with a screwdriver. Keep it firm.
Re-thread the machine with the presser foot up so the thread seats in the tension discs. Threading with the foot down leaves the thread outside the discs, and loose thread then nests under the fabric. Follow the thread path in your manual, through the take-up lever and down to the needle. Thread it slowly.
Try the bobbin next, because the wrong bobbin can mimic a bar fault. Use the bobbin type your manual names, wound evenly with the same thread weight. Seat the bobbin case fully and pull the thread through its tension slot. Brush lint out of the hook area with the small brush from your machine kit. Clean it out.
Tighten the bar clamp only when your manual shows its screw and you can reach it safely. Turn the screw a small amount to the right and test the bar again. If the screw will not hold, stop and book a repair.
The Needle & Thread Finder picks the needle and thread for your fabric once the bar holds firm. Use it to match a fresh needle to the fabric you plan to sew. The right needle bends less and strains the clamp less.
- New needle: fit an 80/12 universal needle, flat side to the back, pushed fully up.
- Re-thread: presser foot up, through the discs, take-up lever, and needle eye.
- Bobbin: correct type, evenly wound, seated fully in its case.
- Lint: brush the hook area clean before you test again.
Test: sew a scrap and read the stitches
Test on a folded scrap of the same fabric you plan to sew. The folded scrap shows skipped stitches and uneven feed more clearly than a single layer. Sew a straight seam at a medium stitch length, about 2.5 mm, and keep your hands off the fabric. Let the feed dogs move the cloth, since pushing it bends the needle. Hands off.
Read the stitches on both sides of the scrap when you finish. Good stitches look even on top and underneath, with no loops, no skipped gaps, and the same spacing from start to finish. Loops underneath point to top threading or tension, not to the bar. Read both sides. Skipped stitches on both sides after a new needle point back to the bar or its timing.
Sew a second seam slowly and watch the needle at the plate. The needle should stay centred in the hole through the whole seam. One that drifts to one side as you sew still has play in the bar or the clamp. Trust your ears. Stop at once when you hear a click or feel a knock.
Keep the scrap as your record of the fix. Sew the same test again after any later change, and compare the two scraps side by side.
- Fold a scrap of your project fabric and place it under the presser foot.
- Sew a straight seam at 2.5 mm stitch length without pushing the fabric.
- Check both sides of the seam for loops, gaps, and skipped stitches.
- Sew a second seam slowly and watch the needle stay centred in the plate hole.
Shop: when a loose needle bar needs a technician
Book a technician when the bar itself has side play after a new needle and a tight clamp. Side play means the bushing or the bar guide has worn, and both sit inside the head. Replacing a bushing needs the head opened and the bar reset to its correct height. Inside work only.
Timing faults also belong in the shop, since they need precise settings. Timing is the match between the needle at its lowest point and the hook passing behind it. The slipped bar breaks that match, and skipped stitches follow. Leave it there.
Unplug the machine when the needle hits the plate, the hook, or the presser foot. Each strike can bend the bar, chip the hook, or snap the needle. Take it in with a note of what you heard and saw. Tell the shop which fixes you already tried.
Ask the shop what they changed before you sew your project again. The repair note should name the part replaced and the setting checked. Sew your folded scrap test at home and compare it with the scrap you kept. Even seams on both sides show the repair held. Keep both scraps.
- Bar wobbles side to side: worn bushing or guide, workshop job.
- Bar height has slipped: timing is out, workshop job.
- Needle strikes metal: stop at once, unplug, book a repair.
- Motor hums or smells hot: switch off, unplug, book a repair.
Still wondering?
Can I sew with a loose needle bar?
No, stop sewing until you know what is loose. The loose needle can snap, and the loose bar can drive the needle into the plate or hook.
Why does my needle bar wobble side to side?
Side play usually means a worn bushing or a loose bar guide inside the head. Neither a new needle nor a tight clamp will cure it, so book a technician.
How do I tell a loose needle from a loose bar?
Try to twist the needle in the clamp. One that turns is loose in its clamp, while a bar that moves as a whole rod has play in the bar itself.
Can I tighten the needle bar clamp myself?
You can tighten the needle clamp screw that holds the needle, using a screwdriver. The bar clamp inside the head is a different screw, so leave it to a technician when your manual does not show it.
Will a new needle fix skipped stitches from a loose bar?
The new needle fixes skipped stitches when the old needle was bent, blunt, or loose. It will not fix a bar that wobbles side to side, so test on a scrap first.