How to Sew a Buttonhole With a Sewing Machine That Fits
To sew a buttonhole with a sewing machine, interface the fabric, mark the position, load the button into the buttonhole foot, pull the buttonhole lever down, and stitch. The machine sews both sides and both ends, then you cut the centre open with a seam ripper.
On this page (8 sections)
- The short version
- What a buttonhole is: two legs and two bar tacks
- Before you sew: interfacing, marking and button size
- How to sew a buttonhole with a sewing machine, step by step
- Four-step buttonholes: the same hole, dialled by hand
- Opening the buttonhole: cut the centre, keep the ends
- Fixes: holes that will not turn, fit or lie flat
- Still wondering?
Part of our guide on beginner sewing courses
Key figures
- Buttonhole length
- Diameter plus thickness
- Test first
- Same fabric, same layers
- Stitch type
- Dense narrow zigzag
- Ends
- Bar tack at each end
- Needle, medium
- 80/12 universal
- Cut open with
- Seam ripper and pin stop
The short version
- Fuse support across the whole placket, not just under each hole.
- Load the real button into the foot so the length is set for you.
- Keep the foot frame slid fully back, or the size will be wrong.
- Cut the centre open toward a pin, never toward your hand.
- Sew both legs and both end bars before you cut anything.
What a buttonhole is: two legs and two bar tacks
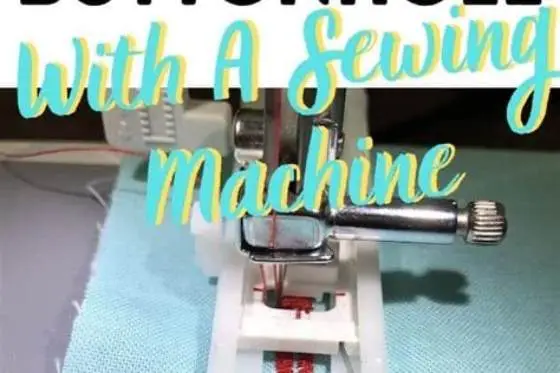
A machine buttonhole is four parts sewn in order. Two dense lines of narrow zigzag form the legs, one on each side of the slit. A wider bar of stitching crosses each end, and that bar is called a bar tack. The slit itself is cut last, after all the stitching is done.
That order matters more than it sounds. Stitching first holds the fabric firm while you cut, so the edges cannot fray away from the needle. Cut first and the hole stretches while you sew, and the legs land unevenly. Every home machine, old or new, builds the hole in that same order.
Machines differ only in how much sequencing you do yourself. A one-step machine sews all four parts in one pass and stops on its own. A four-step machine makes you turn a dial for each part and stop at your marks. Both make a sound buttonhole, and the preparation is identical.
Look at a finished shirt front and you can see the parts clearly. The legs sit close together, the bar tacks close the ends, and the button passes between them. That neat rectangle is the whole job. Everything that follows is just getting those four parts in the right place, at the right size. There is more on how to sew a button by hand in a separate guide.
| One-step | Four-step | |
|---|---|---|
| Who sets the length | The foot, from your button | You, against your marks |
| What you do | Select, lower the lever, sew | Turn the dial four times |
| Best for | Most modern home machines | Older mechanical machines |
Before you sew: interfacing, marking and button size
Fuse a light woven interfacing to the wrong side across the whole placket or waistband, not just under each hole. Brother and Singer manuals both say to interface or stabilise where buttonholes will sit. Soft fabric without support puckers under dense zigzag and the hole grows with use. Light cotton suits light fusible woven; stretch fabric wants a knit fusible that moves with it.
A flat button needs a hole a little longer than its diameter, so it can pass through at an angle. A thick button needs more room, because its thickness has to pass through too. The working rule is diameter plus thickness, and a one-step foot works that out when you load the button.
Mark each hole before you fit the foot. Use chalk or a washable marker to draw the centre line and both ends on the right side of the fabric. Check the marks against the finished garment, with the two fronts overlapped as they will sit when worn. A hole sewn in the wrong place cannot be moved, so this minute saves the garment. We go through create clean seam finishes at home step by step elsewhere on the site.
- Have ready: buttonhole foot, fresh needle and matching thread.
- Have ready: interfacing, chalk or washable marker and pins.
- Have ready: seam ripper and small sharp scissors for opening.

VANICE Buttonhole Presser Foot (R) Auto
Bullets state 'Place Your Button In The Back Of The Foot, And The Guide Will Automatically Size' and 'Designed for most low shank snap-on sewing machines'.
How to sew a buttonhole with a sewing machine, step by step
Fit the buttonhole foot with the machine switched off, as both makers advise. Pull the sliding holder at the back of the foot open, drop your button in flat, and push the holder closed until it grips. That gap is the measurement. The machine reads it from the foot and sews a hole to match, with a little ease built in.
Select the buttonhole stitch and slide the foot frame fully back. Position the fabric so the front end of your mark lines up with the marks on the foot, then lower the foot. Pass the top thread under the foot and hold its tail gently to the side. Do not push the front of the foot in as you lower it, or the size will be wrong.
Pull the buttonhole lever down behind the needle bar as far as it goes. On most machines it then rests behind a tab on the foot, and that contact tells the machine when to turn. Start sewing and let the machine feed the fabric itself. It sews one leg, the end bar tack, the return leg and the second bar tack, then stops. Some electronic models select the stitch on a screen and sense the foot without a separate lever, so follow your manual for that model. We cover how to sew a hidden zipper in its own article.
- Mark the centre line and both ends on the right side.
- Load the button into the holder at the back of the foot.
- Fit the buttonhole foot and select the buttonhole stitch.
- Slide the foot frame fully back with no gap behind it.
- Line the front mark up with the marks on the foot.
- Pull the buttonhole lever fully down behind the foot tab.
- Hold the top thread tail and start sewing.
- Let the machine finish and stop on its own.
- Raise the foot, remove the work and trim the threads.
- Push the buttonhole lever back up before normal sewing.
A neat buttonhole is sized by the button itself, not guessed from a ruler.
Four-step buttonholes: the same hole, dialled by hand
A four-step machine uses a plain buttonhole foot with a sliding gauge instead of a button holder. You set the length yourself, so your marks do the work the holder does on a one-step foot. Singer manuals describe the same preparation: interface the fabric, mark the start and the length, with the same marks guiding the length.
Work through the four dial positions in order. Sew the first bar tack with a handful of stitches. Sew one leg to your end mark next. Add the second bar tack, then the return leg. Raise the needle clear of the fabric before you turn the dial each time. Stop each leg at the mark, with the needle out, so the ends stay square.
Density can differ between the two legs on a four-step machine. A balance control, where fitted, adjusts one leg only, so match it to the other leg on a trial piece. Sew the hole twice around for a denser finish on heavy fabric, following the same marks. The second pass must land on the first, so go slowly. Keep that trial beside the machine for reference.
Opening the buttonhole: cut the centre, keep the ends
Open the hole only after the stitching is complete and the threads are trimmed. Push a pin across the inside of one bar tack, at right angles to the slit. That pin is a stop. It keeps the ripper from slicing through the end stitching, which is the one mistake you cannot undo.
Slide the seam ripper into the centre of the slit and cut toward the pin, then repeat from the other end toward the middle. Keep your free hand out of the cutting path, as Brother warns, because a ripper that slips travels fast. Small sharp scissors can trim any loose fibres left in the opening.
Keyhole buttonholes need one extra move. Punch the round end first with an eyelet punch over a protective sheet, then cut the straight part with the ripper. Push the button through the finished hole before you sew the rest. It should pass with slight resistance and sit flat without pulling the legs apart.
Work on a firm flat surface, never on your lap. A cutting mat or a folded towel under the fabric stops the ripper point reaching the table. Take the last few threads slowly. The centre should open cleanly, with no loose threads crossing the slit and no nick in either leg.
Fixes: holes that will not turn, fit or lie flat
A one-step hole that never turns the corner points to the lever. Check that the lever behind the needle bar is seated behind the foot tab. Check the foot frame was slid fully back before you started. Either one left short gives a hole that runs on or comes out the wrong size. Try the change on a trial piece, cheapest check first.
A hole that will not take the button was sized too short. Thick buttons are the usual cause, because diameter alone ignores thickness. Reload the button flat in the holder, or set the holder by diameter plus thickness if the button will not fit in it. Unpicking a finished hole is slow work, so a trial hole earns its keep here.
Puckered or wavy legs mean the fabric moved or lacked support. Add interfacing, use a fresh needle suited to the fabric, and re-thread with the presser foot up so the tension discs take the thread properly. Clean lint from around the bobbin area while you are there. If dense zigzag still distorts a trial piece, the machine wants a service, not more settings.
- Will not turn: seat the lever behind the foot tab.
- Wrong size: slide the foot frame fully back first.
- Button will not pass: size by diameter plus thickness.
- Puckered legs: add support and a fresh needle.
- Uneven legs: adjust the balance on a trial piece.
Still wondering?
Can I sew a buttonhole without a buttonhole foot?
You can sew the shape with a regular zigzag foot, working each leg and end by hand. The result is slower and less even, because nothing measures the length or guides the turn. For one repair it will do. For a shirt front, borrow or buy the right foot.
How long should a buttonhole be?
Long enough for the button to pass through at an angle, which is its diameter plus its thickness. A one-step foot sets that for you when the button sits flat in the holder. Prove the fit with the real button on a trial hole first.
Why does my buttonhole keep sewing one side?
The lever behind the needle bar is not seated behind the tab on the foot. That contact tells the machine when to turn and come back. Seat it fully, then try a trial hole before the garment.
Do I need interfacing for every buttonhole?
Yes, on any fabric that will be buttoned and unbuttoned often. Dense zigzag pulls on the fabric, and an unsupported hole stretches and frays. Light cotton suits light fusible woven across the whole placket or waistband.
What needle and thread suit buttonholes?
Use the needle you would use for the garment fabric, fresh and undamaged, with ordinary all-purpose thread. Medium cotton and linen suit an 80/12 universal needle. Change the needle first when stitches skip, before you touch any tension dial.