How to Make Bias Tape That Curves Without Puckering
To make bias tape, cut fabric strips on the true bias, join them with diagonal seams, then press the long edges to the centre. Cut twice the finished width for single fold tape, or four times the finished width for double fold tape.
On this page (9 sections)
- The short version
- What bias tape is and why the diagonal matters
- Single fold or double fold: pick before you cut
- How to make bias tape: find the bias and cut strips
- Joining strips so the seams stay flat
- Pressing single fold and double fold tape flat
- Continuous bias from one square of fabric
- Sewing the tape on and fixing common faults
- Still wondering?
Part of our guide on sewing buttonholes on a sewing machine
Key figures
- Cut angle
- 45 degrees, true bias
- Single fold cut
- Twice finished width
- Double fold cut
- Four times finished width
- Join seam
- Diagonal, pressed open
- Maker size means
- Single fold width
- Best fabric
- Light to medium woven
The short version
- Cut at 45 degrees to the grain, or the tape will not curve.
- Single fold takes twice the finished width. Double fold takes four times.
- Join strips with diagonal seams so joins stay flat and flexible.
- Press both edges to the centre, then fold in half for double fold.
- A tape maker size names the single fold width, not the cut width.
What bias tape is and why the diagonal matters
Bias tape is a narrow fabric strip cut on the diagonal and pressed with its long edges folded in. Woven fabric has two sets of threads running at right angles. One set runs along the length, the other across the width. Neither direction gives much, which is why straight grain strips stay firm.
Cut halfway between those directions and the threads can shift against each other. That shift is the point. It changes everything. A bias strip stretches a little and bends smoothly, so it follows a neckline, an armhole or a quilt corner. A straight strip on the same curve buckles and puckers instead.
Shop bought tape and home made tape work the same way. Making your own has real advantages. You match the fabric. You use up scraps. You pick the exact width. Cotton and cotton blends press crisply and suit most garments and quilts. Slippery or very stretchy fabrics fight the folds, so start with a stable woven cloth.
Test the idea on a scrap before you commit good fabric. Cut one strip each way, pin both around a curved edge, and look at the difference. The straight strip stands away in folds. The bias strip hugs the curve with no effort at all. It helps to understand elastic waistband sewing before going further.
| Bias tape | Straight grain strip | |
|---|---|---|
| Cut direction | 45 degrees to the grain | Along length or width |
| Behaviour on curves | Bends and eases smoothly | Stands away in folds |
| Best use | Necklines, armholes, binding | Straight hems and edges |
Single fold or double fold: pick before you cut
Single fold tape has both raw edges pressed to the centre. It suits hidden work. Think narrow facings. Think hem finishes that turn inside. It can also sit flat on the surface as a trim. Because only the edges fold in, the cut strip is twice the finished width.
Double fold tape starts as single fold tape, then folds in half again down the middle. That second fold wraps the edge. Completely. It shows on both sides, so it suits quilt binding, apron edges, necklines and armholes. The cut strip is four times the finished width.
One detail catches people out on double fold tape. The two halves are often pressed slightly uneven on purpose, with the back a fraction wider than the front. Put the narrower side facing you when you stitch. Your needle then catches the wider back layer without you having to check underneath. If that sounds like your situation, read up on how to bind a quilt next.
Patterns name the tape they want, so read the pattern before you choose. If it says double fold, single fold tape will leave raw edges showing. If it says single fold, double fold tape adds bulk the seam was not planned for.
| Finished width | Single fold cut | Double fold cut |
|---|---|---|
| 1/4 inch (6 mm) | 1/2 inch (13 mm) | 1 inch (25 mm) |
| 1/2 inch (13 mm) | 1 inch (25 mm) | 2 inches (51 mm) |
| 3/4 inch (19 mm) | 1 1/2 inches (38 mm) | 3 inches (76 mm) |
| 1 inch (25 mm) | 2 inches (51 mm) | 4 inches (102 mm) |
How to make bias tape: find the bias and cut strips
Press first. Flat fabric, always. Wrinkles shift the grain, and a shifted grain gives strips that twist. Lay the fabric on a cutting mat with one straight edge along a mat line. Bring a corner across so the cut edge meets the side edge. The diagonal fold you just made is the true bias.
Open the fabric and use that crease as your guide. Line a ruler along the crease and cut one clean edge. Move the ruler over by your strip width, measuring straight across from the cut edge, and cut the next strip. Keep the fabric flat on the mat. Never pull it into place, or the strips will stretch unevenly. We cover how to sew a hidden zipper in its own article.
Check the first strip. Then cut the rest. Lay it flat and measure both ends. If one end is wider, your ruler is drifting. Reset the ruler against the last cut edge each time. Measure the edge you will bind, add a little extra for joins and ends, and cut at least that length. A rotary cutter gives the cleanest edges.
Cut more length than the pattern asks for. Joins eat a little length, curves eat a little more, and ends need trimming. Extra tape stores well on a card. Running short halfway round a neckline means cutting and joining a second batch.
- Press the fabric and lay it flat on the mat.
- Fold one corner to the opposite edge to find the diagonal.
- Cut along the crease to make a true bias edge.
- Measure across from that edge and cut parallel strips.
- Check each strip width before cutting the next one.

Clover Fusible Bias Tape Maker
Gives you all five finished widths - 1/4", 3/8", 1/2", 3/4" and 1" - and presses fusible adhesive into the tape as you pull it through, so it sticks flat without extra pinning.
Bias tape only curves because the strip is cut on the diagonal, never along the straight grain.
Joining strips so the seams stay flat
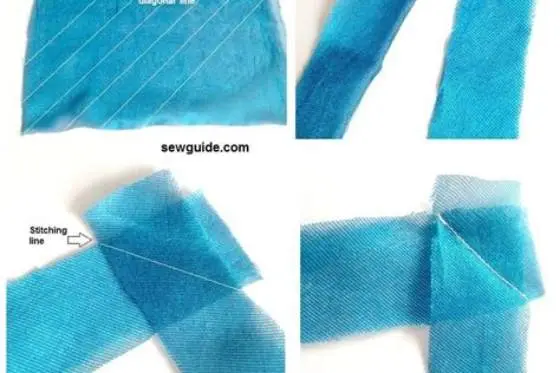
Short strips join end to end, but never with a straight seam across the tape. A straight join makes a stiff lump that shows through and refuses to bend. A diagonal join spreads the bulk along the tape. It also keeps the tape the same width from end to end.
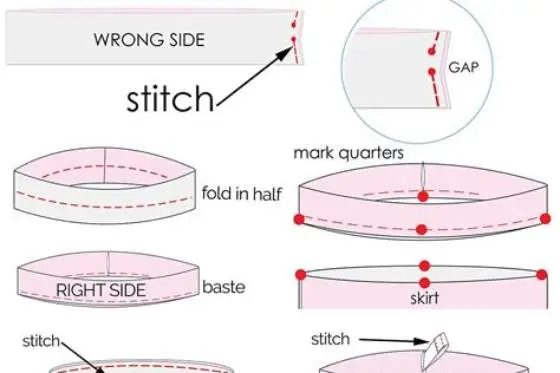
Lay two strip ends right sides together at a right angle, so they form an L shape. Sew diagonally across the overlap, from one corner to the other. Open the strips out flat and check they form one straight length. Trim the seam allowance small and press it open. The join should almost disappear when the tape is folded.
Press every join. As you go. A join pressed later, after folding, never sits as flat. Keep joins away from tight curves when you sew the tape on. Plan the length so a join lands on a straight run instead. That one habit removes most of the lumps people blame on the tape itself.
Stagger joins when you make several tapes for one project. Two joins landing at the same point on a garment make a thick spot that shows. Spacing them out keeps every part of the edge the same thickness.
Pressing single fold and double fold tape flat
Pressing makes the tape. A strip goes in. Tape comes out. Fold both long edges in to the centre and press as you go, working a short length at a time. Keep the folds even, because a wandering fold makes the finished width wander too. Steam helps cotton hold the crease. For fabric that resists a dry crease, a light spray of water or spray starch before pressing sets the fold. Let the tape cool flat before you move it.
For double fold tape, fold the pressed strip in half lengthwise and press again. The folded edges meet inside and no raw edge shows. If you want the back slightly wider, shift the fold a fraction off centre before pressing. Mark the front side with a pin so you sew it on the right way round.
A bias tape maker does the folding for you. Feed the strip through the wide end, pull it out the narrow end, and press right behind the tool as it emerges. The size printed on the maker is the finished single fold width. A maker marked 1/2 inch wants a strip cut 1 inch wide, so check the chart before you cut.
Press with the iron lifted and set down, never dragged along the strip. Dragging stretches bias fabric, and stretched tape ripples once sewn. A few seconds of heat in one spot sets the fold better than a long slide.
Continuous bias from one square of fabric
Long tape means many strips. Many strips mean many joins. Continuous bias avoids most of them. One square of fabric becomes one long strip with very few seams. Quilters use it for binding, where a long smooth length matters and joins should stay rare.
Cut the square in half diagonally and sew the two triangles together into a parallelogram. Draw lines across it spaced one strip width apart. Sew the short ends together into a tube, offset by one line so the lines form a single spiral. Cut along the spiral line and the tube opens into one long bias strip.
Choose the square size from the length you need. Longer tape or wider strips need a bigger square, so work the size out before you cut. A small test square teaches the offset faster than any diagram. If the spiral breaks into rings, the offset was wrong, and you can rejoin the ends and cut again.
Mark the lines with a ruler and a fabric marker, and double check the spacing at both ends. Lines that drift closer together give tape that narrows as you cut. Ten careful minutes of marking saves a whole strip of uneven tape.
Sewing the tape on and fixing common faults
Open one fold of double fold tape and pin it to the edge, right sides together. Stitch along the crease line. On curves, ease the tape in gently so its stretch matches the garment edge, without pulling it tight. Fold the tape over the raw edge to the back and press. Stitch from the front, close to the edge, and the wider back layer gets caught underneath.
Puckering usually means the tape was pulled tight on a curve. Unpick that section, let the tape relax, and pin again with the tape sitting naturally. A wavy edge means the tape was stretched while pressing. Press again without dragging the iron along the strip. Let the iron sit, lift, and move on.
Store tape flat. Wind it on a card. Roll it loosely. Creases pressed in during storage are hard to remove without flattening the folds you made. Label each roll with its finished width and whether it is single or double fold. Future you will thank present you when a pattern calls for tape by name.
If the tape will show, match the thread to the tape, not the garment. The stitching sits on the tape surface, so that is where it is seen. A close colour match makes small wobbles in the stitching line almost invisible.
Still wondering?
Can I make bias tape from straight grain strips?
No. Straight grain has almost no give, so it cannot follow a curved edge. Cut on the true bias, at 45 degrees to the grain, so the threads can shift and the tape can curve.
How wide do I cut strips for double fold tape?
Cut four times the finished width. For 1/2 inch finished double fold tape, cut 2 inch strips. For single fold tape of the same finished width, cut 1 inch strips instead.
What does the size on a bias tape maker mean?
It means the finished single fold width. A 1/2 inch maker produces 1/2 inch single fold tape from a 1 inch strip. Fold that tape in half again and it becomes 1/4 inch double fold tape.
Which fabric works best for home made bias tape?
Light to medium weight woven cotton presses crisply and holds its folds. Very slippery fabrics slide out of the folds, and stretchy knits distort. Match the tape fabric weight to the project fabric.
Why does my bias tape twist after pressing?
Twisting usually starts at the cutting stage, when the fabric grain was pulled out of line or the ruler drifted. Re-press the fabric flat, check the first strip at both ends, and cut without pulling the cloth.