How to Sew an Elastic Waistband That Stays Flat All Day
To sew an elastic waistband, cut non-roll elastic shorter than your waist, fold the top edge down to make a casing, stitch it leaving a gap, thread the elastic through, overlap and zigzag the ends, then close the gap and tack the elastic at the side seams.
On this page (8 sections)
- The short version
- Which elastic: width and type decide whether it rolls
- How long to cut: shorter than the waist, tested sitting
- How to sew an elastic waistband, step by step
- Separate band or sewn-on elastic: when a casing is wrong
- Stop it twisting: tack the elastic where it cannot roll
- Fixes: loose, tight, twisted and bulky waistbands
- Still wondering?
Part of our guide on how to sew a buttonhole with a sewing machine
Key figures
- Elastic width
- Wide band for adults
- Cut length
- Shorter than the waist
- Casing ease
- A little over elastic width
- Gap to leave
- Roughly 1 1/2-3 in
- End overlap
- About 1 in, more if bulky
- Needle, medium
- 80/12 universal
The short version
- Cut elastic shorter than the body, by an amount the elastic decides.
- Make the casing a little wider than the elastic, never snug.
- Overlap the ends and zigzag a box, never just knot them.
- Stitch through the casing at the side seams to stop twisting.
- Finish the top raw edge before it disappears inside the fold.
Which elastic: width and type decide whether it rolls
Waistband elastic has one job: hold the garment up without folding over inside its channel. Width does most of that work. For many adult woven skirts and trousers, a wide band is a common starting point. Wider bands resist rolling on heavier fabrics. Narrow elastic folds in half under any real weight, and very wide elastic fights a shallow casing.
Type matters as much as width. Woven elastic, sold as non-roll, keeps its full width when stretched and resists twisting in a casing. Knit elastic is softer, keeps its width when stitched through, and suits lighter garments. Braided elastic narrows as it stretches, rolls readily, and loses stretch where a needle pierces it, so keep it for narrow casings and sleeves.
Test any elastic in your hand before you buy a length. Stretch it hard and watch the edges. A band that stays flat and springs back to its first length will behave in a waistband. A band that curls into a cord while stretched will do the same inside your casing, only where you cannot reach it.
Colour matters less than construction, because a casing hides the band. White elastic can shadow through thin pale fabric, so hold the two together in daylight before you cut. When the elastic will show as a sewn-on band, match the colour to the garment. The stretch test still decides first. For the detail, see our notes on creating a hidden zipper seam.
| Type | Behaviour when stretched | Best use |
|---|---|---|
| Woven non-roll | Keeps width, resists rolling | Waistbands, heavier fabric |
| Knit | Keeps width, softer feel | Light waistbands, sew-on bands |
| Braided | Narrows, rolls, weakens if sewn | Sleeves and narrow casings |
How long to cut: shorter than the waist, tested sitting
Measure where the waistband will actually sit, not where a chart says a waist is. Skirts usually sit at the natural waist. Pyjama trousers and joggers often sit lower, on the hips. Wrap the tape snug but not tight, and write the number down before you touch the elastic.
Cut the elastic shorter than that measurement, because elastic only holds a garment up while it is under tension. How much shorter depends on the elastic: firm woven needs less taken off than soft, stretchy knit. Start with roughly 1 in (2.5 cm) of overlap for the join, and allow more if the elastic is bulky. Cutting to the full waist measurement gives a band that slides down by lunchtime.
Prove the length on your body before you sew anything. Pin the uncut elastic into a loop at your planned length and wear it where the garment will sit. Walk, sit and bend in it. A loop that digs in while sitting wants a fraction more length, and one that slips wants a fraction less. The other half of this decision is first sewing projects.
Write the final cut length on the pattern or in a notebook. Elastic varies between rolls, even from the same maker, so the next waistband may want a small change. A note saves you repeating the whole fitting process. It also helps when you replace worn elastic in a garment you love.

Dritz 1-1/2" Ribbed Non-Roll Elastic
Width 1.5 inches published; ribbed non-roll elastic stated in bullets.
How to sew an elastic waistband, step by step
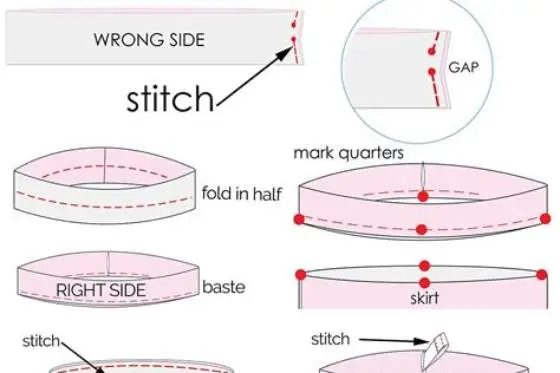
Finish the top raw edge first, with a zigzag or overcast stitch, because once it is folded inside the casing you cannot reach it. Press a small turn-under to the wrong side first. Fold the edge down again to form a channel a little deeper than the elastic, so the elastic can move without twisting. A snug channel traps the band, so leave it room to slide.
Stitch along the lower fold all the way round. Leave a gap of roughly 1 1/2-3 in (4-7.5 cm) at the back or a side seam. That gap lets you thread and later adjust the elastic. Use a straight stitch at a normal length for woven fabric. Pin a large safety pin or bodkin to one end of the elastic. Work it through the casing, pinning the trailing end to the garment.
Check the elastic lies flat all the way round, with no twist, before you join it. Overlap the ends, allowing more overlap for bulky elastic, and zigzag a box across the join, forward and back. Let the joined elastic slip inside, stitch the gap closed, and spread the gathers evenly around the waist.
- Finish the top raw edge so it cannot fray inside.
- Press a small turn-under to the wrong side.
- Fold down again to make a channel deeper than the elastic.
- Stitch the casing, leaving a gap for threading.
- Thread the elastic through with a safety pin or bodkin.
- Pin the trailing end so it cannot slip inside.
- Check the elastic is flat, with no twist, all round.
- Overlap the ends and zigzag a box across the join.
- Stitch the gap closed and spread the gathers evenly.
A waistband that rolls all day was usually cut to the waist, not shorter than it.
Separate band or sewn-on elastic: when a casing is wrong
A fold-over casing needs enough fabric at the top of the garment to fold twice. When the pattern gives you none, sew a separate band instead. Cut a strip of fabric, fold it into a channel, stitch it to the top edge, and thread the elastic through it exactly as before. The elastic does the same work; only the tunnel changes.
Sewn-on elastic skips the tunnel altogether. Pin the elastic to the wrong side of the top edge at quarter marks. Stretch it to fit between the pins and zigzag it in place. Fold it under once for a hidden finish, or leave a decorative band exposed. Quarter marks keep the gathers even, because each stretch is the same length.
Choose by fabric weight and by looks. Casings suit woven skirts, shorts and pyjamas, where a hidden band keeps the outside clean. Sewn-on bands suit knits and childrens clothes, where speed matters and the garment will be outgrown. Cut a separate band on the same grain as the garment, so both parts stretch and shrink together in the wash.
A separate band also rescues a garment cut too short at the top. The added strip restores the missing height while it forms the channel. Match the grain of the band to the garment, so both stretch and shrink together in the wash. Press the join flat before you thread anything through.
Stop it twisting: tack the elastic where it cannot roll
Twisting happens in the wash, when a loose band of elastic turns inside a roomy casing. The fix is one short line of stitching at each side seam. Stitch in the ditch of the seam, through casing and elastic together, for the width of the band. Two tacks, one at each side, and the elastic can no longer rotate.
Spread the gathers before you tack, not after. Work the fabric around the elastic with your fingers until the fullness looks even from front to back. A waistband gathered hard at the front and flat at the back was threaded unevenly, and tacking it only locks the mistake in. Even it out first, then secure it.
Try the garment on before those final tacks, using the fit you settled earlier. Sit down in it, because a waistband that feels right standing can dig in sitting. Adjust the overlap now, while the gap is still easy to reopen. Once the tacks are in, changing the length means unpicking, so this check is the cheap one.
Mark the tack positions with pins while the garment is on. Side seams are the natural anchors, because the fabric is already doubled there. A centre back tack can help on a very wide casing, though two tacks usually suffice. More tacks than that make the band hard to adjust later.
Fixes: loose, tight, twisted and bulky waistbands
A waistband that slides down was cut too long, or the elastic has lost its spring. Reopen the gap, pull the join out, and shorten the overlap a little at a time, testing the loop each time. Old elastic that stays stretched after a pull will not recover, so replace the length rather than shortening it. Replacement through an existing casing takes minutes.
A band that digs in was cut too short for that elastic. Firm woven elastic needs less taken off the waist measurement than soft knit, so the same cut length can feel very different. Lengthen the overlap if there is spare elastic in the join. If there is none, thread a fresh, longer piece through the same casing.
Bulk at the waist usually means the casing is too deep or the fabric too heavy for the elastic width. Trim the turn-under, grade the seam allowances inside the fold, and press the casing flat before you stitch it. Skipped stitches over thick folds point to the needle first. Fit a fresh one suited to the fabric, re-thread with the foot up, and clear lint. Wash finished waistbands cool and dry them away from high heat, since heat ages elastic faster than wear does.
- Slides down: shorten the overlap, or replace tired elastic.
- Digs in sitting: lengthen the loop a fraction at a time.
- Twists in wash: tack through the casing at both side seams.
- Rolls in half: use a wider band, or a firmer type.
- Bulky fold: trim the turn-under and grade the allowances.
Still wondering?
How much shorter than my waist should the elastic be?
Shorter enough to stay under tension, which depends on the elastic. Firm woven elastic needs less taken off than soft, stretchy knit. Settle the length in the cutting section above, where the loop test is explained once.
Which elastic is best for a waistband?
For many adult woven garments, a wide band is a common starting point. The first section gives the reasons. Heavier fabric or a deep casing may want a wider band still. Narrower bands suit light fabric and childrens clothes.
Why does my elastic keep twisting inside the casing?
The casing is roomy and the elastic is free to rotate, usually in the wash. Spread the gathers evenly, then stitch through the casing and elastic at each side seam. Two short tacks stop the band turning without changing how it feels.
Can I replace elastic in a finished waistband?
Yes, if the casing has a gap or you open a short length of its stitching. Pin the new elastic to the old and pull the old one out, so the new one threads itself. Overlap the ends, zigzag a box, and close the gap.
Should I sew through the elastic or use a casing?
Use a casing when the elastic should stay hidden and adjustable, as on skirts and pyjamas. Sew elastic on directly for knits and quick childrens clothes, stretching it between quarter marks. Check the elastic type first, since some kinds lose stretch where a needle pierces them.