Seams puckering as you sew: tension, needle and feed fix
Fabric puckering when sewing happens mainly because of incorrect tension, wrong needle type or size, poor fabric feed, or inadequate stabilizer use in embroidery. Measure and adjust tension settings, test needles, and check feed dogs to prevent puckers.
On this page (8 sections)
- The short version
- What causes fabric to pucker when sewing - tension, thread, needle, feed
- How to fix sewing machine puckering on woven fabric
- Why machine embroidery puckers and how stabilizer, hooping and tension stop it
- How to sew knit fabric without puckering - needle, stitch length and presser-foot pressure
- How to sew PUL fabric without puckering or perforating the laminate
- Steps to check and fix fabric puckering when sewing
- Still wondering?
Part of our guide on adjusting feed pressure
Key figures
- Typical tension range
- 3-5 upper tension
- Needle size for woven
- 80/12 EU/US
- Needle size for knit
- 75/11 ballpoint
- Feed dog pressure
- adjustable on some machines
- Stabilizer types
- cut-away, tear-away
- Presser foot pressure
- varies with fabric weight
- Stitch length range
- 2.0-3.0 mm typical
The short version
- Check upper and bobbin thread tension first; uneven tension causes puckering.
- Use the correct needle size and type for your fabric's weight and stretch.
- Lower feed dog pressure or use a walking foot for delicate or layered fabrics.
- Stabilizers and proper hooping reduce puckering in machine embroidery.
- Adjust stitch length to match fabric type; shorter stitches may cause puckers.
What causes fabric to pucker when sewing - tension, thread, needle, feed
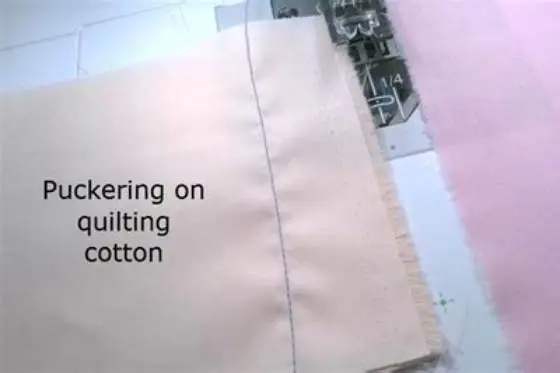
Fabric puckering often starts with uneven thread tension, where the upper or bobbin tension pulls too tight. This pulls fabric fibers together, causing ripples or gathers along the seam.
The needle choice also matters. A needle too thick or sharp for your fabric can damage fibers, causing puckering in delicate weaves or knits. A dull needle creates skipped stitches and uneven penetration, which also puckers fabric.
Feed dogs, the little teeth that pull fabric through, can cause puckering if they push unevenly or too hard. This especially affects slippery or fine fabrics. Presser foot pressure that’s too high or too low also disrupts fabric feed, leading to puckers.
Thread quality and thickness play a role too. Heavy or rough thread can pull fabric tight, while thread incompatible with fabric stretch causes uneven seams. We go through sewing pedal not working step by step elsewhere on the site.
| Cause | Effect | Depends on |
|---|---|---|
| Uneven tension | Puckered seam edges | Upper and bobbin tension settings |
| Wrong needle | Damaged fibers, skipped stitches | Needle size and type vs fabric |
| Feed dog problems | Uneven fabric feed, puckers | Fabric type and feed dog pressure |
| Improper thread | Tight or loose seams | Thread weight and fiber compatibility |

Superior Threads L-Style Towa Bobbin Tension Gauge
Lets you check and correct bobbin tension on L-style machines so seams feed evenly and puckering flattens out.
How to fix sewing machine puckering on woven fabric
Woven fabric puckers mostly from tension imbalance or using too thick a needle. Start by testing your machine on a fabric scrap identical to your project’s. Adjust upper tension gradually, usually between 3 and 5, until stitches lie flat without gathers.
Replace the needle with an 80/12 sharp or universal needle if the fabric is medium weight. For heavier woven fabrics, try a 90/14 needle. Use a new, sharp needle every project to avoid fiber damage.
Presser foot pressure should be moderate. Too much pressure stretches the fabric before sewing, causing puckers when released. Lower the pressure if your machine allows it or use a walking foot to stabilize thick or multiple layers. The other half of this decision is troubleshooting skipped stitches quickly.
Check stitch length. Wovens usually sew well at 2.5 mm. Shorter stitches can crowd fabric and cause folds. Longer stitches help keep seams smooth but reduce seam strength if too long.
- Test on scrap fabric first
- Adjust upper tension slowly
- Use fresh 80/12 or 90/14 needle
- Lower presser foot pressure
- Set stitch length to 2.5 mm
Why machine embroidery puckers and how stabilizer, hooping and tension stop it
Machine embroidery puckering happens when fabric moves or stretches during stitching. The dense stitch patterns pull the fabric fibers inward, causing ripples or gathers around the design edges.
Using the right stabilizer is key. Cut-away stabilizers support delicate or stretchy fabrics best by holding fibers stable through stitching and after removal. Tear-away stabilizers suit sturdy fabrics that don’t distort easily. The other half of this decision is sewing machine not feeding fabric.
Proper hooping stretches fabric evenly without warping it. A loose or uneven hoop causes movement under the needle, inviting puckering. Check that fabric is taut but not stretched beyond its limits in the hoop.
Embroidery tension settings differ from regular sewing. Adjust upper thread tension lower than normal if puckering appears. Use embroidery needles sized for your fabric weight and thread type to avoid piercing damage.
- 1. Choose stabilizer type based on fabric and design density.
- 2. Hoop fabric tautly without overstretching.
- 3. Use embroidery needles sized for fabric weight.
- 4. Lower upper tension setting incrementally, testing after each adjustment.
- 5. Monitor for puckering and adjust hoop or stabilizer type if needed.
Fabric puckering is fixed by measuring tension, choosing the right needle, and adjusting feed—not just guessing or blaming your machine.
How to sew knit fabric without puckering - needle, stitch length and presser-foot pressure
Knit fabric puckering arises when the needle or stitch length doesn’t accommodate stretch. Use a ballpoint needle sized 75/11 to part fibers instead of piercing them, preventing runs and puckers. We go through resetting machine timing step by step elsewhere on the site.
Stitch length should be slightly longer than for woven fabric, around 2.8–3.5 mm, to allow fabric to stretch without stitches bunching. Short stitches lock fabric tightly and cause puckers or runs.
Presser foot pressure needs lowering to prevent stretching or compressing the knit fabric as you sew. Some machines offer adjustable pressure; otherwise, use a lightweight or stretch presser foot.
A walking foot or roller foot helps feed knit fabric smoothly and keeps layers aligned without puckering, especially on heavy or multiple layers.
- Use 75/11 ballpoint needle
- Set stitch length 2.8–3.5 mm
- Lower presser foot pressure
- Try a walking or roller foot
How to sew PUL fabric without puckering or perforating the laminate
Polyurethane laminate (PUL) fabric puckers when the laminate layer is perforated by the needle or stretched unevenly. Use a 70/10 or 75/11 microtex or sharp needle to make clean, small holes that minimize laminate damage.
Reduce presser foot pressure to avoid pushing or stretching the laminate. A Teflon foot or non-stick presser foot slides better over the laminate than a standard foot, preventing drag and puckers.
Set stitch length longer than usual: 3.0 to 3.5 mm stitches help reduce hole density and puckering. Avoid backstitching directly on the laminate; instead, tie off threads or sew near edges.
Use a stabilizer or tissue paper underneath to prevent fabric shifting and laminate stretching while sewing. Remove stabilizer carefully after stitching to keep seams smooth.
- Use 70/10 or 75/11 sharp or microtex needle
- Lower presser foot pressure
- Use Teflon or non-stick foot
- Set stitch length 3.0–3.5 mm
- Use stabilizer or tissue under fabric
Steps to check and fix fabric puckering when sewing
Follow these steps systematically to diagnose and fix puckering before calling a repair shop. Each test eliminates common causes one by one and helps pinpoint the fix.
Start with a new needle suitable for your fabric type and weight. Then re-thread the machine with the presser foot up to ensure smooth thread flow and set upper tension between 3 and 5 as a baseline.
Test sew on scrap fabric matching your project. Observe if puckering appears and where. Adjust tension gradually if puckers form at the seam edges, or try changing stitch length for better fabric accommodation.
Check feed dogs and clean lint from the machine’s feed area. Adjust presser foot pressure if your machine allows it, reducing it for delicate fabrics.
For embroidery, hoop fabric properly with the right stabilizer and reduce upper tension below normal sewing settings until puckering stops.
- 1. Insert a fresh needle matching fabric type and weight.
- 2. Re-thread machine with presser foot raised.
- 3. Set upper thread tension to 3-5 as starting point.
- 4. Sew test seam on fabric scrap; observe puckering.
- 5. Adjust tension or stitch length to reduce puckers.
- 6. Inspect and clean feed dogs; adjust presser foot pressure.
- 7. For embroidery, check hoop tightness and stabilizer type.
Still wondering?
Can old or dull needles cause fabric puckering?
Yes. A dull or bent needle damages fabric fibers or causes skipped stitches, leading to puckering. Replace needles regularly to maintain smooth stitching.
How does thread weight affect puckering?
Heavier thread adds bulk and tension, increasing puckering risk, especially on lightweight fabrics. Use thread weights that match fabric thickness for even seams.
Does presser foot type influence puckering?
Definitely. Specialty feet like walking or roller feet help feed tricky fabrics evenly, reducing puckers caused by uneven feeding or fabric drag.
Why does puckering worsen with multiple layers?
Multiple layers shift differently under the presser foot. Uneven feeding or pressure causes layers to gather, creating puckers. Use stabilizers and appropriate presser feet to manage this.
Can stitch length prevent puckering?
Yes, stitch length affects fabric tension. Too short stitches bunch fabric; longer stitches reduce tension and help keep seams flat.