Sewing machine timing off: hook misses loop and how to reset it
Your sewing machine timing is off when the hook tip misses the thread loop behind the needle, so stitches skip or nest. Reset it only after you fit a new 80/12 needle, re-thread with the presser foot up and confirm the hook-needle gap of about 0.04 in (1 mm) is wrong. Then realign the hook to meet the needle scarf.
On this page (8 sections)
- The short version
- Sewing machine timing off: how to tell it's really timing
- Safety prep: power, needle and handwheel position before you look
- Check: where the hook should meet the needle and the gap to see
- Adjust: how to reset hook timing and re-test stitch formation
- When not to force it: bent shafts, burrs and shop-only jobs
- Prevention: what throws timing and how to keep it steady
- Still wondering?
Part of our guide on stitches skipping on machine
Key figures
- Timing gap
- ~0.04 in (1 mm) hook to needle
- Needle test size
- 80/12 universal, new
- Handwheel turn
- Toward you only, by hand
- Stitch test
- Straight stitch, length 2.5 mm
- Stop sign
- Wobble, burr, or bent bar
The short version
- Fit a new 80/12 universal needle and re-thread with foot up first; real timing slip skips on every fabric.
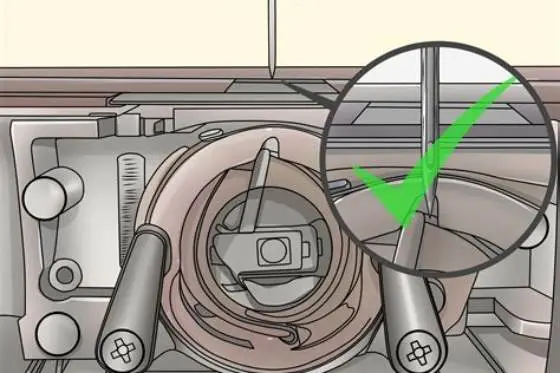
- Check hook meets needle scarf just above eye, with ~0.04 in (1 mm) gap.
- Turn handwheel toward you by hand only; never run motor with throat plate off.
- If shaft wobbles, hook has burrs or needle bar is bent, stop and book service.
Sewing machine timing off: how to tell it's really timing
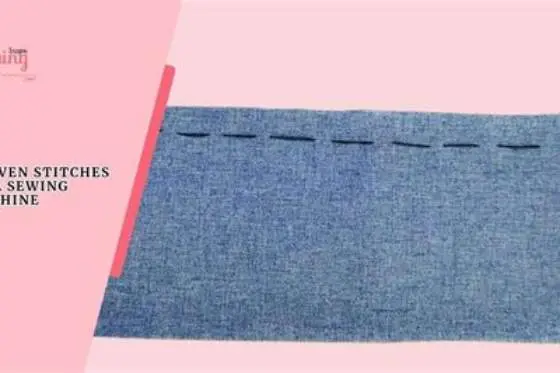
Sewing machine timing off means the hook tip arrives too early or too late to catch the loop that forms behind the needle. You see perfectly skipped stitches, a straight line with holes but no thread, or sudden nests under the fabric. Timing slip feels consistent across fabric and thread, not random. That consistency matters. A bent needle or wrong tension skips in patches, while timing misses on every few stitches no matter what you sew.
You can sort it without tools. Fit a new 80/12 needle, right system for your machine, with the flat side as your manual shows. Re-thread top and bobbin with the presser foot up, so the tension discs open and the take-up lever seats the thread. Sew a straight stitch at 2.5 mm on plain cotton with 50 wt thread. If skips stay regular after that, timing is suspect.
Listen and look next. A light tick as the hook tip kisses the needle, or a needle that hits the throat plate, points away from pure timing. True timing slip often sews but drops stitches, while a burr or bent needle shreds thread or snaps it. Your next step is a visual hook-needle check, not a tension tweak. That check tells you if the hook meets the scarf at the right height.
| Cause | What skips look like | Quick check | First fix |
|---|---|---|---|
| Timing slip | Regular skips, holes with no thread | Hook misses loop at scarf on hand turn | Reset hook timing |
| Bent or dull needle | Random skips, pulled fabric | Needle wobbles when rolled on glass | New 80/12 needle, correct system |
| Wrong needle system | No pickup at all, needle hits plate | Needle too long or short in clamp | Fit manual-specified system |
| Tension or threading | Nests underneath, loops on top | Re-thread with foot up, test 2.5 mm | Clean lint, reset tension |
Safety prep: power, needle and handwheel position before you look
Unplug the machine or switch it off and keep your foot off the pedal. You will turn the handwheel by hand with the throat plate off, and a powered motor can grab fingers or bend the needle. Remove thread, fabric and the bobbin case so you see the hook assembly clearly. Keep small screws in a dish. Good light helps more than force. For the detail, see our notes on adjusting needle issues.
Fit a new 80/12 needle fully up into the clamp and tighten it. The needle's scarf, the small cutout just above the eye, must face the hook. On most home machines the scarf faces the bobbin side. Check your manual for the flat orientation. A needle set low or twisted throws the whole check off.
Turn the handwheel toward you, never away, as you would to sew. The hook tip should sweep past the needle from the same direction each time. Stop with the needle at its lowest point, then raise it slowly until the hook tip lines up behind the needle. You will use that window to judge height and gap. If the site's Sewing Machine Doctor is handy, open it here and click the bobbin area to follow the same view in 3D.

Buspoll Mini ultrashort flat head and Phillips small screwdriver set, sewing
Gets into the tight hook area to loosen and re-tighten the timing screws with flat and Phillips stubby drivers so you can reset timing and re-test stitches.
Check: where the hook should meet the needle and the gap to see
With the throat plate off, turn toward you until the needle is all the way down, then up again. Watch the hook tip approach the back of the needle. At the meeting point the tip should be just above the eye, centered on the scarf. If the tip passes below the eye or well above the scarf, height is off. If it passes beside the scarf without entering, rotation is off. If that sounds like your situation, read up on safe jam clearance steps next.
Gap matters as much as height. You want a whisker of clearance, about 0.04 in (1 mm), between the back of the needle scarf and the hook tip. No gap lets the tip strike and dull; too much gap lets the loop slip past. Use a magnifier and a white card behind the hook to see it. Nudge the needle gently, it should not flex into the hook.
Note what you see before you loosen anything. Does the hook meet the needle every turn or wobble? Does the needle bar move up and down without side play? A steady miss at the same height points to timing. A wobble, a scrape mark on the hook, or a needle bar that rocks side to side points to a bent shaft or burr. That changes the fix. Write it down.
A hook that misses by a hair leaves perfect holes with no thread, and no tension dial will fix it.
Adjust: how to reset hook timing and re-test stitch formation
Most home rotary-hook machines set timing with two or three set screws on the hook drive gear or lower shaft. Your manual shows their location under the bobbin area, often near the base. You loosen just enough to let the hook turn on its shaft while the needle stays still. You do not remove screws. Patience beats muscle here. If that sounds like your situation, read up on which machines need oil next.
Work in tiny moves. Loosen the screws a quarter turn, hold the needle at the timing position, then rotate the hook until its tip sits centered on the scarf just above the eye with that 0.04 in (1 mm) gap. Snug one screw, recheck height and gap, then snug the rest evenly. Turn the handwheel through two full cycles by hand and watch the tip pass cleanly without kissing the needle.
Test before you close up. Replace the throat plate, bobbin case and bobbin, thread with 50 wt thread and sew straight at 2.5 mm on two layers of plain cotton, about 6 in (15 cm). You want every stitch formed, no skips, no ticking. Then zigzag at width 3 mm and see if the hook still catches on both swings. If it skips only on zigzag, the hook is still a touch late.
- Unplug machine, remove needle plate, bobbin case and bobbin; fit new 80/12 needle fully up.
- Turn handwheel toward you to lowest needle, then raise until hook tip aligns with scarf.
- Loosen hook gear set screws just enough to rotate hook by hand.
- Set hook tip centered on scarf just above eye, gap ~0.04 in (1 mm), no contact.
- Snug one screw, hand-turn two cycles to verify clearance, then tighten remaining screws evenly.
- Reassemble, thread with foot up, sew straight 2.5 mm then zigzag 3 mm on cotton and inspect.
When not to force it: bent shafts, burrs and shop-only jobs
Stop if you see a bent needle bar, a hook with a burr, or a lower shaft that wobbles. A needle bar that leaves a crescent mark on the throat plate or a hook tip with a shiny nick will shred thread no matter how you time it. Burrs need polishing or a new hook assembly, and a bent shaft needs pressing straight on a jig. Both are shop work.
Industrial or high-speed machines, and many embroidery units with dual drives, set timing with marks and gauges that you should not guess. If your manual lists a timing mark, a gauge height, or a service code, follow it or let a tech use it. Forcing screws on those can strip gears or throw feed timing that you cannot reset at home.
Use cost as your guide. If the machine hit a pin or sewed over a thick seam and now the handwheel binds, the needle hits metal, or the hook will not hold gap, book service. Tell the shop what you saw: gap size, where the tip meets the scarf, and whether the miss is constant. A clear note saves an hour on the bench.
- Bent shaft: handwheel feels tight in one spot, needle bar rocks side to side.
- Burr: thread frays at same point, hook tip shows bright nick under magnifier.
- Industrial timing: manual shows gauge or mark - needs that gauge to set correctly.
- DIY reset: quick when gap and height are only issue
- no parts needed beyond new needle
- won't fix bent bar or burred hook
- risk of stripping set screws if over-tightened
Prevention: what throws timing and how to keep it steady
Timing slips after shock, not wear. Hitting a pin, sewing over a bulky seam with the wrong 90/14 or 100/16 needle, or pulling fabric from behind bends the needle and jars the hook gear. Even a single hard jam can rotate the hook a fraction. Sew heavy layers with the right needle and let the feed dogs move the work. Guide, don't pull.
Keep the hook area clean and lightly oiled as your manual says. Lint packs under the bobbin case and adds drag, so the hook hesitates and misses the loop. Brush lint out after every large project, change the needle every 6-8 hours of sewing, and use the correct bobbin for your model. A bobbin that sits high changes the loop shape.
My rule of thumb: new needle, re-thread with foot up, clean lint, then check timing. I would reset timing myself on a simple home rotary-hook machine with clear set screws and a manual diagram. I would not open an industrial or a computer-controlled embroidery machine beyond the throat plate. If you sew leather or denim often, keep a leather needle and a jeans needle on hand and match them to the job. Your hook will thank you.
- fewer skipped stitches
- less hook and needle wear
- needs regular needle changes
- still not a fix for a hard crash
Still wondering?
Can thread tension look like timing off?
Yes, but tension nests and loops rather than leaving clean holes. Re-thread with the presser foot up and sew straight at 2.5 mm on cotton. If loops vanish but regular skips stay, check hook-needle timing.
What needle should I use to test timing?
Use a new 80/12 universal, correct system for your machine, fully seated. A bent, dull or wrong-system needle mimics timing slip and makes the gap check meaningless.
How close should the hook be to the needle?
About 0.04 in (1 mm) between hook tip and needle scarf, just above the eye. No contact, but close enough to catch the loop. Check with a magnifier on two handwheel turns.
My machine still skips on zigzag after a timing reset, why?
The hook may be slightly late. Zigzag swings the needle side to side, so a late hook catches the center but misses the outer swing. Nudge hook a fraction earlier and re-test both straight and zigzag.
When should I call a shop instead of resetting at home?
If the needle bar wobbles, the hook has a burr, the shaft binds, or your manual calls for a gauge or mark. Those need parts or jigs you won't have at home.