Pattern envelope, symbols and sizes: how to cut the right pieces
Match your body measurements to the pattern's size chart, then follow the envelope's fabric and layout guide and cut on the correct size line, grainline and notches. Pattern sizes run 1-2 sizes smaller than ready-to-wear, so you choose by inches, not store size.
On this page (8 sections)
- The short version
- Start Here: how to read a sewing pattern before you unfold the tissue
- Envelope Front and Back: what the photos, views and fine print tell you
- Symbols on the Tissue: notches, grainlines and marks that guide your stitching
- Sizing: why pattern sizes run small and how to pick yours
- Fabric and Yardage: how to read requirements, layout and cutting instructions
- Cutting Plan: the check-before-you-cut sequence that saves fabric
- Still wondering?
Part of our guide on threading and winding for beginners
Key figures
- Seam allowance
- often 5/8 in (1.5 cm)
- Pattern vs store size
- 1-2 sizes smaller
- Measure over
- undergarments only
- Grainline rule
- parallel to selvage
- Notch cut
- outward, 1/8 in (3 mm)
- Fabric widths
- 45 in (115 cm) or 60 in (150 cm)
The short version
- Choose pattern size by body inches on the chart, not your store size, and size to your largest key measurement.
- Cut on the line for your size, keep grainline parallel to the selvage, and clip notches outward.
- Use the envelope layout for your width and view to save fabric and keep nap or print right.
- Check seam allowance on the tissue before you cut, it is not always 5/8 inch.
Start Here: how to read a sewing pattern before you unfold the tissue
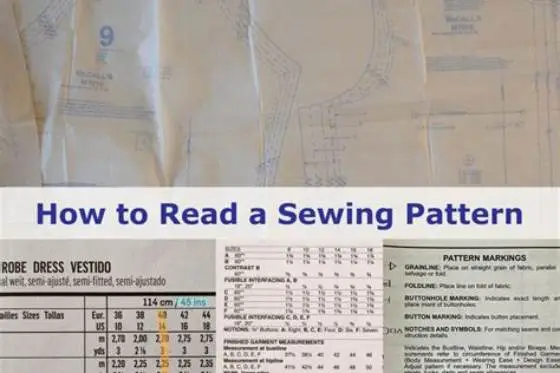
You can learn how to read a sewing pattern in one pass if you start at the envelope and work inward. The envelope tells you the views, sizes, fabric and yardage. The guide sheet inside explains the layout and order. The tissue holds the pieces, lines and symbols you will actually cut and sew.
Think of the three parts as a set. The front of the envelope shows the finished garments, usually called views A, B, C, with fabric suggestions. The back lists measurements, yardage by width, notions and finished garment measurements. The tissue gives you multi-size cutting lines and the grainline that sets the drape.
Before you cut, you will make three checks. You will pick a size by inches, you will confirm the fabric and width you have matches the yardage table, and you will find the layout for your view and size. That sequence stops the most common error, cutting a store size and running short on fabric.
Envelope Front and Back: what the photos, views and fine print tell you
The front shows the promise and the limits. You will see model photos or line drawings for each view, plus a suggested fabric list such as quilting cotton, linen or ponte. That list matters because drape and stretch change fit. A pattern cut for woven fabric will not fit the same in knit, even in the same size. We go through sewing machine needle sizes explained step by step elsewhere on the site.
Turn it over and you get the working data. Look for the size range on the header, for example 6-14 or 16-22, and the body measurement chart in inches with cm in brackets. You will also see yardage by 45 in (115 cm) and 60 in (150 cm) widths, plus lining, interfacing and notions like 7 in (18 cm) zipper or four 5/8 in (15 mm) buttons.
You will also see finished garment measurements. Those numbers include ease, which is extra room for movement. If your bust measures 36 in (91 cm) and the finished bust is 39 in (99 cm), you have 3 in (7.5 cm) of ease. Compare that ease across views to judge how close or relaxed the fit will be.
- Views: each letter is a different length, sleeve or detail. Pick one and follow only its yardage column.
- Fabric suggestions: fibre and weight hint at drape. Hold your fabric on grain and see how it falls.
- Notions: buy the exact length and type listed. A different zipper length changes the opening.

GDMINLO Soft Tape Measure Double Scale Body Sewing Flexible Tailor Craft
Lets you take accurate bust, waist and hip inches to pick the right pattern size with its 60-inch/150-cm non-stretch tape.
Symbols on the Tissue: notches, grainlines and marks that guide your stitching
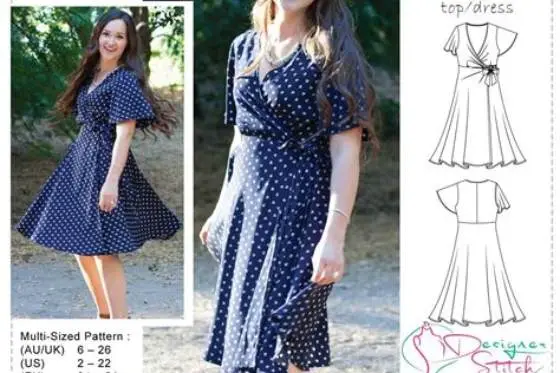
The tissue looks busy until you learn the handful of marks that repeat. You will cut on a solid outer line for your size, match triangular notches along seams, keep the long grainline arrow straight, and sew to dots, circles and button marks. Every mark has a job during cutting or sewing, not just on paper. It helps to understand best wrap dress sewing pattern before going further.
Notches are the small triangles or slits along the edge. A single notch may mark the front, a double notch the back, so you do not sew two backs together. Clip them outward about 1/8 in (3 mm) so you do not weaken the seam allowance. Grainline is the long arrow with bars at each end. It must stay parallel to the selvage, the finished edge of the fabric, or the garment will twist on your body.
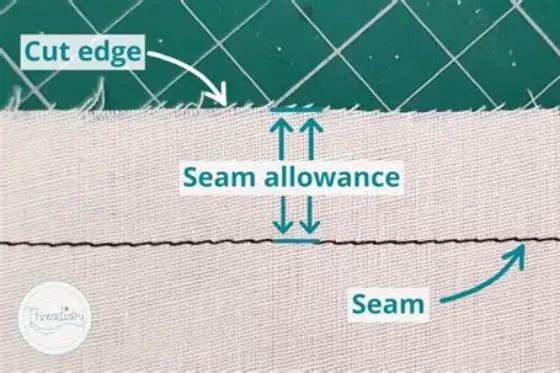
You will see more helpers. Small circles and dots show where to stop, pivot or place a dart point. A big circle with a line through it marks a button or buttonhole. A fold line tells you to place that edge right on the fold, not cut it twice. Seam allowance is often 5/8 in (1.5 cm) but some indie patterns use 1/2 in (1.2 cm) or 1 cm, so check the guide sheet.
- Notches: match them, do not trim them off. They align seams and ease.
- Grainline: pin at both ends, measure to selvage, adjust until equal.
- Darts and pleats: dashed lines are fold lines, dots are points.
- Lengthen/shorten lines: double lines where you add or remove length without shifting notches.
Those little triangles and arrows on the tissue are how your side seam finds its match without twisting.
Sizing: why pattern sizes run small and how to pick yours
Pattern sizes do not match ready-to-wear. A store size 10 often measures like a pattern 12 or 14, because pattern blocks use older sizing and include less vanity easing. That is normal and it is not about your body. You pick by body inches on the chart, not the number you buy in shops. The other half of this decision is sewing straight allowances every time.
Measure over the undergarments you will wear with the garment. Bust at the fullest point, waist at the natural waist, hip at the fullest point, usually 7-9 in (18-23 cm) below waist. Hold the tape measure level and snug but not tight. Write down all three. For tops choose by high bust or full bust per the company's note, for bottoms choose by hip.
If your numbers span two sizes, choose by the area that matters most for that garment. For a fitted bodice, fit the bust and shoulders. For trousers, fit the hip and seat. My rule of thumb is simple: size to your largest key measurement, then take in the smaller areas. I would rather do a small tuck at the waist than fight a tight hip.
You can blend sizes. Cut the shoulder and bust in one size and grade to another at the waist and hip, following the size lines where they nest. That keeps the neckline and armhole right while giving room where you need it. Make a quick tissue check by measuring the pattern piece minus seam allowance and comparing to your body plus ease.
| Your body inches | Pattern size (Big 4) | Typical store size | What to do |
|---|---|---|---|
| Bust 34 in (86 cm) | 12 | 8 | Cut 12, check ease |
| Bust 36 in (91 cm) | 14 | 10 | Cut 14, blend if waist is smaller |
| Hip 42 in (107 cm) | 16 | 12 | For pants, cut 16 at hip |
- sizing by inches - matches tissue, fewer fitting surprises
- blend sizes - keeps shoulders right, adds room at hip
- store size - often 1-2 sizes off, garment pulls
- grading freehand - can distort notch alignment if rushed
Fabric and Yardage: how to read requirements, layout and cutting instructions
The yardage table is keyed to fabric width and view. Find your view letter, then your size, then the column for 45 in (115 cm) or 60 in (150 cm) wide fabric. If your fabric is 44 in (112 cm) wide or has a nap like velvet or a one-way print, use the "with nap" column, which usually asks for 1/4 to 1/2 yd (0.2 to 0.5 m) extra. That extra keeps the pile or print running the same way.
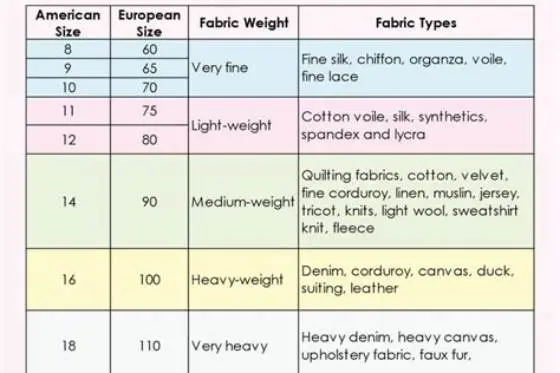
Check fibre and stretch. The envelope may say "moderate stretch knit, 30-40% cross-grain" or "lightweight wovens only." If it calls for knit, your woven will not have the needed give at the bust or hip. If it calls for woven, a knit will hang differently and the facings may ripple. Match the weight too. A heavy twill on a blouse pattern adds bulk at seams and changes ease.
Layout diagrams show you how to fold the fabric and place each piece. Some use lengthwise fold, selvage to selvage, some use crosswise or double fold. Pieces marked "cut on fold" sit right on the fold, no seam there. Pieces marked "cut 2" need two mirrored cuts, so flip one for a left and right. Keep the grainline arrow parallel to the selvage as you pin, and slide pieces until the layout fits without crowding.
- Width first: buy for your actual fabric width, not the width you wish it was.
- Nap and print: all pieces face one way, you cannot nest head-to-toe to save fabric.
- Interfacing and lining: listed separately, often 45 in (115 cm) wide, check yardage there too.
Cutting Plan: the check-before-you-cut sequence that saves fabric
A short sequence stops most cutting mistakes. You will confirm size lines, press and straighten fabric, lay out by the diagram, then cut. Do not skip pressing. Wrinkles and a crooked grain throw off the grainline and you will see the twist after you sew. A press with steam and a gentle pull on the bias helps the grain relax.
Work on a flat surface big enough to keep the fabric flat. If you use a rotary cutter, keep the blade fresh and cut on a mat. If you use shears, keep the fabric on the table and slide the lower blade under. Either way, cut notches outward, clip to the tip but not past. Mark darts and circles with chalk or a washable marker on the wrong side.
Once cut, keep pieces pinned to their tissue until you sew. That keeps size and grain notes with the piece and stops you mixing front and back. Transfer any marks you need on the seam line, like the dart point or pocket placement, before you unpin. A quick check now saves unpicking later.
- Measure and circle your size on the chart, then highlight that cutting line on every piece you need for your view.
- Pre-wash and press your fabric as you will wash the finished garment, then fold it exactly as the layout shows.
- Place the largest pieces first, set each grainline parallel to the selvage and measure both ends to confirm.
- Pin or weight pieces, double-check "cut on fold" and "cut 2" notes, then cut smoothly and clip notches outward.
- Mark darts, dots and button positions on the wrong side before you lift the tissue.
Still wondering?
Do I cut the tissue on my size line or leave it whole?
Cut it on your size line if you are sure of your choice. If you may need another size later, trace the line onto paper or Swedish tracing film and keep the original intact.
What if my bust and hip are different pattern sizes?
Choose the size for the area that controls fit, then blend to the second size between bust and hip. Follow the nested lines and keep notches aligned so seams still match.
How do I know the seam allowance on my pattern?
Read the guide sheet header. Most printed patterns state it once, such as 5/8 in (1.5 cm) unless noted. Some mark it on each piece. Do not assume, check before you set your seam guide.
Can I use a 60-inch layout on 45-inch fabric?
Not without changing the layout. Narrow fabric needs more length and a different placement. Use the column for your actual width or you will run short.
Why does my pattern say with nap and without nap?
With nap means fabric with pile or directional print, like velvet or large florals, where all pieces must face one way. Without nap you can place pieces head-to-toe to save yardage.