How to attach walking foot to Janome machine: step-by-step guide
First identify your Janome's shank: most home models are low-shank and take a low-shank walking foot. Remove the current foot, snap or screw the walking foot onto the shank, rest its folding lever above the needle clamp, and confirm both feed sets move evenly.
On this page (8 sections)
- The short version
- How to attach a walking foot to a Janome machine, step by step
- Is my Janome low-shank or high-shank?
- Removing the current presser foot and ankle safely
- Fitting the walking foot and routing the lever over the needle clamp
- Threading through the walking foot's own guide slots
- Test on a two-layer sandwich and confirm even feed
- Still wondering?
Part of our guide on upholstery sewing machine
Key figures
- Most Janome home models
- low-shank
- Shank gap on low-shank
- about 0.5 inch (1.3 cm)
- Snap-on removal
- press the small release lever
- Feed lever position
- above the needle clamp
- Test fabric
- two layers, medium weight
- Needle for the test
- 80/12 universal
The short version
- Check low-shank vs high-shank before buying or attaching any walking foot.
- Snap-on Janome ankles release with a small lever; screw-on ankles need the screw fully loosened.
- The walking foot's folding lever must ride above the needle clamp, driven by the needle bar.
- Thread through the walking foot's own guide slots as well as the machine's normal path.
- Keep the feed dogs up: the walking foot needs both sets to grip and advance the fabric.
- Use the walking foot for quilting, plaids, vinyl and slippery fabric; a regular foot is fine for plain seams.
How to attach a walking foot to a Janome machine, step by step
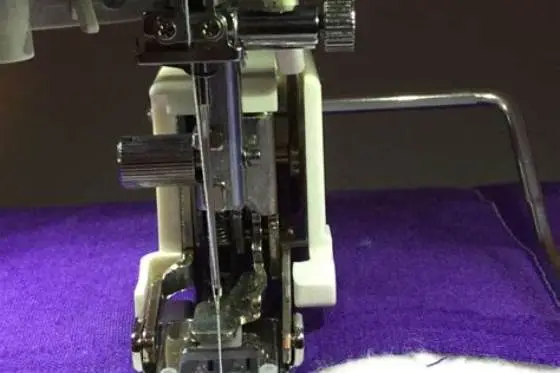
Attaching a walking foot to a Janome takes about two minutes once you know your shank type. Identify the shank first. Remove the existing foot safely. Attach the walking foot, route its feed lever, then test on a scrap sandwich before you touch your real project.
In practice, Most Janome home models are low-shank; check your manual or measure to confirm.. A smaller number, including some of the heavier domestic machines, are high-shank. Janome publishes shank information in each machine's manual. If the manual is long gone, the measurement in the next section settles it in seconds.
The walking foot matters here more than most feet because it is a powered attachment. It has its own set of feed dogs, driven by the needle bar through that folding lever. If the lever is not positioned correctly, the foot feeds like an ordinary one. You lose the even gripping that makes plaids match and quilt layers stay put.
Some machines have a built-in dual-feed system. Confirm the detail for your model to see if yours does. Confirm the detail for your model for whether your model has it. If it does, you'll use that instead of a clip-on walking foot. It helps to understand sewing stretchy knit edges before going further.
- Identify the shank type (low or high).
- Remove the current presser foot and ankle safely.
- Attach the walking foot to the shank.
- Seat the foot fully on the shank.
- Thread through the foot's guide slots and test.
Is my Janome low-shank or high-shank?
The shank is the metal bar above the needle plate that presser feet clip or screw onto. Raise the needle to its highest position and remove the presser foot. Measure from the bottom of the shank to the surface of the needle plate. Roughly 0.5 in (1.3 cm) from shank bottom to needle plate means low-shank. A much taller gap means high-shank.
Low-shank Janome models use either a snap-on ankle with a rear release lever or a screw-on ankle. Both take the same low-shank feet. The snap-on ankle is a short spring-loaded holder. The screw-on ankle is held by a slotted screw. The difference is only how the foot or ankle is fixed on.
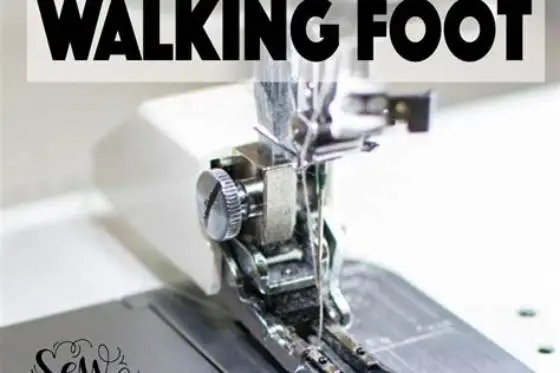
A snap-on walking foot looks like a black or silver foot with a tall arm and a metal lever folded back along the arm. The base has a grooved slot that clicks onto the ankle. A screw-on walking foot has a round or oval shank clamp with a hole for the screw instead of a snap groove. Check the packaging or product listing to confirm which type you have. The other half of this decision is lockstitch machine for 6 oz canvas.
If your machine is high-shank, a standard walking foot will not reach the needle plate. Buy one specifically labelled high-shank. Janome's official website and your manual list shank height per model.
| Shank type | Gap to needle plate | Attachment style | Foot needed |
|---|---|---|---|
| Low-shank | About 0.5 in (1.3 cm) | Snap-on or screw-on ankle | Low-shank walking foot |
| High-shank | About 1 in (2.5 cm) | Screw-on ankle | High-shank walking foot |

YMXFAWO Walking Foot Kit for Brother
Fits your Janome's low-shank mount directly and claims tool-free installation, so you can attach it in seconds and start feeding quilting layers evenly.
Removing the current presser foot and ankle safely
Raise the needle to its highest position and lift the presser foot lever before you touch anything else. This clears the fabric area. On machines with a needle-up function, it keeps the thread path open. Always raise the needle fully first; a lowered needle can bend against the foot as you change it.
If your Janome uses a snap-on ankle, look for the small release lever at the back of the ankle. Press it and the current foot drops free. The ankle itself stays on the shank for ordinary feet. Most walking feet replace the ankle entirely: they mount straight onto the shank in place of it. Some generic walking feet are designed to fit over a small snap-on ankle instead, so check the packaging before removing anything. For the detail, see our notes on feeding thick seams without shifting.
For a screw-on ankle, hold the shank firmly and turn the clamping screw anti-clockwise until it is completely loose. The screw is short and slotted. Keep it in a saucer, because it rolls. Once the screw is free, the ankle and foot slide off the shank together.
If the screw is missing or the threads are stripped, you'll need a replacement ankle screw before you can mount the walking foot. Janome dealers sell these as spare parts. Use the screw that came with your machine or foot, as the manual describes. Take your machine model number to a Janome dealer, or photograph the ankle and screw to match a replacement.
- Raise the needle fully and lift the presser foot lever.
- Snap-on: press the rear release lever and let the foot drop; remove the ankle if your walking foot mounts direct.
- Screw-on: loosen the clamping screw fully and slide the ankle and foot off the shank.
- Set the screw or ankle somewhere it cannot roll away.
The step every other guide skips — seating the feed lever on the needle clamp — is the one that decides whether your walking foot actually walks.
Fitting the walking foot and routing the lever over the needle clamp
Hold the walking foot so its arm faces up and back, with the folding metal lever raised. Lower it onto the shank where the ankle sat. Align the fork at the top with the needle clamp screw. For a screw-on mount, slide the shank clamp screw through the hole. Tighten it firmly by hand: walking feet are heavier than normal feet, so a loose mount will wobble and click.
Lower the presser foot lever and check the folding lever position. The lever must rest on top of the needle clamp screw. As the needle bar moves up and down, that clamp pushes the lever, which drives the foot's own upper feed dogs. If the lever sits beside the clamp or under it, the walking foot will not walk.
Walk the handwheel slowly through one full stitch cycle with the thread out and the fabric out. Watch the lever rock. The lever should rock smoothly as the needle bar moves; it must not stay still. This ten-second check tells you the foot is mechanically engaged before you waste a test sandwich on a foot that was never connected.
When you raise the presser foot lever again to thread the machine, the walking foot lever will lift along with the whole foot assembly. After threading, lower the foot again and confirm the lever has settled back on top of the needle clamp. This second check catches any shift that happened during threading.
- Set the walking foot on the shank with the lever folded up and back.
- Align the fork over the needle clamp screw.
- Tighten the shank screw hand-firm on screw-on mounts.
- Lower the presser foot lever and confirm the lever rests on top of the needle clamp.
- Turn the handwheel one full cycle and watch the lever rock.
Threading through the walking foot's own guide slots
A walking foot adds its own thread guides. Using them makes a real difference on thick or slippery work. After threading the machine normally, pass the thread down through the guide slot on the walking foot's arm before threading the needle. Thread the machine with the presser foot up, so the thread seats properly in the tension discs. Thread guides vary by foot: follow the threading diagram printed in the foot's instructions or packaging.
Why bother with an extra guide? The walking foot moves a lot relative to the needle bar. An unguided thread can flutter and catch on the foot's moving arm, causing skipped stitches or tension variation down a long quilt line. Routing through the slots holds the thread at a steadier angle to the eye.
A common starting point is 50 wt cotton for piecing and quilting; heavier weights for topstitching. Match your needle to the thread, not the other way round. a universal needle for medium cotton, and a heavier needle for denim, canvas or leather. Check your machine manual for needle and thread charts. Bring up the bobbin thread before your first stitch so the sandwich starts clean.
Test on a two-layer sandwich and confirm even feed
Before the real project, sew a test sandwich: two layers of medium-weight cotton, roughly 6 by 6 inches. Use a universal 80/12 needle and 50 wt thread. Sew a straight seam about 4 inches long at a moderate speed. Then look at two things: the top and bottom layers should end the seam the same length they started. No pleating on either side. The seam should sound even, without the clicking of a loose mount.
Now check the walking action itself. With the presser foot lever down and no thread in the needle, turn the handwheel slowly. You should feel both the bottom feed dogs and the foot's upper feed set grip and advance the fabric together. If the top set is dead still, the lever is not riding the needle clamp. Lift the foot, refold the lever, and remount it.
Keep the feed dogs up. The walking foot needs both the machine's lower feed dogs and its own upper feed dogs to grip and advance the fabric. Lowering the feed dogs turns off half the system. For free-motion quilting where you move the fabric by hand, swap to a darning foot instead.
On some Janome computerised models, presser foot pressure matters for walking-foot performance. If your test sandwich shows uneven feed or one layer puckering, confirm the detail for your model for a pressure adjustment dial or setting. Start at the default and raise the pressure slightly for thicker sandwiches.
Use a medium stitch length for straight-line quilting, then adjust on a scrap. Shorten the stitch length for curves. Lengthen it to show off the quilting stitches on a finished quilt top.
| Task | Walking foot | Regular foot |
|---|---|---|
| Quilting straight lines through layers | Yes | Layers shift |
| Matching plaids and stripes | Yes | Pattern drifts |
| Vinyl, oilcloth, faux leather | Yes | Top layer drags |
| Plain seams on stable cotton | Fine but slower | Yes |
| Free-motion quilting | No | Use a darning foot |
Still wondering?
Can I leave the walking foot on my Janome all the time?
You can, but it is bulkier and blocks your view of the seam line. It earns its place on quilt sandwich layers, matching plaids and stripes, laminated cotton, vinyl, oilcloth, faux leather and thick fleece. For plain cotton seams, garment construction on stable wovens, and most patchwork piecing, the regular foot is faster.
Why is my fabric still shifting even with the walking foot on?
The folding lever is probably not riding on top of the needle clamp. The upper feed dogs are not moving at all. Raise the foot, refold the lever, remount, and run the handwheel test. Check the shank screw is tight, since a wobbly mount cannot feed evenly.
Do I need a Janome-brand walking foot or will a generic one fit?
Any low-shank walking foot fits a low-shank Janome. High-shank machines need a foot labelled high-shank, so measure before you buy rather than assuming.
My walking foot clicks when it sews — is that normal?
A soft rhythmic sound is normal because the foot is mechanically driven. A sharp click or knock usually means the shank screw is loose or the foot is mounting over an ankle it was not designed for. Remount it directly on the shank and retighten.
Can I use a walking foot for zigzag or decorative stitches?
Most walking feet allow zigzag. Check the slot width in the instructions first. using wide or multi-directional stitches. Very wide decorative stitches can strike the foot.