Which hand embroidery stitches are easiest for beginners to learn first
The easiest hand embroidery stitches for beginners are the running stitch, backstitch, satin stitch, and French knot. These are simple to learn, practical for many designs, and let you practice control and neatness step-by-step.
On this page (7 sections)
Part of our guide on embroidery machine for beginners
Key figures
- Running stitch length
- 1/8 to 1/4 inch
- Needle type
- Embroidery needle, size 7-9
- Thread weight
- 50 wt embroidery floss
- Hoop size
- 6-8 inches common
- Practice time
- 10-15 minutes daily
The short version
- Start with running stitch and backstitch to build control and consistency.
- Satin stitch and French knot add texture and detail once basics are mastered.
- Practice stitch length and thread tension regularly to improve.
- Avoid pulling threads too tight to prevent puckering fabric.
- Use an embroidery hoop for even tension and easier stitching.
What basic stitches a beginner should start with
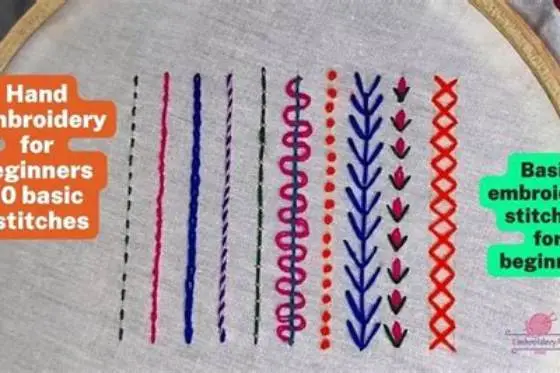
Begin with the running stitch and backstitch. These two form the foundation of many embroidery designs because they are straightforward and practical. The running stitch is the quickest and easiest, perfect for outlining and simple lines.
Next, add the satin stitch for filling shapes with smooth, dense thread coverage. It is slightly more challenging but rewarding as it creates a solid, shiny surface.
Finish the core set with the French knot, a tiny looped stitch that creates raised dots for texture and accents. It teaches thread control and precision.
The running stitch is your go-to for learning rhythm in embroidery. Its even spacing helps you develop control quickly. You can practice by stitching straight lines or simple shapes like squares and triangles. Try stitching lines 2 inches long with each stitch about 1/8 inch apart. This builds consistency. We go through how to use brother embroidery machine step by step elsewhere on the site.
Backstitch is slightly more advanced but vital for outlining and detail. It teaches overlapping stitches that strengthen a line. Practice by stitching letters or numbers to get used to reversing the needle’s direction. Aim for uniform stitch lengths of about 1/8 inch.
Satin stitch takes patience. It fills small shapes like leaves or petals with smooth coverage. Start with shapes about 1/2 inch wide. Keep stitches parallel and close to avoid gaps. This stitch improves your needle placement and thread tension skills.
- Running stitch– simple straight stitch, easy for outlines
- Backstitch– stronger line stitch, great for detail
- Satin stitch– fills shapes smoothly
- French knot– adds decorative dots
How to do each basic stitch step-by-step
The running stitch moves the needle in and out of fabric evenly. Start by pushing the needle up at point A, then down at point B about 1/8 inch (3 mm) away. Repeat, keeping stitch length consistent. If that sounds like your situation, read up on quilting guide for beginners next.
Backstitch creates a continuous line by stitching backward. Insert the needle back into the end of the previous stitch, then forward past it, overlapping stitches for strength.
Satin stitch fills a shape with close, parallel stitches. Bring the needle up at one edge of the shape, then down straight across to the opposite edge. Repeat side by side until filled.
French knot starts with the needle coming up through fabric. Wrap thread around the needle twice, then hold wraps taut and insert needle close to the entry point to secure the knot. Before you commit to anything, it is worth looking at machine embroidery for beginners.
- Running stitch: push needle up at A, down at B, repeat.
- Backstitch: push up ahead of last stitch, then down at stitch end.
- Satin stitch: stitch straight across shape, side by side filling.
- French knot: wrap thread twice, insert needle near entry, pull tight.
Tips for practicing and mastering these stitches
Use an embroidery hoop to tension your fabric evenly. This prevents puckering and keeps stitches neat.
Practice on a medium-weight cotton fabric to feel thread control better. Avoid slippery or very stretchy fabrics until confident.
Keep your thread length to about 18 inches (45 cm) to avoid tangling and frays. Shorter lengths give smoother stitches. Before you commit to anything, it is worth looking at machine embroidery for beginners.
Slow down your stitching initially. Concentrate on even stitch length and consistent spacing.
Regular practice sessions of 10 to 15 minutes improve muscle memory while keeping it enjoyable.
Track your progress by photographing your stitches regularly. Compare photos to spot improvements or recurring errors. This visual feedback helps refine technique faster than memory alone.
Try stitching simple patterns repeatedly to build muscle memory. Repetition of the same stitch in shapes like circles or lines makes your hand steadier and stitching more fluid. Set small goals like completing a row of 20 stitches with even spacing.
Use high-contrast thread colors on plain fabric for practice. It makes stitch placement and mistakes easier to see and correct. For example, use red thread on white fabric to highlight uneven stitches or tension issues.
- Use a 6-8 inch hoop for fabric tension.
- Choose medium cotton fabric for practice.
- Limit thread to 18 inches for smooth stitching.
- Focus on even stitch length and spacing.
- Practice daily for 10-15 minutes.
These simple, step-by-step embroidery stitches let beginners quickly create neat, beautiful hand embroidery with practical skills.
Common mistakes beginners make and how to avoid them
Pulling the thread too tight is a common error. It puckers the fabric and distorts your design. Keep a gentle tension, just enough to snug the stitch flat.
Skipping the embroidery hoop leads to uneven tension and sloppy stitches. Always hoop your fabric before stitching.
Using thread lengths longer than 18 inches causes tangling and fraying. Cut shorter lengths to keep thread manageable.
Ignoring stitch direction can result in messy, inconsistent lines. Follow the same direction and angle for each stitch in a row.
Not securing thread ends causes stitches to loosen over time. Tie knots or weave the thread ends under stitches.
- Avoid pulling thread too tight– causes puckering.
- Always use an embroidery hoop for even tension.
- Keep thread length under 18 inches to avoid tangles.
- Maintain consistent stitch direction for neatness.
- Secure thread ends to prevent loosening.
Which hand embroidery stitches are easiest for beginners to learn first
The four easiest hand embroidery stitches for absolute beginners are the running stitch, backstitch, satin stitch, and French knot. Each builds skills progressively from simple lines to texture.
The running stitch is the simplest, allowing you to focus on stitch length and thread tension. The backstitch adds strength and crisp detail.
Once confident, the satin stitch teaches filling shapes with smooth coverage, sharpening control and patience.
The French knot, though fiddly, offers a fun way to add dots and texture, improving your fine motor skills and thread handling.
| Stitch | Ease level | Primary use | Skill developed |
|---|---|---|---|
| Running stitch | Very easy | Outlines, simple lines | Even stitch length |
| Backstitch | Easy | Strong lines, detail | Precision and overlap |
| Satin stitch | Moderate | Shape filling | Thread control, patience |
| French knot | Moderate | Decorative dots | Thread tension, dexterity |
Still wondering?
How do I choose the right needle for hand embroidery?
Select an embroidery needle size 7 to 9. These needles have a sharp point and a long eye to accommodate embroidery floss, making it easier to pull thread through fabric without damage.
How long should my thread be when stitching?
Keep your thread length to about 18 inches (45 cm). Longer threads tend to tangle and fray, which makes stitching frustrating and uneven.
Can I embroider on any fabric?
Medium-weight cotton fabrics are best for beginners because they hold stitches well and are easy to work with. Avoid slippery or stretchy fabrics early on, as they can distort stitches.
How tight should I pull the thread when stitching?
Pull the thread gently to lay the stitch flat without puckering the fabric. Overly tight stitches cause the fabric to ripple and distort your design.
How often should I practice embroidery stitches?
Practicing 10 to 15 minutes daily builds muscle memory and improves stitch consistency without overwhelming you.