How to use a seam ripper properly without damaging fabric
Hold the seam ripper by its handle, positioning the rounded ball tip against the fabric. Slide the blade under a stitch and lift gently to cut the thread without pulling or damaging the fabric. Work carefully and steadily.
On this page (10 sections)
- The short version
- How to hold and position a seam ripper
- Using the rounded ball tip correctly
- Techniques to remove stitches safely
- When to switch methods and choose ripper size
- Tips to avoid fabric tears or holes
- What different seam ripper parts do
- Putting it all together
- Practical safety and troubleshooting
- Still wondering?
Part of our guide on tables fitting big quilts
Key figures
- Typical stitches cut at once
- small groups of stitches
- Seam ripper blade
- short, sharp blade suited to fabric weight
- Rounded ball tip
- designed to protect fabric from punctures
- Fabric damage risk
- increases if blade is forced
- Working speed
- slow and steady for control
The short version
- Use the rounded ball tip against the fabric to protect it from punctures.
- Cut small groups of stitches at a time and remove loose threads to prevent pulling.
- Apply gentle pressure with the blade and avoid forcing it through the fabric.
- Select a seam ripper size that suits your fabric’s weight and stitch type.
- Check the fabric regularly during removal to catch any damage early.
How to hold and position a seam ripper
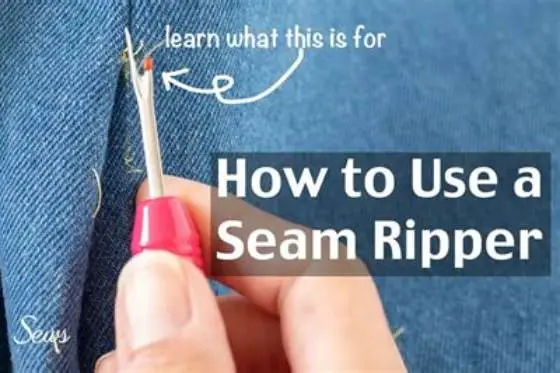
Hold the seam ripper firmly but relaxed between your thumb and forefinger. Position the rounded ball tip so it rests lightly against the fabric surface. This keeps the blade from piercing the material as you slide it under stitches.
Approach the seam from the underside when possible. This angle lets you see the stitches clearly and protects the fabric’s visible side. Hold the ripper like a pencil for precise control without gripping too tightly.
Keep your hand steady and adjust your grip as needed to maintain comfort and control. A secure yet gentle hold helps you work accurately, especially on delicate or densely stitched fabrics.
Using the rounded ball tip correctly
The rounded ball tip on the seam ripper’s forked blade protects your fabric as you slide the tool beneath stitches. It acts as a buffer preventing the sharp blade from piercing the material. The other half of this decision is prewashing fabric without fraying.
Press the ball tip gently against the fabric so it rests lightly while the blade slips under stitch threads. Too much pressure can cause holes, while too little makes it hard to catch the stitches.
Use the rounded ball tip to guide the seam ripper along the seam line. Its shape helps you sense the seam's position without needing to flip the fabric repeatedly.
Techniques to remove stitches safely
Slide the blade under a stitch with the rounded ball tip resting on the fabric. Lift the blade gently to cut the thread cleanly. Do not apply force or jerk the ripper, as this can damage fabric fibers.
Cut small groups of stitches at a time, then carefully remove loose threads using tweezers or fingers. This reduces stress on the fabric and prevents distortion or tearing.
For longer seams, cut stitches at intervals to loosen the seam, then gently separate the fabric layers. Use scissors to trim stray threads after most stitches are removed. Check your work frequently to avoid cutting fabric threads by mistake.
A second common method is sliding the forked blade under the seam and pushing it forward to cut stitches. This works well on some fabrics and seams but requires a steady hand to avoid fabric damage. Choose the method based on fabric type, stitch tightness, and your comfort.
- Keep the rounded ball tip against the fabric.
- Insert the blade carefully under stitch threads.
- Lift or push the blade gently to cut threads.
- Remove small groups of stitches and loose threads.
- Repeat until the entire seam is undone.
Learn step-by-step seam ripper techniques that safeguard your fabric from holes and tears, with expert tips on the rounded ball tip.
When to switch methods and choose ripper size
Use the rounded ball tip method for most fabrics, especially delicate or loosely woven ones. It provides protection and control when cutting stitches.
Switch to the slide-forward method when working on sturdier fabrics or tightly sewn seams. This method can be faster but risks fabric damage if not done carefully.
Select a fine, small seam ripper for lightweight fabrics like silk or chiffon. Larger, sturdier ripper blades work better for thick or heavy fabrics like denim or canvas.
Adjust your technique and tool based on fabric weave, weight, and stitch type. Testing on scrap material helps determine the best approach and ripper size for your project.
Tips to avoid fabric tears or holes
Avoid pulling the fabric while cutting stitches to prevent stretching or tearing. Cut in small sections and remove loose threads before continuing.
Inspect the fabric frequently for signs of stress, such as thinning or small holes. If you spot these, pause and adjust your technique or ripper choice.
Stretch wrinkles or folds gently to expose stitches clearly, but don’t pull hard. This helps prevent accidentally cutting fabric fibers hidden in folds.
Use a magnifying glass or bright light to see tiny stitches or sheer fabric better. Clear visibility lets you place the blade precisely and reduce slip risks.
Test the seam ripper on a scrap piece of the same fabric before starting. Make sure the blade cuts smoothly without snagging. Replace your ripper if the blade feels dull or pulls threads instead of cutting cleanly.
- Cut small groups of stitches.
- Keep the rounded ball tip against fabric.
- Avoid forcing or jerking the blade.
- Choose ripper size suited to fabric weight.
- Inspect fabric regularly for damage.
What different seam ripper parts do
A typical seam ripper has three main parts: the handle, the forked blade with a sharp latest, and a rounded ball tip on one prong.
The handle offers grip and control. The forked blade slips under stitches to cut threads cleanly. The sharp edge slices thread with little effort.
The rounded ball tip protects fabric by preventing the blade from puncturing it. It also helps guide the ripper along the seam. Some seam rippers have variations in blade length or shape for different fabric types or tasks.
Understanding each part and its role lets you use the tool properly and avoid fabric damage. Using a quality ripper with a well-shaped rounded tip makes seam removal easier and safer.
| Part | Function | Use tip |
|---|---|---|
| Handle | Provides grip and control | Hold firmly but relaxed |
| Forked blade | Fits under stitches to cut threads | Insert carefully beneath stitch threads |
| Rounded ball tip | Protects fabric from punctures | Keep against fabric surface while cutting |
Putting it all together
Start by selecting a seam ripper sized appropriately for your fabric weight and stitch type. Hold it firmly but relaxed, resting the rounded ball tip lightly against the fabric.
Slide the blade under small groups of stitches and lift or push gently to cut threads without forcing or jerking. Remove loose threads carefully before continuing. Adjust your method based on fabric and seam conditions.
Check the fabric often for signs of stress or damage. If you nick the fabric, pause and use a needle or fabric glue to repair small holes before proceeding.
Test your seam ripper’s sharpness on scrap fabric regularly. Replace it if the blade dulls to avoid pulling threads or causing damage.
After use, store your seam ripper with its cap on or in a safe place to protect the blade and prevent accidents. Keeping the tool sharp and clean extends its life and improves your sewing results.
Practical safety and troubleshooting
If you accidentally nick the fabric, stop and assess the damage. Minor holes can sometimes be repaired with fabric glue or by stitching over carefully.
Test blade sharpness by trying it on a scrap piece of fabric. If it pulls threads or struggles to cut, it’s time to replace or sharpen the ripper.
Always cap your seam ripper when not in use to protect the blade and avoid injury. Store it in a sewing kit or safe container out of reach of children.
Keep your workspace well-lit and free of distractions. A focused environment helps avoid slips and fabric damage.
If you find the ripper uncomfortable or ineffective, consider trying different sizes or brands to find one that suits your hand and fabric types better.
Still wondering?
Can I use a seam ripper on all fabric types?
Yes, but use a fine ripper with a small rounded ball tip for delicate fabrics like silk. Choose a sturdier ripper for heavy fabrics. Adjust your technique based on fabric and seam tightness.
How do I avoid holes after removing stitches?
Cut stitches gently in small groups with the rounded ball tip against the fabric. Stop if you see thinning or holes and change your method or ripper size.
What if the seam ripper blade is dull?
A dull blade makes cutting harder and risks fabric damage. Test sharpness on scrap fabric and replace the ripper if it pulls threads instead of cutting cleanly.
Is it better to remove stitches from the front or back of the fabric?
Removing stitches from the underside usually protects the fabric’s right side. It lets you see stitch loops clearly and reduces visible damage.
Can I reuse thread after removing it with a seam ripper?
Usually not. Cutting breaks thread fibers, making the thread weaker and prone to tangling or breaking if reused.