How to Thread a Sewing Machine Without the Tangles
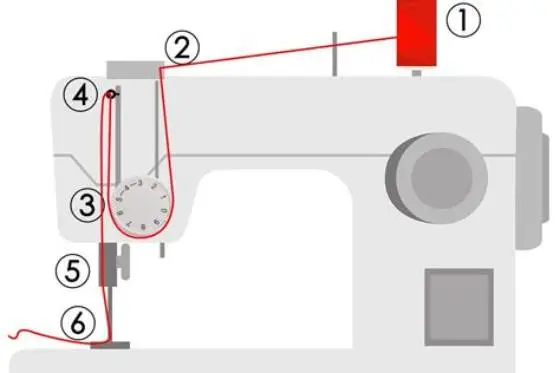
Here is how to thread a sewing machine: lift the presser foot and the needle to the top. Run the thread from the spool through the top guide, between the tension discs, up through the take-up lever, then through the needle eye from the front. Wind the bobbin and draw its thread up.
On this page (8 sections)
- The short version
- How to thread a sewing machine: the path in order
- Before you thread: needle, bobbin and spool
- Tension discs: why the presser foot stays up
- Take-up lever and needle eye: the two missed steps
- Drawing up the bobbin thread and testing the seam
- When threading goes wrong: five quick fixes
- Still wondering?
Part of our guide on sewing a clean french seam
Key figures
- Presser foot
- Up while threading
- Needle position
- At its highest point
- Needle size
- Universal 80/12
- Thread
- All-purpose 50 wt
- Tension dial
- Start at 4
- Thread tails
- 4 to 6 in (10 to 15 cm)
- Needle direction
- Front to back
The short version
- Raise the presser foot before you thread, or the thread never seats between the tension discs.
- The take-up lever must be at its highest point, and the thread must pass through its eye.
- On most home machines the needle threads from the front, then leave a 4 to 6 in (10 to 15 cm) tail.
- Turn the handwheel toward you once to draw the bobbin thread up before you sew.
- Sew a test seam on scrap first, and re-thread from the spool when stitches loop.
How to thread a sewing machine: the path in order
Learning how to thread a sewing machine looks fiddly the first time, and it feels worse when the machine jams halfway through a seam. The path itself is short. Thread leaves the spool, drops between the tension discs, rises through the take-up lever, then passes through the needle eye. Every home machine follows this order, from a basic Singer to a computerised Brother. Your manual shows the same path with numbered marks, so keep it open beside you.
Two moves in that list do most of the work. With the foot up, the tension discs open, so the thread slips between them. Raising the needle lifts the take-up lever to the top, where its eye is easy to reach. Skip either move and the thread sits outside the parts that control it. Stitches loop, the thread shreds, or nothing forms at all. Slow down for those two moves.
Thread choice matters here too. A 50 wt all-purpose polyester thread suits most woven cotton and blends, and it runs cleanly through a universal 80/12 needle. Match the thread to the fabric weight, and let the needle size move with it.
- Raise the presser foot with the lever at the back of the machine.
- Turn the handwheel toward you until the needle and the take-up lever reach their highest point.
- Set the spool on its pin and pull the thread through the top guide.
- Draw the thread down between the tension discs until you feel it seat.
- Bring the thread up and through the eye of the take-up lever, from right to left.
- Guide the thread down through the needle bar guide above the needle.
- Pass the thread through the needle eye.
- Draw a tail of 4 to 6 in (10 to 15 cm) through the eye and lay it behind the presser foot.

Gutermann Sew-All Thread 547yd
This is a 547-yard spool of 100% long-staple polyester all-purpose thread, exactly the 50 wt Sew-All you need for hand and machine sewing.
Before you thread: needle, bobbin and spool
Start with a fresh needle. Change the needle every 6 to 8 hours of sewing, or sooner if it skips, shreds thread, or pops. Fit a universal 80/12 for ordinary woven cotton. The flat side of the shank faces the back on most home machines. Push the needle up into the clamp as far as it will go. Tighten the screw firmly, then tug the needle to check it holds. For the detail, see our notes on how to thread a sewing machine.
A new needle is the cheapest fix in sewing. Keep a pack of universal 80/12 needles beside the machine, so a dull needle never stops a project. The size is printed on the pack as two numbers, 80/12. They are two names for one needle: 80 is the European size and 12 is the American one. Size 80/12 suits medium-weight woven fabric and pairs with all-purpose 50 wt thread.
Wind the bobbin before you thread the top, because a half-wound bobbin runs out mid-seam. Follow your manual for the bobbin winder, and wind the thread evenly until the bobbin looks full. Set the spool on its pin with the thread coming off the way your manual shows. A spool that spins freely feeds thread smoothly. One that catches on its pin jerks the thread and breaks it.
| Fabric | Needle | Thread |
|---|---|---|
| Light woven, lawn and voile | Universal 70/10 | Fine all-purpose 50 wt |
| Medium woven, quilting cotton | Universal 80/12 | All-purpose 50 wt |
| Heavy woven, denim and canvas | Jeans 90/14 | All-purpose 40 wt |

SCHMETZ Universal Sewing Machine Needles
These are genuine SCHMETZ Universal 80/12 needles for all home machines, exactly the fresh needle that stops shredded thread and skipped stitches.
Tension discs: why the presser foot stays up
The tension discs are two metal plates that press together and grip the thread as it feeds. They set how much drag the upper thread carries. That drag pulls the bobbin thread up into the fabric to form a stitch. When the presser foot is down, the discs press shut. When the foot is up, they open. Thread with the foot up and the thread slips between the discs, where it belongs. Thread with the foot down and the thread lies on top of the discs, with no grip on it at all.
This one move causes more threading trouble than any other. Beginners thread with the foot down, and the first seam comes out as a nest of loops underneath. The fix costs nothing: lift the foot and run the path again from the spool. Test the seat before you sew. With the foot up, pull the thread gently to the left and it should slide freely. Lower the foot and pull again: now you should feel steady resistance.
Your tension dial sets how hard the discs press together once the foot is down. Most dials run from 0 to 9. Most manuals suggest starting around the middle of the dial, often 4, for ordinary straight stitching on medium cotton. Your manual names the default for your model. Leave it at 4 while you learn. Loops underneath mean the top thread is too loose, so turn the dial up one step. Bobbin thread showing on top means the upper thread is too tight, so lower it one step.
Most threading trouble comes from two skipped steps, and both take seconds to fix.
Take-up lever and needle eye: the two missed steps
Look for the metal arm with an eye in it that rises and falls as you sew. It pulls each stitch loop tight, and it only works when the thread passes through its eye. Turn the handwheel toward you until the lever reaches its highest point. The eye is easy to miss when the lever sits low, and a thread that skips the lever never forms a proper stitch.
From the lever, guide the thread down through the needle bar guide, the small wire loop just above the needle clamp. This guide holds the thread steady before the eye, so the needle meets it straight. Then thread the needle itself from front to back, which is the direction on most home machines. Hold the thread 2 in (5 cm) from the end and guide it through with a steady hand.
Draw 4 to 6 in (10 to 15 cm) of thread through the eye and lay the tail behind the presser foot. A tail this long stays put when you start sewing, while a short tail pulls straight back through the eye. Keep the tail under the foot, pointing to the back. If the thread keeps slipping out, check the tail length first, then check the take-up lever.
Drawing up the bobbin thread and testing the seam
Every stitch needs the bobbin thread too, and it has to meet the top thread before you sew. Drop the wound bobbin into its case with the thread unwinding as your manual shows, then pull the tail through the tension slot. Hold the top thread tail and turn the handwheel toward you. One full turn carries the needle down and back up, and the bobbin thread comes up as a loop beside the needle.
Catch the loop with a pin or a seam ripper and pull it through, then lay both tails behind the foot. Never sew straight onto your project after threading. Fold a scrap of the same fabric double and sew a seam about 4 in (10 cm) long. Look at both sides: the stitches should lock in the middle of the layers, with no loops on either side. Even stitches on both sides mean the threading and tension are right.
On this site, the Sewing Machine Doctor helps when the test seam still looks wrong. Turn the machine in 3D, click where the trouble shows, and it gives the fix for that spot. Use it after a re-thread, not before, because most bad seams come from the path, not the machine. If the scrap sews cleanly, move on to your project with the same thread, needle and tension.
When threading goes wrong: five quick fixes
Most threading trouble has a short list of causes, and the fix is almost always a re-thread rather than a new setting. Work through the list in order, cheapest first, and test on scrap after each change. A fresh needle fixes shredded thread, skipped stitches and popping sounds in one move. Lint in the bobbin area jams the hook, so brush it out with the small brush that came with the machine.
When a fix works, you will know at once. The stitches lock in the middle of the fabric, both sides look even, and the machine sounds steady. Keep that test scrap as your proof, and change nothing else until the project is done. If the same problem returns after a full re-thread, a fresh needle and a clean bobbin area, the trouble sits deeper in the machine. Timing and motor trouble belong to a service shop.
With practice, threading gets faster, and most sewists thread without thinking about it after a few projects. The path stays the same on every home machine, so the habit transfers to a new one. Keep the manual in the drawer, keep fresh needles beside the machine, and re-thread from the spool whenever a seam looks wrong. That one habit fixes more sewing trouble than any setting on the machine.
- Thread nests under the fabric: re-thread the top with the presser foot up, then check the take-up lever.
- Thread shreds at the needle: fit a fresh 80/12 needle and check the thread passes through the eye.
- Stitches skip: fit a new needle, then re-thread and test on a scrap.
- Thread breaks again and again: brush lint from the bobbin area and check the spool spins freely.
- Loops underneath the fabric: turn the tension dial up one step and test again.
Still wondering?
Do I thread a sewing machine with the presser foot up or down?
Up, always. The foot up opens the tension discs so the thread seats between them. Thread with the foot down and the thread lies on top of the discs, which gives you loops underneath.
Which way does the thread go through the needle?
On most home machines, the thread goes through the eye from the front. Check your manual: a few older machines thread side to side.
Why does my thread keep coming out of the needle?
The tail is usually too short, or the take-up lever was missed. Leave a tail of 4 to 6 in (10 to 15 cm) through the eye and lay it behind the foot. If it still slips out, re-thread from the spool and check the lever.
What tension setting should I start with?
Leave the dial at 4, which most manuals suggest as a starting point for straight stitching on medium cotton. Change it one step at a time only when a test seam shows loops or puckering.
Do I need to wind the bobbin before I thread the machine?
Yes, wind it first. A half-wound bobbin runs out mid-seam. Wind the bobbin, drop it in, then thread the top.