Which quilting rulers fit your style and how to use and store them
For the best quilting rulers for beginners, pick a 6 x 24 inch non-slip rectangle such as the Creative Grids CGRT624 and a 12-1/2 inch square like the Olfa QR-12. Prices vary by retailer and model. Use a 1/4 inch thick ruler for free-motion quilting with a ruler foot to avoid needle strikes.
On this page (9 sections)
- Fit check
- The short version
- Beginners: best quilting rulers to learn accurate cutting
- Non-slip: best non-slip quilting rulers that stay put
- Squares: best square quilting rulers for true 90-degree blocks
- Free motion: best rulers for free motion quilting and foot clearance
- Technique: how to use quilting rulers correctly without slips
- Storage: how to store quilting rulers so they stay flat and safe
- Still wondering?
Part of our guide on choosing features for quilting at home
| Product | ruler thickness (mm) | Verdict | |
|---|---|---|---|
| Creative Grids Quilt Ruler 6-1/2in x 12-1/2in Rectangle Creative Grids | 0.5 inches = 12.7 mm thickness, above 6 mm threshold | Meets it | View on Amazon |
| Creative Grids Quilt Ruler 6-1/2in x 24-1/2in Rectangle Creative Grids | 0.1 inches = 2.54 mm thickness, below 6 mm threshold | Short by 58% | View on Amazon |
Key figures
- Beginner starter set
- 6x24 inch (Creative Grids CGRT624) + 12.5 inch square (Olfa QR-12)
- Free-motion thickness
- 1/4 inch (6 mm) acrylic minimum for ruler foot clearance
- Non-slip check
- full silicone dot backing, frosted coating, or grip strips
- Square ruler range
- 6.5 to 15.5 inches commonly used
- Storage rule
- store flat or hung vertically, no leaning
- Marking colour
- black with yellow accent lines for contrast
The short version
- Start with a 6 x 24 inch rectangle and a 12-1/2 inch square, both with reliable non-slip backing
- Grip is more important than brand; clear markings in 1/8 inch increments are best
- Use a 1/4 inch thick ruler for free-motion quilting with a ruler foot
- Store rulers flat or hung vertically to prevent warping
Beginners: best quilting rulers to learn accurate cutting
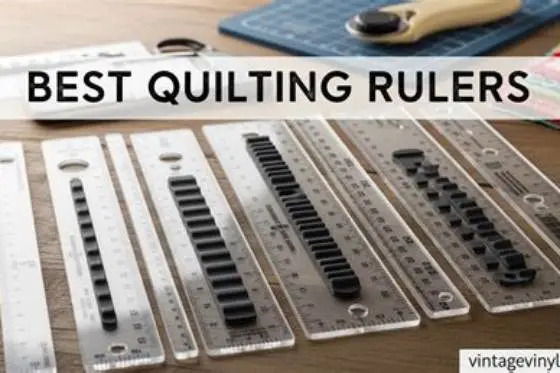
A 6 x 24 inch (15 x 61 cm) non-slip rectangle covers most beginner cuts, such as squaring yardage and cutting 2-1/2 inch (6.35 cm) strips. It fits well on an 18 x 24 inch cutting mat without overhang. Pair it with a 12-1/2 inch (31.75 cm) square to trim blocks up to 12 inches finished. These two sizes suit most beginner projects without buying a full set.
Look for rulers with simple, high-contrast markings in 1/8 inch increments and a clear 45-degree angle line. Markings should be visible from any side without turning the fabric. Matte, non-glare acrylic with black numbers and thin yellow accent lines works well.
Check the ruler’s edge by holding it up to the light to ensure the edge is flat and not chipped or beveled. A flat edge keeps the rotary cutter blade from riding up, which protects your fabric and blade. This check prevents costly mistakes.
If buying only one ruler, choose the long rectangle first. You can square fabric by turning the block, though it takes more time. Add the square ruler when trimming pieced blocks. Use quilting calculators to estimate how many strips and squares your projects need before cutting. It helps to understand best iron for quilting before going further.

Creative Grids Quilt Ruler 6-1/2in x 12-1/2in Rectangle
Meets it
- Height 0.5 Inches
- Width 7.5 Inches
- Length 13.0 Inches
Non-slip: best non-slip quilting rulers that stay put
A ruler that moves 1/16 inch (1.5 mm) during a cut causes errors that add up to 1/2 inch after several strips, leading to mismatched seams. Grip matters more than length for accuracy. The best non-slip rulers have full backs covered with tiny silicone dots, frosted coatings, or grip strips that make contact across the surface.
You should feel resistance when pressing the ruler lightly. The best non-slip rulers hold with light pressure and don’t require heavy leaning. Suction-style handles help on large rulers but don’t replace full-surface grip. Test by pushing gently sideways on cotton fabric laid on your mat; the ruler should resist sliding without scratching.
Plain acrylic rulers without grips slide easily on smooth cotton, especially on new mats. Some sewists add stick-on grip dots, which work but may peel and obscure markings. Factory-applied non-slip backing stays clearer and lasts longer under rotary cutter pressure. Choose factory non-slip if available. The other half of this decision is understanding batting for sewing.
- Grip dots: tiny clear bumps across the back, easy to see through
- Frosted coating: full-surface etch with strong grip, slightly less transparent
- Grip strips: two or three long strips, offer good hold but can hide markings
- Add-on dots: cheap fix for plain rulers, need replacement if peeling
- holds with light pressure, reduces wrist strain
- helps maintain accurate 1/4 inch seam allowances
- slightly less clear than plain acrylic
- coating can wear if scrubbed with solvents
Squares: best square quilting rulers for true 90-degree blocks
A 12-1/2 inch (31.75 cm) square trims a 12 inch finished block to 12-1/2 inches unfinished, including seam allowances. This size works for most quilt blocks, half-square triangles, flying geese, and 6 inch blocks without repositioning. Smaller squares like 6-1/2 inch (16.5 cm) suit small units but require extra moves on larger blocks.
Square rulers must be truly square. Check corners by placing the ruler against a sheet of printer paper, which is reliably square, or compare with another square ruler. Gaps at the corner cause skewed blocks. Look for etched lines running edge to edge to align seams under the ruler visibly.
Thickness matters less for piecing than for free-motion quilting. A 1/8 inch (3 mm) acrylic ruler resists flex when pressing near the edge. Thinner rulers tend to bow under hand pressure, causing curved cuts. Avoid glass rulers as they are heavy and fragile.
| Size (inches) | Best for | Limitation |
|---|---|---|
| 6-1/2 (16.5 cm) | small units, fussy cutting | too small for 12 inch blocks |
| 10-1/2 (26.7 cm) | 10 inch finished blocks | awkward for 12 inch blocks |
| 12-1/2 (31.75 cm) | most quilt blocks, versatile | larger size requires more storage space |
| 15-1/2 (39.4 cm) | large blocks, whole-cloth trimming | heavy and needs a large cutting mat |
A ruler that slips 1/16 inch on each cut can shrink a 12-inch block by half an inch.
Free motion: best rulers for free motion quilting and foot clearance
Free-motion quilting with a ruler foot requires a thicker acrylic ruler, typically 1/4 inch (6 mm) thick. Domestic and longarm ruler feet have a small lip that rides against the ruler edge. A standard 1/8 inch (3 mm) piecing ruler can slip under the lip and cause the needle to break or damage the ruler.
The best free-motion rulers are smaller and have curved edges. Shapes like straight edges, gentle arcs, and circles help guide the quilt sandwich smoothly. You move the fabric, not the ruler, so compact shapes reduce drag. Look for etched lines on both sides and a non-slip back that holds yet slides when you want.
Not every quilter needs these rulers. If you use a walking foot, stitch-in-the-ditch foot, or send quilts out for longarming, you do not need a thick ruler. They are heavier, cost more per size, and are less efficient for rotary cutting. Buy these only if you have a ruler foot and plan to quilt free-motion on your machine.
- safe clearance for ruler foot, prevents needle strikes
- stable edge for smooth curves
- too thick for rotary cutting
- smaller shapes not suited for strip cutting
Technique: how to use quilting rulers correctly without slips
Straight cuts happen when the ruler, fabric, and mat stay still together. Most wavy cuts come from lifting pressure mid-cut or reaching too far. Position your shoulder over the ruler and spread your non-cutting hand wide, with fingertips well inside the ruler edge. This hand pressure keeps the ruler steady.
Use a sharp 45mm rotary blade and a flat cutting mat on a stable table. A dull blade forces you to press hard, causing the ruler to slip. Change the blade when it skips threads or requires multiple passes. Keep the blade against the ruler edge, not angled away, and keep ruler markings visible while cutting.
Measure twice from the same reference edge. Do not flip the ruler end for end between cuts because slight printing differences add errors. After each cut, measure the strip width in two places with the ruler. If widths vary, you moved the ruler. Stop and re-square the fabric edge before the next cut.
- Square the fabric edge: align a horizontal line on the ruler with the fabric fold and trim a clean straight edge.
- Place the ruler for cutting: line up the desired width marking with the trimmed edge, keep the ruler flat.
- Anchor with your hand: spread fingers, press down, add a second hand near the far end for long cuts.
- Cut in one smooth motion: stand so you can reach the full length, roll the cutter away from you with even pressure.
- Check the piece: measure the strip or block in two places; re-trim if off by more than 1/16 inch.
Storage: how to store quilting rulers so they stay flat and safe
Acrylic rulers can warp with heat and prolonged leaning. Store them flat or hung vertically by a hole or hook. Do not lean rulers at an angle against a wall where gravity causes them to bow. Warped rulers cause inaccurate cuts that transfer to every block.
A wall-mounted rack, pegboard with hooks, or door-mounted holder keeps rulers visible and separate. Stacking rulers causes scratches and chips. If storing flat in a drawer, place paper between rulers and do not stack heavy tools on top.
Organize rulers by frequency of use, not size alone. Keep your 6 x 24 inch rectangle and 12-1/2 inch square at the front or top. Specialty shapes and thick free-motion rulers go behind. Label your rack if rulers look similar. This helps you grab the right one quickly and notice any missing.
Dust and sunlight fade markings over time. Wipe rulers with a soft dry cloth, not solvents, and keep them out of direct sun. If a ruler has deep scratches on important lines, retire it from cutting and use it for marking only. Proper storage keeps rulers accurate and saves fabric.
Still wondering?
What size quilting ruler should I buy first?
Start with a 6 x 24 inch non-slip rectangle, such as the Creative Grids CGRT624. Add a 12-1/2 inch square like the Olfa QR-12. This pair covers strip cutting, squaring fabric, and trimming most blocks. Other sizes can come later.
Are non-slip rulers worth it if I add grip dots myself?
Factory-applied non-slip backing stays clearer and grips fabric evenly. Stick-on dots help and are cheap, but they can peel and hide markings. For frequent cutting, invest in factory non-slip rulers.
Can I use my piecing ruler for free-motion quilting with a ruler foot?
No. Use a 1/4 inch thick ruler designed for ruler foot quilting. Thinner rulers can slip under the foot lip and cause needle breaks or damage.
How do I keep rulers from warping in a small sewing space?
Hang rulers vertically on hooks or racks, or lay them flat in drawers with no weight on top. Never lean them against walls. Keep rulers away from heat and sunlight.
How often should I replace a quilting ruler?
Replace rulers when edges are chipped, corners are no longer square, or if they rock on your mat due to warping. With gentle cleaning and proper storage, rulers can last many years.