Zigzag settings for raw edge applique: widths and lengths that hold
For a zigzag stitch setting for raw edge applique, start from the ranges in the table for your fabric weight. Match the needle to the thread, back the work with stabilizer, and try it on spare fabric first.
On this page (8 sections)
- The short version
- Zigzag stitch setting for raw edge applique: the starting numbers
- Needle, thread and stabilizer: the trio that stops puckering
- Satin stitch vs open zigzag: which edge finish to choose
- Step by step: stitch a raw edge applique that holds
- Fusible web: stitch before or after fusing
- Troubleshooting: tunnelling, fraying and skipped stitches
- Still wondering?
Part of our guide on upholstery sewing machine
Key figures
- Satin start
- Width 3.0-4.0 mm, length 0.3-0.5 mm
- Open zigzag start
- Width 2.5-3.0 mm, length 2.0 mm
- Needle, cotton
- Universal 80/12
- Thread, standard
- 50 wt all-purpose
- Tension start
- 4, lower slightly if tunnelling
- Test first
- Scrap sandwich, same layers
The short version
- Start from the table's ranges for your fabric weight, not one fixed pair.
- Match the needle to the thread: heavier thread wants a bigger needle.
- Back the work with tear-away stabilizer before you blame the tension.
- Fuse first, stitch second, and pivot with the needle down at corners.
- Test every setting on a scrap sandwich of the same layers.
Zigzag stitch setting for raw edge applique: the starting numbers
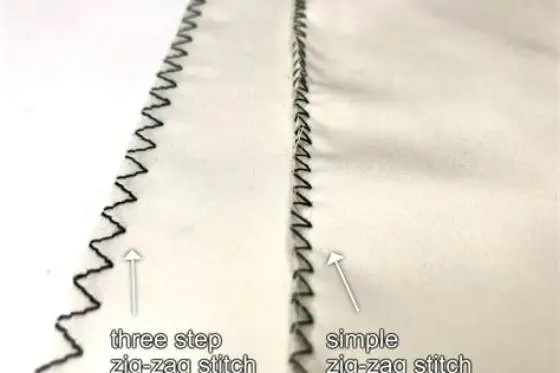
A zigzag stitch setting for raw edge applique has no single right pair. The table below gives a workable range for each fabric weight. For quilting cotton, the table gives width 3.0-4.0 mm and length 0.3-0.5 mm for a dense satin edge. An open zigzag runs width 2.5-3.0 mm and length 2.0 mm. Both numbers change with fabric weight, so treat them as starting points and try each one on spare layers first.
Width sets how far the needle swings from side to side. Length sets how far the fabric moves between swings. Short lengths pack the stitches close together until they form a solid band of thread. Long lengths leave gaps that show the fabric between stitches. Let the needle swing just past the raw edge, so the thread wraps the fibres and holds them down.
Your machine has two dials for this stitch, and each one fixes a different problem. Width decides whether the raw edge stays covered. Length decides whether the edge looks solid or open. Change one dial at a time on your test scrap, and write the winning pair on the pattern envelope. Use the table below for starting numbers on the four fabric weights home sewists meet most.
| Fabric weight | Open zigzag (W x L) | Satin edge (W x L) | Needle to start with |
|---|---|---|---|
| Light cotton, lawn | 2.0-2.5 mm x 1.5-2.0 mm | 2.0-3.0 mm x 0.3-0.5 mm | Microtex 70/10-80/12 |
| Medium quilting cotton | 2.5-3.0 mm x 2.0 mm | 3.0-4.0 mm x 0.3-0.5 mm | Universal 80/12 |
| Heavy denim, canvas | 3.0-4.0 mm x 2.0-2.5 mm | 4.0-5.0 mm x 0.5 mm | Jeans 90/14 |
| Knit, stretch | 1.0-1.5 mm x 1.5-2.0 mm | Use a narrow zigzag | Jersey 75/11-80/12 |
Needle, thread and stabilizer: the trio that stops puckering
Swap in a fresh needle before you test a single stitch. A blunt needle causes more applique trouble than any dial setting, and it costs nothing to rule out. A 40 wt thread usually wants an 80/12 needle; go up a size for heavier thread. On quilting cotton with ordinary 50 wt thread, a Universal 80/12 is the right start. Microtex 70/10 or 80/12 suits lawn and other light wovens. Its sharp point slips between fine fibres instead of pushing them aside. We go through handling tight curves on cotton step by step elsewhere on the site.
Thread weight changes the look of the edge as much as the stitch settings do. Use 40 wt thread for a bold, raised satin edge that covers fraying fibres fast. For small shapes and tight curves, a 60 wt thread makes a finer line that a heavy thread would swamp. A 50 wt all-purpose thread sits between the two and suits most applique on quilting cotton. Wind the bobbin with the same 50 wt thread so the underside stays smooth.
Stabilizer keeps the background fabric flat while a dense stitch pulls at it. Slip tear-away stabilizer under the background fabric before you stitch, and the zigzag has something firm to grip. Iron-on tear-away holds the layers still without pins, which matters on small shapes that shift under the foot. Cut-away stabilizer stays in the work, so save it for pieces that will be washed often. A spare sandwich of the same layers shows in one minute whether your backing is heavy enough.
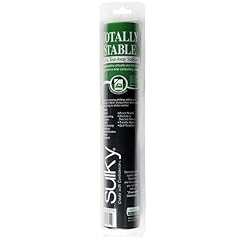
Totally Stable 12" x 12yd Roll
Irons onto the back of your applique and holds the background flat while the dense zigzag edge is stitched, then tears away cleanly without sticky residue — 12 inches wide by 12 yards.
Satin stitch vs open zigzag: which edge finish to choose
Turn the length down to 0.2-0.5 mm and a zigzag becomes a satin stitch. Stitches land so close together that no background fabric shows between them. That leaves a solid band of thread. Length 1.5-2.5 mm gives an open zigzag, with the stitches standing apart and the fabric showing through. Both are the same stitch on the machine. Only the length dial tells them apart.
Choose the satin edge when the piece will be washed often, or for a bold outline that frames the shape. It covers fraying fibres completely and survives the laundry better than any open stitch. Choose the open zigzag when you want a soft, folk look, or when the shape has tight curves and sharp points. Open zigzag pivots more easily, and it sews faster because fewer stitches land per inch (2.5 cm).
Not every edge wants a zigzag. Blanket stitch gives a hand-sewn look, with a straight stitch along the edge and a bite into the shape. It suits wool and felt well. Straight stitch close to the edge gives the deliberate frayed look of raw edge applique, but the edge will keep fraying in the wash. Pick the stitch that matches how the piece will be used, not the one that looks fastest.
- covers the raw edge fully
- survives frequent washing
- bold outline frames the shape
- slow on large shapes
- hard to pivot on tight curves
- uses more thread per inch
Most applique guides give you one setting. This one gives you the starting numbers for your fabric, then the dial to turn when it goes wrong.
Step by step: stitch a raw edge applique that holds
Sew a trial piece first, and sew it exactly as you will sew the real piece. Cut scraps of background fabric, applique fabric and stabilizer. Fuse them the same way, then stitch a curve and a corner. If the test puckers or tunnels, fix the setting there. Five minutes of testing saves an evening of unpicking.
Corners and curves need the needle down and the foot up. Stop with the needle in the fabric at the outside of the curve. Lift the presser foot, turn the work a fraction, lower the foot and sew on. After each turn, check the needle still catches the edge on the right swing. Short stitches forgive a clumsy pivot, so shorten the length a touch on tight curves.
Keep the applique shape flat under the foot and let the feed dogs do the moving. Pulling the fabric from behind the foot stretches the stitch and narrows the edge it covers. When the shape starts to creep, stop, lift the foot, smooth it flat and carry on. Slow, even feeding beats fast sewing on every applique shape, and the edge shows it.
- Iron the applique shape onto the background fabric and let it cool.
- Slip tear-away stabilizer under the background fabric.
- Set the width and length from the table row for your fabric.
- Position the work so the needle swings past the raw edge on the right.
- Sew slowly, pivoting needle-down at corners and curves.
- Lock the ends with two tiny straight stitches, then trim the stabilizer away.
Fusible web: stitch before or after fusing
Fuse first, then stitch. Web glues the shape to the background so it cannot shift under the foot. Stitching then seals the raw edge for good. Stitching first and fusing after sounds quicker, but the shape moves while you sew and the stitch lands off the edge. Even a shift of 1/8 in (0.3 cm) leaves bare fibres showing past the thread.
Pick a web made for sewing through. HeatnBond Lite is a common sewable choice; it stays flexible enough to stitch through, which suits quilts and garments. Press it to the back of the applique fabric, let it cool, peel the paper, then press the shape to the background. No-sew web such as HeatnBond UltraHold is made for bonds that are never stitched. Keep it for no-sew projects, because it can gum up a needle.
Skip the web when the shape may need to move. Pins or a light basting stitch hold a piece you are still placing, and they leave no stiffness behind. Web also adds slight firmness, which suits a quilt block but can feel wrong on a soft garment. When the piece is large or the fabric is loosely woven, fuse it: a shifting shape is the fastest way to a crooked edge.

HeatnBond Lite Iron-On Adhesive
Holds the applique shape still while you zigzag the edge so it cannot shift or lift, is a paper-backed double-sided adhesive you sew straight through, and bonds without adding stiffness — 17 inches by 75 yards.
Troubleshooting: tunnelling, fraying and skipped stitches
Work cheapest first when a stitch goes wrong. Fit a new needle, re-thread with the foot up, wind a fresh bobbin and clean lint from the hook area. Most skipped stitches and shredded thread clear up at this step, and it costs nothing. If the fault stays, change one dial at a time and try again on spare fabric.
Each fault points at one dial. Tunnelling means the tension is too tight, the width is too wide, or the backing is too light. Fraying after washing means the stitch did not cover the edge, so widen it or shorten the length. Skipped stitches on fused layers mean a gummed or blunt needle, or a needle too fine for the thread. Read the fault, change the one thing it points at, and test again.
Write down the setting that worked. Note the fabric, the width, the length, the needle and the thread on the pattern envelope or in a notebook. Next time the same fabric comes up, the numbers are waiting instead of guessed. A fault that repeats on one fabric only points at the fabric rather than the machine.
- Tunnelling: lower the top tension slightly (one number below your normal setting), narrow the width by 0.5 mm, and add tear-away stabilizer.
- Fraying after washing: widen the stitch so the right swing lands past the edge, and shorten the length to 0.5 mm.
- Skipped stitches: fit a new 90/14 needle, re-thread with the foot up, and clean lint from the hook area.
- Shredded thread: fit a larger needle eye for the thread weight, and slow the machine down.
Open zigzag for speed and a soft look; satin stitch for edges that must survive the wash.
Still wondering?
What width and length should I use for raw edge applique on quilting cotton?
On quilting cotton, a dense satin edge runs width 3.0-4.0 mm and length 0.3-0.5 mm. An open zigzag at width 2.5-3.0 mm and length 2.0 mm holds the piece with a softer look. Try both pairs on spare fabric before you stitch the real piece.
Can I use a straight stitch for raw edge applique?
Yes, and it gives the deliberate frayed look that raw edge applique is known for. Stitch about 1/8 in (0.3 cm) inside the edge so the fibres can lift a little without the piece coming loose. Skip it for anything washed often, because the edge keeps fraying with every wash.
Why does my zigzag tunnel the fabric?
Tunnelling means the stitch is pulling the fabric in from both sides. Lower the top tension slightly, one number below your normal setting. Narrow the width by 0.5 mm, and slip tear-away stabilizer under the background fabric. Test the setting again on a scrap before you go back to the real piece.
Do I stitch before or after ironing on fusible web?
Stitch after the web is fused, not before. The web holds the shape still so it cannot shift under the foot. Stitching then locks the raw edge down for good. Sew first and the shape can move under the foot, so the stitch lands off the edge.
What thread weight is best for applique?
Most applique on quilting cotton suits a 50 wt all-purpose thread. A bolder satin edge takes 40 wt thread, and small shapes take 60 wt thread for a finer line. Use an 80/12 needle for 40 wt thread, and go up a size for heavier thread.