How to measure and trim a quilt block or top square before quilting
Square a quilt block or top by measuring its sides and diagonals with a ruler, then trimming edges to match the desired square size. Use a rotary cutter and a quilting ruler to cut straight lines ensuring all corners are 90° before quilting or adding borders.
On this page (8 sections)
Part of our guide on sewing machine with quilting features
Key figures
- Standard block size
- 6-12 inches
- Squaring tool
- Quilting ruler
- Angle to check
- 90° corners
- Common cut tool
- Rotary cutter
- Measure units
- Inches (cm)
The short version
- Always measure sides and diagonals to confirm squareness before trimming.
- Use a clear quilting ruler and rotary cutter for precise cuts.
- Trim blocks before sewing them into the quilt top for accurate assembly.
- Square the quilt top before adding borders or binding to avoid distortion.
- Different methods apply to blocks, panels, and backing due to size and flexibility.
How to square up a quilt block
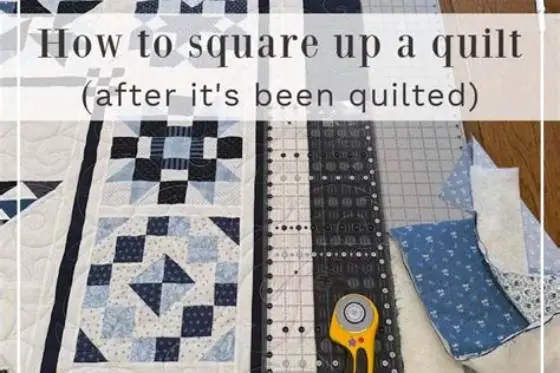
Begin by measuring the quilt block’s edges with a quilting ruler to check if all sides equal the block’s intended size. Usually, blocks range from 6 to 12 inches square, depending on the pattern.
Next, measure the diagonals from corner to corner. For a true square, both diagonal measurements must match within 1/8 inch (3 mm). If they differ, the block is skewed and needs trimming.
To trim, lay the block on a cutting mat and place the quilting ruler aligned with the longest diagonal. Cut along the ruler edge with a rotary cutter to square the block. Repeat on the opposite corner if needed.
Skewed blocks often show one diagonal longer by more than 1/8 inch (3 mm). Check this before trimming. For example, if one diagonal measures 8 1/4 inches and the other 8 inches, trim along the longer diagonal to match 8 inches. If that sounds like your situation, read up on quilting ruler sets next.
After trimming, press the block flat with a hot iron to set the shape. Wrinkles or puckers can distort measurements, so pressing helps keep the block true. Double-check diagonals after pressing to confirm the block stayed square.
- Measure all four sides of the block for length.
- Measure both diagonals corner-to-corner.
- Identify which diagonal is longer if they differ.
- Align ruler with the longer diagonal and trim excess.
- Recheck measurements to confirm the block is square.
How to square up a quilt top before quilting
Lay the quilt top flat on a large surface, smoothing out wrinkles but not stretching the fabric. Measure all four edges with a long quilting ruler or measuring tape to check for evenness.
Measure the diagonals of the quilt top; they should be equal within about 1/4 inch (6 mm) for large sizes. Unequal diagonals indicate the top is out of square and needs trimming.
Trim the edges carefully using a rotary cutter and quilting ruler. Trim long edges first, then the short edges, checking diagonals again after trimming to confirm squareness before quilting.
Large quilt tops sometimes stretch unevenly during piecing or handling. Measure diagonals again after any stretching occurs. A 60-inch square top might have diagonals differing by up to 1/2 inch if untrimmed, causing skewed borders.
Trim edges using a rotary cutter with a fresh blade to avoid tearing. Work on a flat surface with ample lighting to see ruler lines clearly. Lay the ruler straight along the edge, then cut in one steady motion to get an even line.
- Spread quilt top flat and smooth wrinkles.
- Measure all four edges for length; note differences.
- Measure diagonals corner to corner.
- Trim the longest edges first using a ruler and rotary cutter.
- Re-measure diagonals and edges, trim short edges as needed.
- Repeat measurements until all sides and diagonals align.

OLFA 45mm Quick-Change Rotary Cutter (RTY-2/C)
Squares up your quilt with clean accurate trims using its sharp 45mm tungsten blade.
Tools needed to square a quilt accurately
Use a clear quilting ruler with marked gridlines in inches and degrees; 24-inch (60 cm) length suits large projects. The ruler must have a non-slip backing for stability during cutting.
A rotary cutter with a sharp 45 mm blade provides clean, straight cuts. Change blades frequently to avoid jagged edges that affect squareness.
A cutting mat with gridlines matching your ruler helps align edges and protects your work surface. Self-healing mats last longer and maintain a flat surface for accurate cuts.
| Tool | Specification | Purpose |
|---|---|---|
| Quilting ruler | Clear, non-slip, at least 24 inches | Measure and guide cuts accurately |
| Rotary cutter | Sharp 45 mm blade | Trim fabric edges cleanly |
| Cutting mat | Self-healing, grid marked | Protect surface and align cuts |
Master precise measuring and trimming to get perfectly square quilt blocks and tops before quilting or binding.
How to square up before adding borders
Square the quilt top first by measuring edges and diagonals so borders attach evenly. Borders added to a non-square top will make the quilt lopsided.
Trim the quilt top to exact desired size using a quilting ruler and rotary cutter. Verify diagonals equal to within 1/4 inch (6 mm) before adding borders.
Cut border strips precisely to the squared quilt top edges. Adding borders to an uneven top means trimming again later or an uneven finish.
Borders alter the quilt’s final size, so squaring before attaching is crucial. If the quilt top is 48 by 60 inches, and borders add 4 inches on each side, the finished top should be 56 by 68 inches. Verify this by measuring after trimming the top but before cutting borders.
If the quilt top is not square, borders will accentuate its irregularities. For instance, a 1/2 inch difference on one side becomes more visible after adding borders, making the quilt look crooked. That forces additional trimming or re-sewing of borders, wasting time.
- Square the quilt top completely as explained earlier.
- Measure and trim top edges to desired size.
- Cut border strips to match the trimmed sides precisely.
- Sew borders carefully, checking alignment after each side added.
How to square a quilt before binding
Before applying binding, check the quilt’s edges for straightness and square corners since binding highlights any irregularities.
Measure the quilt’s width and length; they should match the pattern size within 1/4 inch (6 mm). Examine corners with a square ruler for true 90° angles.
Trim edges if needed with a rotary cutter and ruler. Square edges help the binding attach smoothly and prevent puckering.
If the quilt is very large, check the backing fabric is also square to avoid pulling during binding.
- Measure quilt width and length.
- Check corners with a 90° square tool.
- Trim uneven edges with a rotary cutter.
- Confirm backing matches the quilt top size.
Differences in squaring blocks, panels, and backing
Blocks are usually small and stiff enough to trim precisely with a quilting ruler and rotary cutter. They require careful squaring before piecing to ensure the quilt top assembles correctly.
Panels can be large printed or pieced units that are more flexible and might stretch. You often need to pin or weight them flat before measuring and trimming carefully to avoid distortion.
Backing fabric is typically larger and looser. It’s best to measure and trim it after piecing to match the quilt top size exactly. Use a long quilting ruler and rotary cutter to square the backing edges.
Each type requires gentle handling and precise measurement but differs in flexibility and size, affecting how you square them.
| Item | Size | Flexibility | Squaring method |
|---|---|---|---|
| Block | 6-12 inches | Rigid | Trim edges with ruler and rotary cutter |
| Panel | Large, variable | Flexible | Pin flat before measuring and trimming |
| Backing | Larger than top | Very flexible | Measure after piecing, trim to top size |
Still wondering?
Why is it important to measure the diagonals when squaring a quilt?
Measuring diagonals checks if the piece forms a true square with 90° corners. Unequal diagonals mean the block or top is skewed, so trimming must focus on compensating this to ensure all corners are right angles.
Can I square a quilt without a rotary cutter?
While scissors can be used, a rotary cutter and quilting ruler provide cleaner, straighter cuts, crucial for accurate squaring. Using scissors increases the risk of jagged edges and uneven lines.
How often should I square blocks during piecing?
Square blocks before assembly and after piecing rows if needed. This prevents errors from accumulating and keeps the quilt top aligned.
What size quilting ruler is best for squaring a quilt top?
A clear quilting ruler at least 24 inches (60 cm) long helps measure large edges and diagonals. Smaller rulers work for blocks but limit measuring full quilt tops accurately.
Should I square the backing fabric before or after quilting?
Square the backing after piecing and before quilting, trimming it to match the quilt's finished size. This prevents puckering and stretching during quilting.